Customer Portal Setup
Last Modified on 06/24/2026 2:17 pm PDT
This article is about the key setup areas that influence the performance and usability of the Customer Portal.
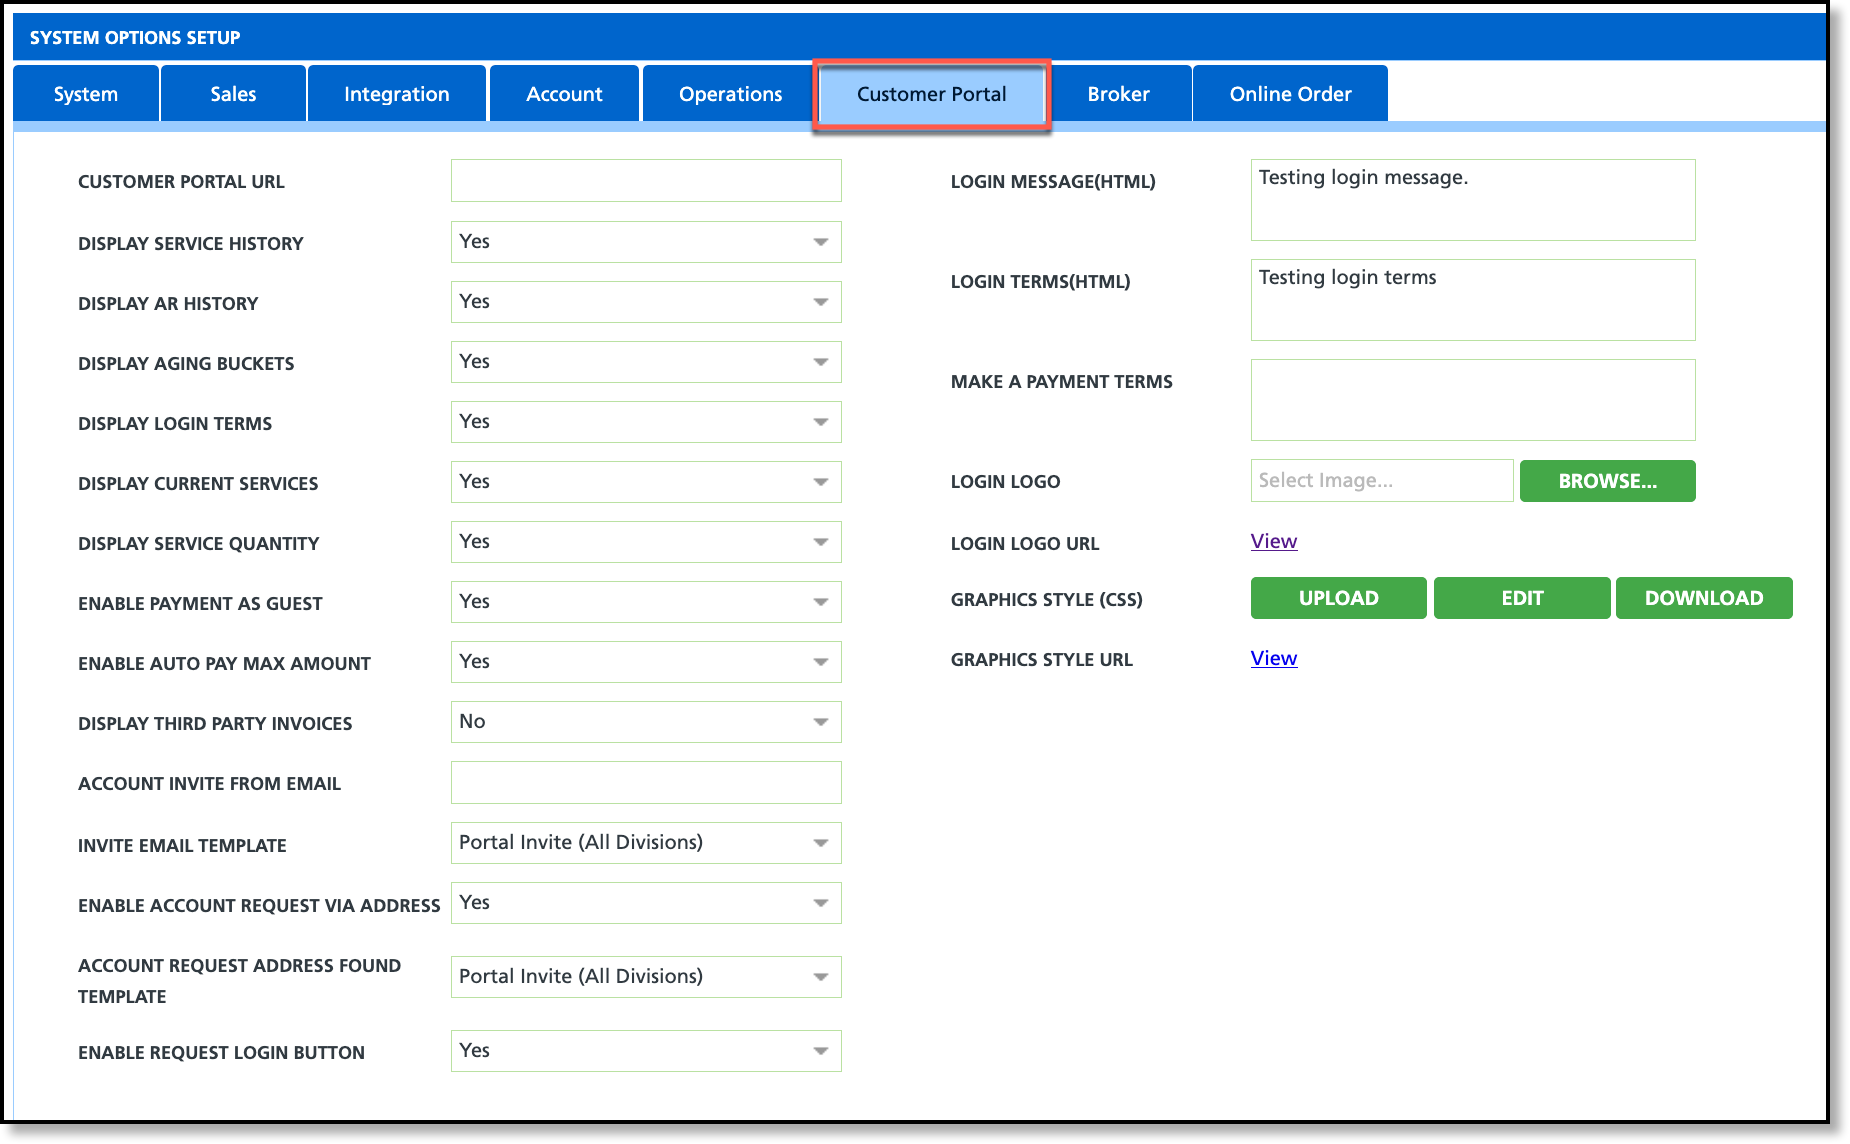
System Options Setup
Pathway: Setup > System > System Options > Customer Portal (tab)
Configurations made in System Options are universal to all divisions and account classes for the Customer Portal.
| Field |
Description and Use |
Customer Portal URL
|
Enter the portal URL that can be provided to customers here.
|
Display Service History
|
Displays a 'Recent Services' section on the portal. This setting is also controlled by the Customer Portal Homepage setting that is established in Account Class.
|
Display AR History
|
When enabled, the 'Past Due' and 'Total Due' amounts are displayed. If disabled, these fields will be hidden.
|
Display Aging Buckets
|
When enabled, the aging buckets with amounts are displayed. If disabled, these fields will be hidden.
|
Display Login Terms
|
When enabled, the login terms entered on this tab will be displayed to the customer when logging into the portal.
|
Display Current Services
|
Displays a 'Current Services' section on the Customer Portal that includes the display of the frequency for the service and the next scheduled servicing date.
NOTE: If this setting is disabled (No), but the account class has 'Enable On Call Orders' set to 'Yes,' the Current Services section will still be displayed, as 'Enable On Call Orders' overrides this setting.
|
Display Service Quantity
|
Displays the quantity next to each service in the Current Services section of the Customer Portal.
|
Enable Payment as Guest
|
When enabled, an 'Invoice Quick Pay' option is available on the login screen. To make a payment, the invoice number and the quick pay code or account number are required.
|
Enable Auto Pay Max Amount
|
When enabled, a Maximum Payment Amount field is displayed in the Manage Automatic Payments popup in the Customer Portal. Additionally, an AutoPay Amount field is also displayed in the Account Wallet (Accounts > AR History).
|
Display Third Party Invoices
|
This setting applies to Vendor and Broker homepages. Homepages are set in the Account Class. If enabled, third party invoices will be displayed.
|
| Enable Request Login Button |
This optional setting allows customers to self-register for a Customer Portal account using information from a recent invoice. Further information and setup can be viewed here: Setting Up Portal Access for Contacts
|
Login Message (HTML)
|
Displays a message in the customer portal under the 'Select Account' field after login. This setting does not apply to all customer portal homepages that are set in the account class. Current homepages this doesn't apply to include:
- Vendor
- Service Map and Requests
- Calendar View
|
Login Terms (HTML)
|
Displays a message at the bottom of the Customer Portal's login screen.
|
Make a Payment Terms
|
Displays a message at the bottom of the Make a Payment screen in the Customer Portal.
|
Login Logo
|
Option to upload a logo.
|
Login Logo URL
|
Option to view the logo that was uploaded.
|
Graphics Style (CSS)
|
Please enter a support ticket for assistance with this setting.
|
Graphics Style URL
|
Please enter a support ticket for assistance with this setting.
|
Account Class Setup
Pathway: Setup > Accounts > Account Class
Certain customer portal settings can be managed at the account class level, such as the customer's default homepage and the ability to create on-call orders. In some cases, these settings may override those configured in System Options.

| Field |
Description and Use |
| Enable Portal Access |
Enables Customer Portal access to users of accounts assigned the account class.
Default is set to 'Yes'.
|
Customer Portal Home Page
Required
|
The Home Page users see upon logging in to their Customer Portal account. This is a predefined set of options as described in the Customer Portal Views article.
|
| Enable Add Sites |
Enables the ability for users to add new service locations from their portal account.
|
| New Location Template |
If 'Add Sites' is enabled, select the template the Customer Portal will follow when a new site is added.
|
| New Location Bundle |
Default setting for self service ordering. More details to come.
|
| Enable On Call Orders |
Enables the option to create On Call Orders from the Customer Portal. When a customer submits an on call order from their portal account, it will display as a Scheduled service in Dispatch as 'No Route Assigned.' Portal users can not submit on call orders for the current day.
- Yes - Enable
- No - Disable
|
Enable Report Access
Required |
Option to control whether Customer Portal users can run reports. This feature requires additional setup in Report Formats to enable specific reports for portal access.
|
| Enabling Viewing Inactive Site |
Grants users of an inactive site access to view service history information, associated photos, manifests, and report attachments. Other options, such as the ability to create a request or view AR information, are hidden if the site is inactive.
|
| Default Work Order Photo - Display In Customer Portal |
Controls if a photo should display in the Customer Portal.
|
Default Work Order Attachment - Display In Customer Portal
|
Controls if an attachment should display in the Customer Portal.
|
| Auto Send Portal Invitation on Contact Creation |
Optional setting that allows portal invitations to be automatically sent when a new contact is created. To enable this, select 'Yes' for the 'Auto Send Portal Invitation on Contact Creation' setting in the Account Class Setup screen. Once enabled, a portal invites will be sent to new contacts, provided a valid email address is entered.
Further setup and information can be reviewed here: Setting Up Portal Access for Contacts
|
| Allow Invoice-Verified Self Registration |
Optional setting to allow customers to self-register for a portal account using a recent invoice that includes an invoice number and either a quick pay code or an account number.
Further setup and information can be reviewed here: Setting Up Portal Access for Contacts
|
Division Setup
Pathway: Setup > System > Division
Configuring the Credit Card / ACH Processing screen within Division Setup is crucial for handling online payment transactions. These settings impact online payments in the customer portal as well as payment processing for billing.
Details Tab
On the Details tab of the Division setup screen, the Customer Portal URL must be entered. Text entered in the Customer Portal Past Due Text field will appear on the portal beneath the past due amount when the account is overdue.

Credit Card / ACH Processing Tab
The Credit Card / ACH Processing settings in Division Setup controls if and how credit card and ACH transactions are processed, as well as customer access to manage their payment methods in Wallet. The Card Not Present section and the lower section of this tab are the fields that are relevant to the Customer Portal and the focus here.

| Field |
Description and Use |
| Card Not Present |
Enable
Required |
Selections here affect the display of the Wallet and Payment features in the Customer Portal. If 'No' is selected, payment features are not displayed. Options include:
- Yes (Credit Card & ACH) - Customers can add a credit card or bank routing information to wallet, or make a payment with either option.
- Yes (Credit Cards Only) - Customers can only add a credit card to wallet, or make a payment with a credit card.
- No - Wallet is not available.
|
Processor
Required |
Select CardPointe Processor from the drop-down.
|
| Environment |
Select the type of environment this is being set up for:
- Production - Required to process live customer transactions.
- Sandbox - Testing option.
|
API Key / User Name
Required |
Enter the API Key provided by the selected Processor.
|
Trans. Key / Password
Required |
Enter the password provided by the selected Processor.
|
| Credit Card Merchant ID |
Enter the identification number for the credit card provided by the selected Processor.
|
| eCheck / ACH Merchant ID |
Enter the identification number for the bank account provided by the selected Processor. If something is entered here, then the following fields are displayed:
- eCheck / ACH Reporting Mid ID
- eCheck / ACH Reporting User Name
- eCheck / ACH Reporting Password
|
Card Present
|
Wait for Terminal Timeout (Sec)
|
Specifies how long the system will wait for a response from the credit card terminal before timing out. If the terminal does not respond within the defined number of seconds, the transaction will be canceled and may need to be retried.
|
The rest of the fields in the Card Present section are relevant to Card Present - Credit Card Terminal Setup.
|
| Bottom section |
Settlement Time
Required |
The settlement time for the payment batches. Any payments recorded after the time selected will be applied to the next day's payment batch.
|
| Credit Card Bank Account |
Select the bank account that payments are to be sent to.
Bank Accounts are created in Setup > Accounting > Bank Account
|
Payment Receipt Notification Template
Required |
Select the template that will be emailed to the customer upon receipt of payment.
Notification Templates are created in Setup > System > Notification Template
|
Declined Payment Notification Template
Required |
Select the template that should be emailed to the customer in the event a payment is declined.
Notification Templates are created in Setup > System > Notification Template
|
Payment Refund Notification Template
Required |
Select the template that should be emailed to the customer in the event a payment is declined.
Notification Templates are created in Setup > System > Notification Template
|
Chargeback Notification Template
Required |
Select the template that should be emailed to the customer in the event of a chargeback.
Notification Templates are created in Setup > System > Notification Template
|
Work Type Setup
Pathway: Setup > Operations > Work Type
If a customer can submit online orders, review the Work Type Setup to confirm it is properly configured and uses naming conventions that can be easily identified and understood by a portal user.
Account Request Type Setup
Pathway: Setup > Account > Account Request Type
If the Customer Portal includes the option for customers to submit online requests, request types must be configured in Account Request Type Setup.
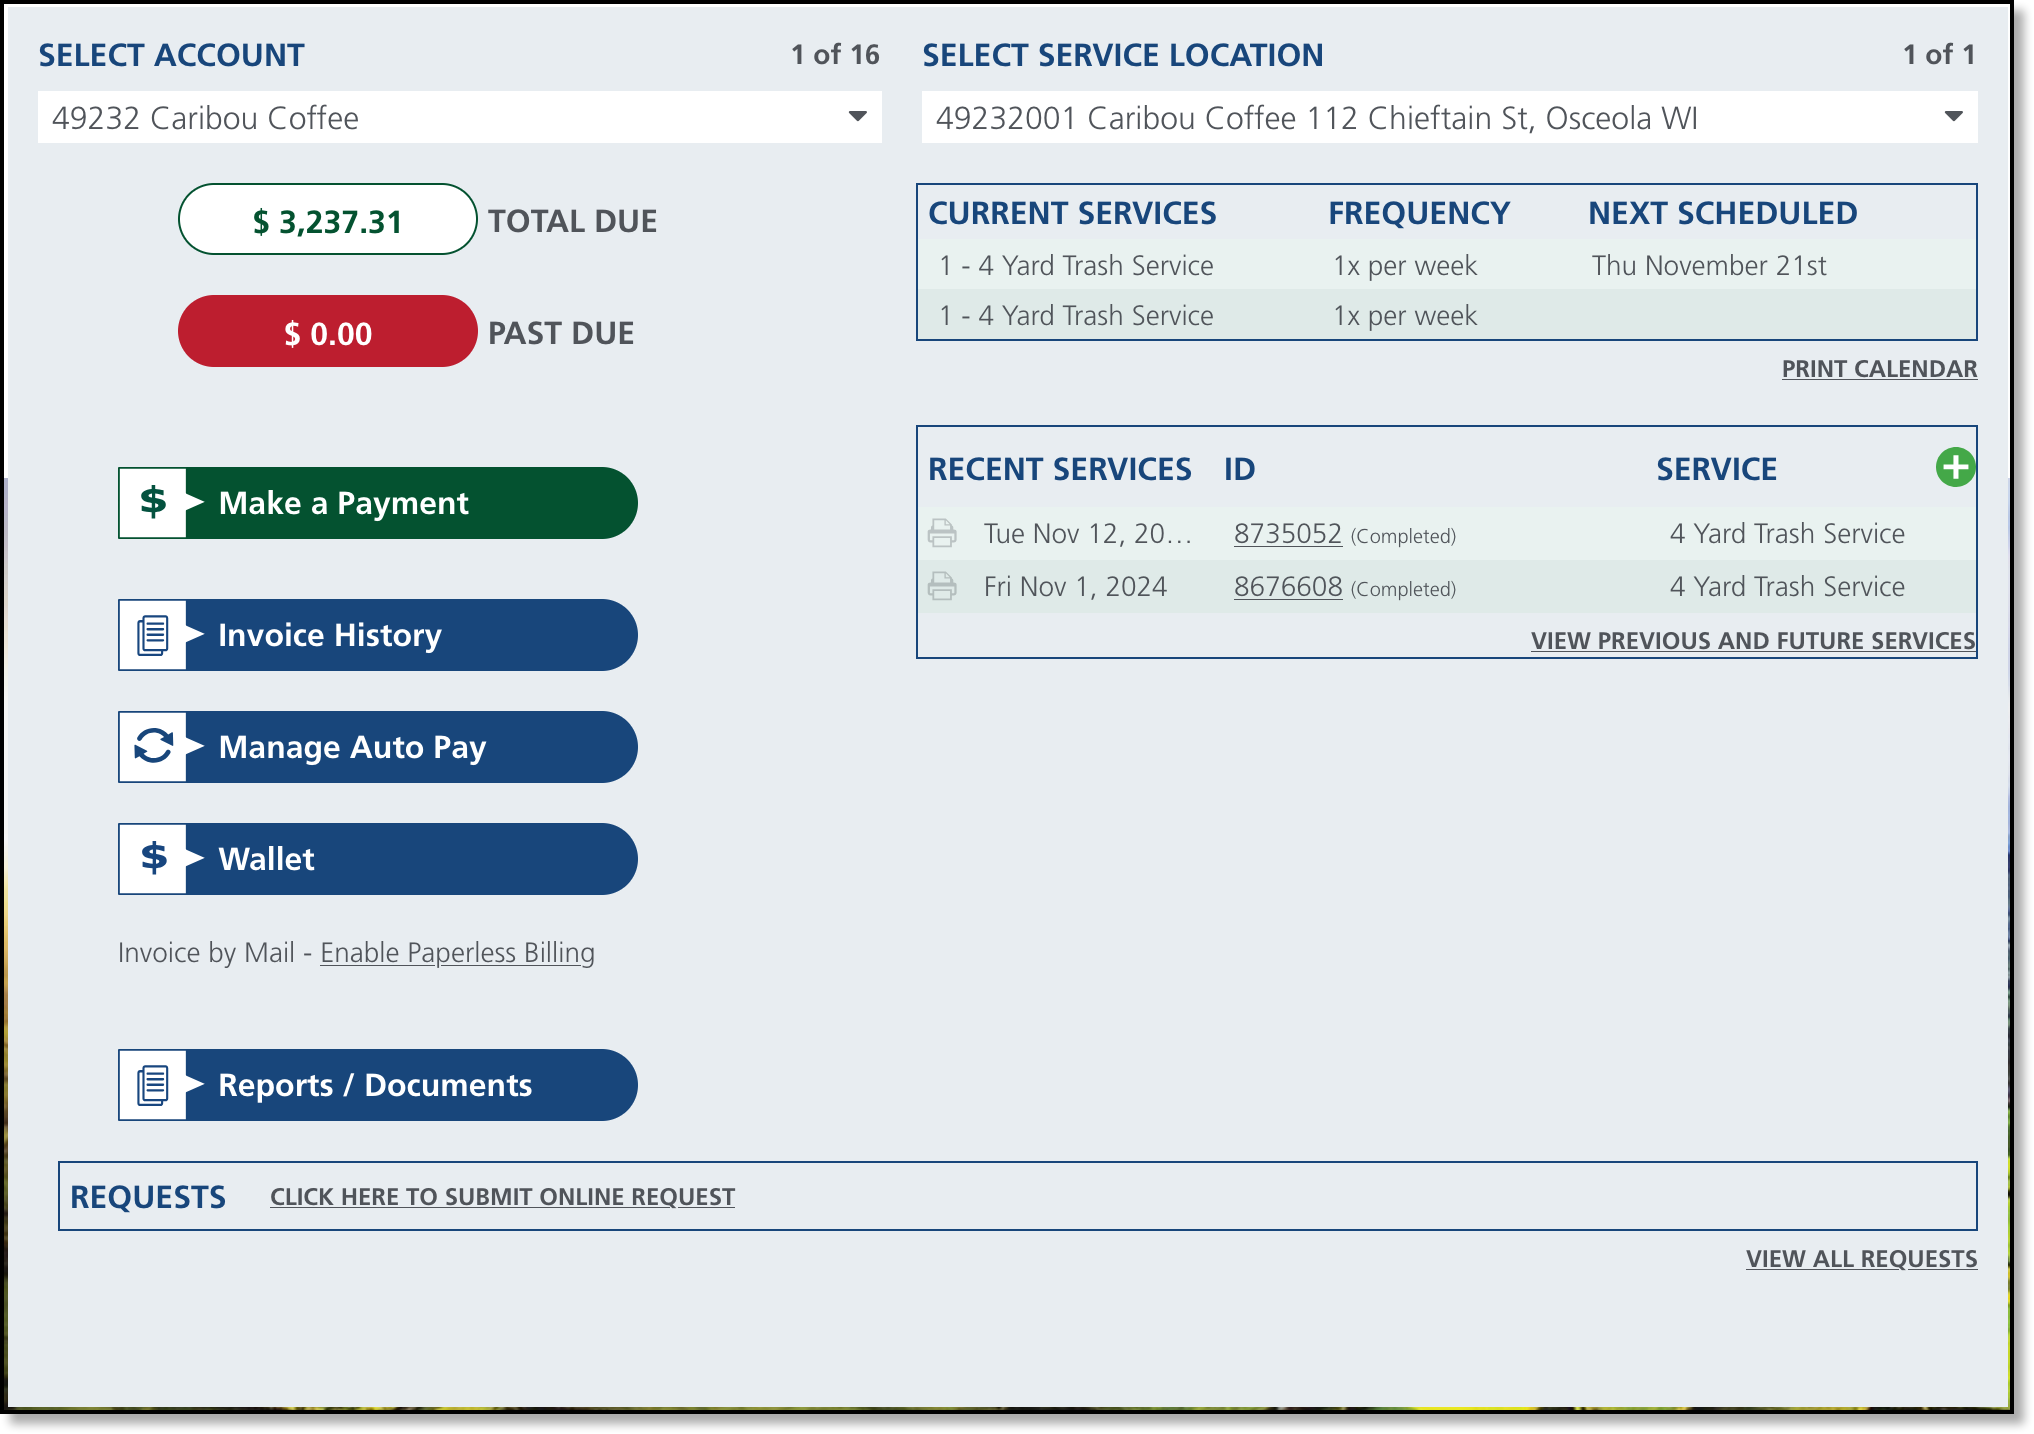
Customer Portal - Online Request
If Online Request has been configured, it displays as shown below. To learn more about how to submit an online request from the customer portal, check out Account Requests.

Configuration Setup
Only the Account Request Types that are configured to allow self-service ordering are provided in the options in the Customer Portal. Check out Account Request Type Setup and Account Request Management for more information.
To enable, set Allow Self-Service Ordering to Yes.

| Field |
Description |
Name
Required |
The text that will be displayed as the reason visible to the customer in the portal.
|
Type
Required |
Select the category type that best aligns with the request.
|
| Active |
Controls the availability of the request for selection and use. By default, it is set to 'Yes'. Select 'No' to de-activate it.
|
| Allow Self-Service Ordering |
By default, it is set to 'No'. Select 'Yes' to make the request available for selection on the Customer Portal.
|
| Assign User By Default |
Indicates who portal requests will be assigned to. In Account Request Management, requests can be filtered down by user.
|
| Department |
Option to categorize requests by department. In Account Request Management, requests can be filtered down by department.
|
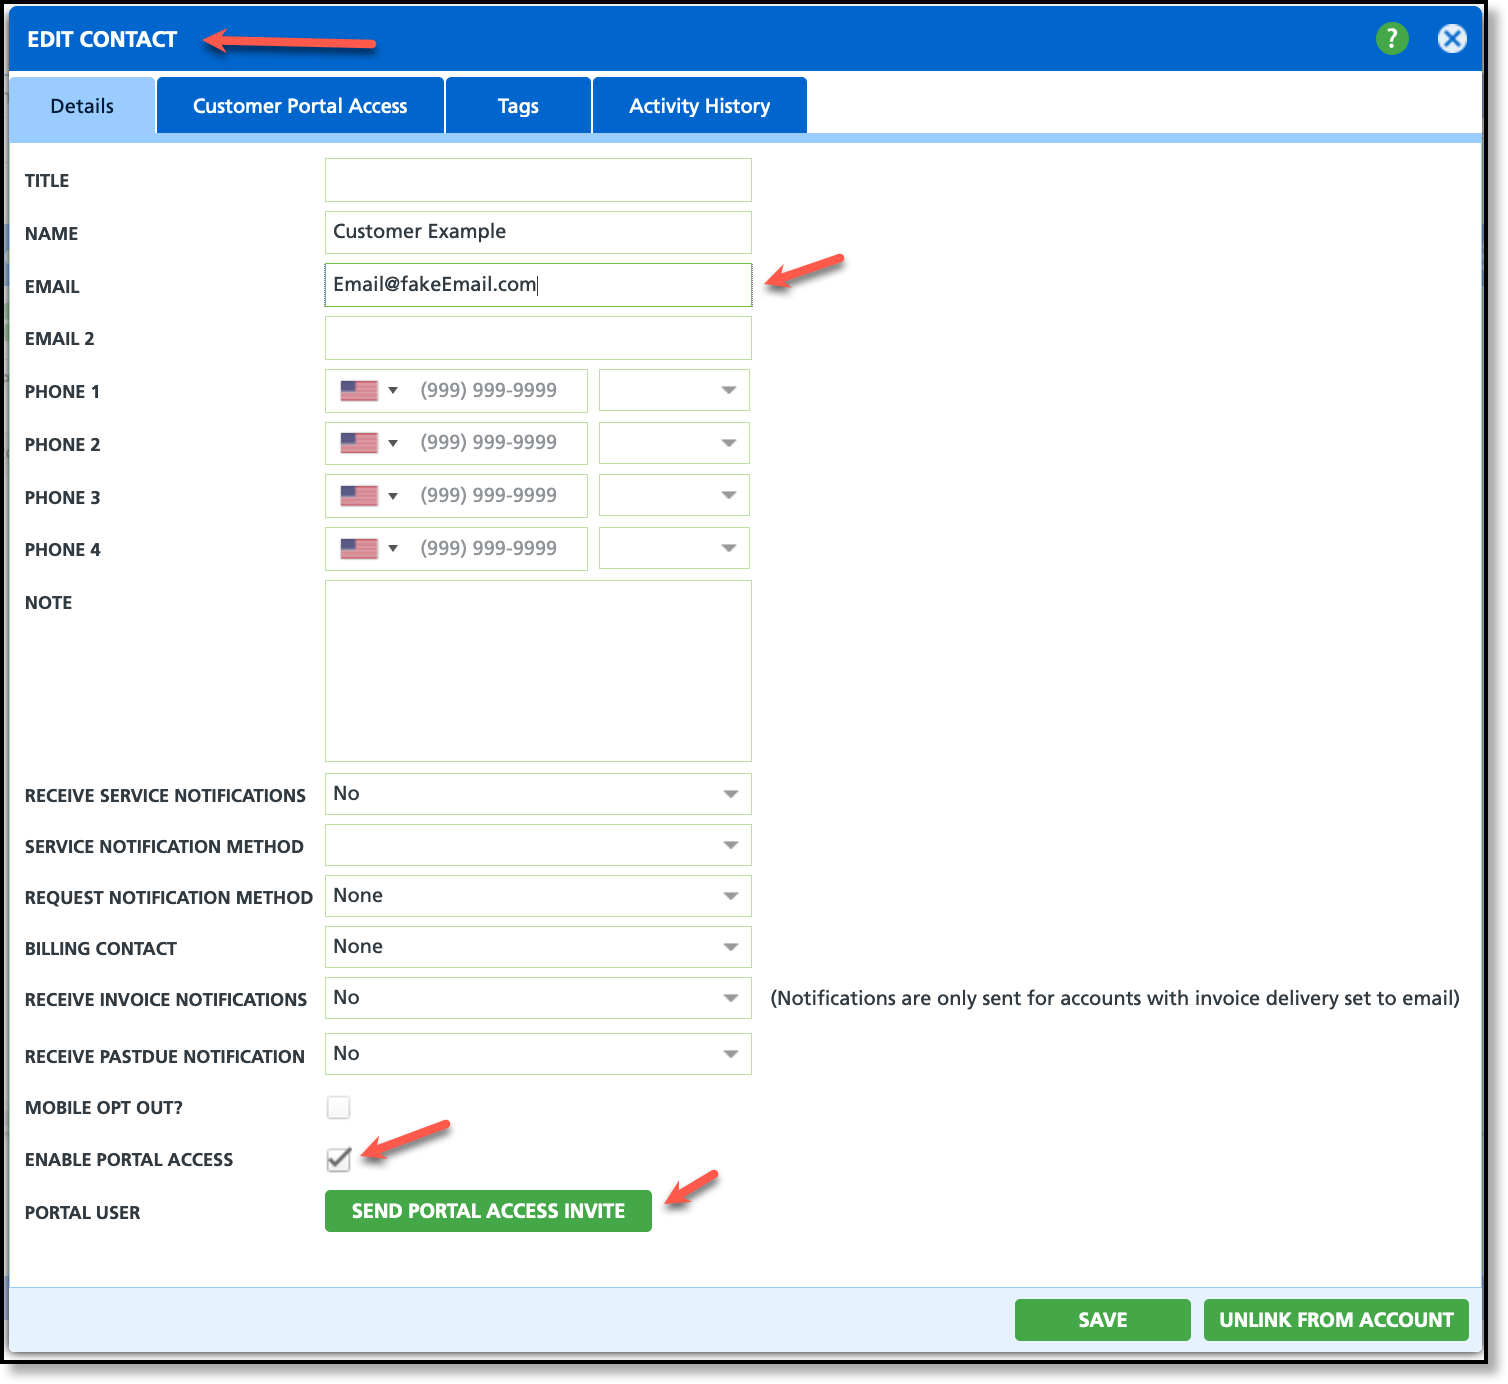
Grant Customer Contacts Portal Access
Pathway: Accounts > Contacts
After completing the setup, grant customers access to their portal accounts through the Contacts section of the Customer Service screen. Ensure that contacts, whether site-level or account-level, are added to the account before granting portal access. Learn how to add contacts to an account here- Add and Edit Account Contacts.
Optional setup is available to automatically send portal invitations to new contacts and to allow customers to self-register for a Customer Portal account, following the process outlined in this article: Setting Up Portal Access for Contacts
Details Tab
Use the Details tab to add a contact and enable their portal access. The fields on the Details tab will update after the contact is added, saved, and reopened, including the Send Portal Access Invite field which requires the entry of the contact's email address where the portal invite can be sent.
Customer Portal Access Tab
Use the Customer Portal Access tab to manage a contact's access level.
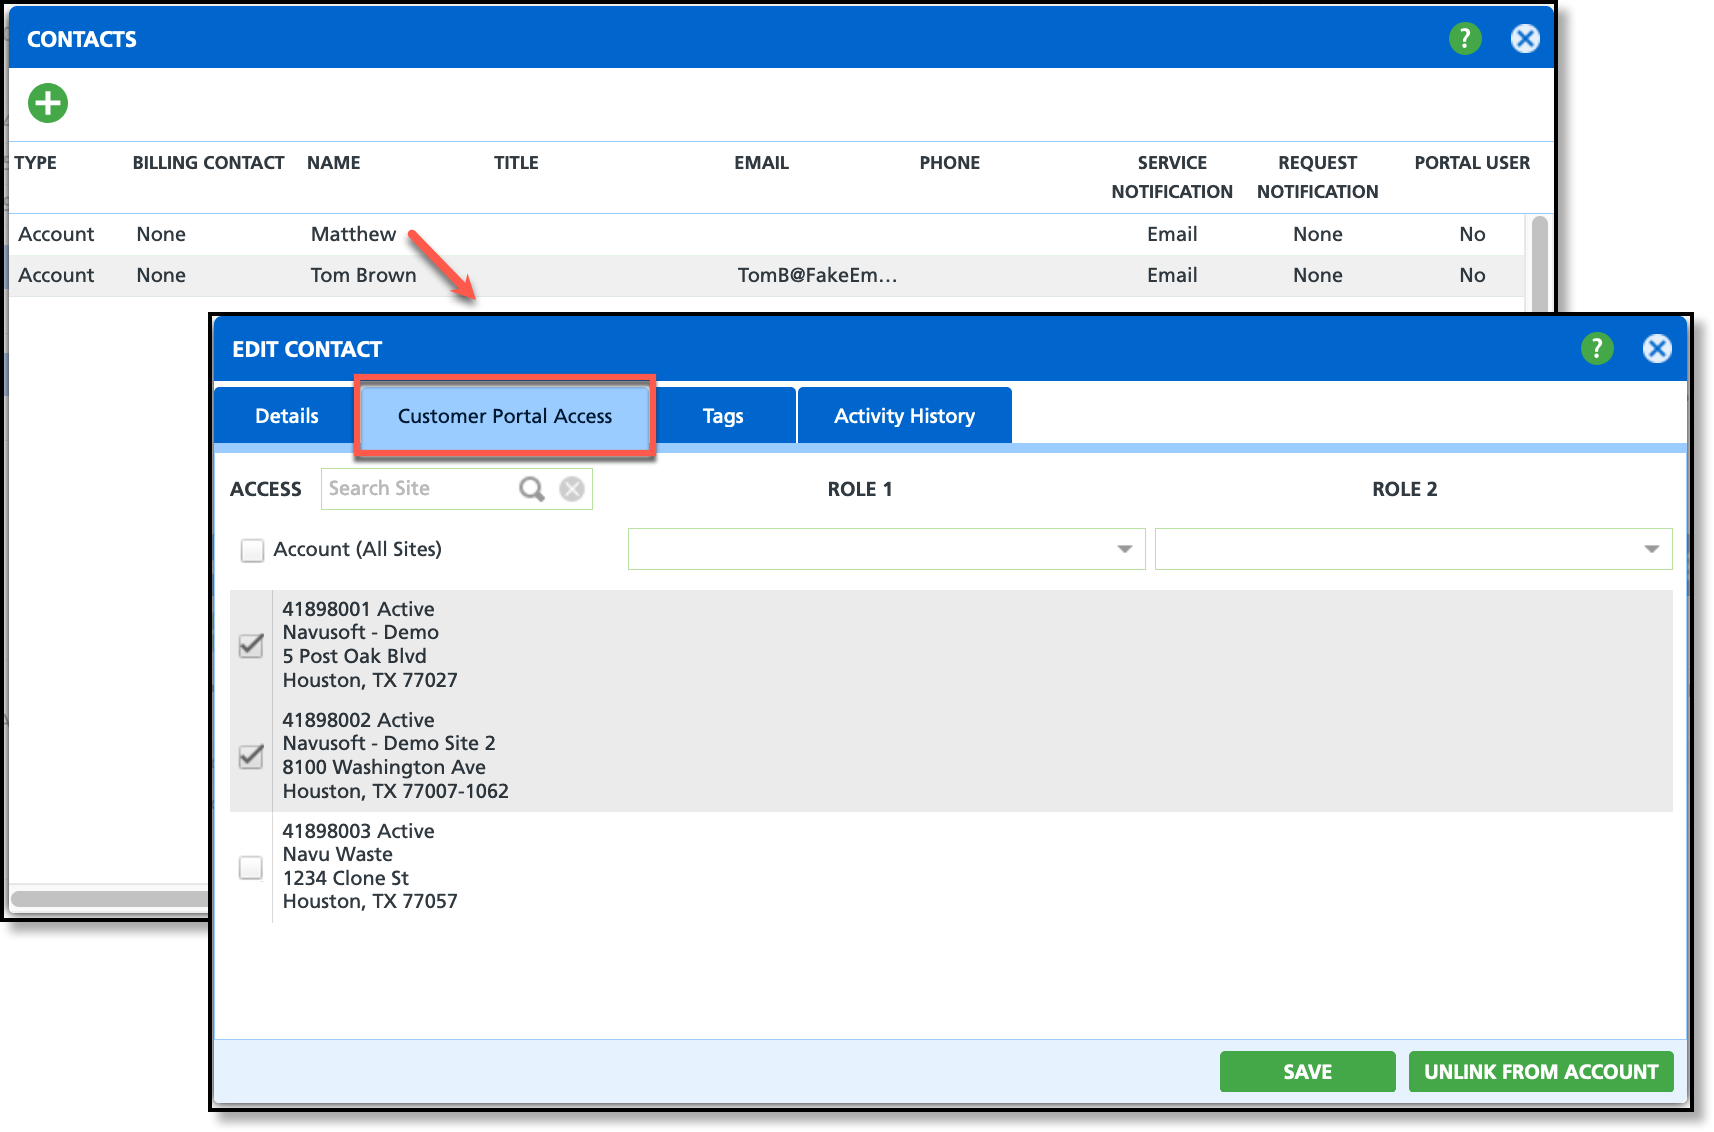
Grant Access to All Sites (Account Level Contact)
To grant an account contact access to all sites within the portal, select the Account (All Sites) checkbox.
Grant Limited Site Access (Site Level Contact)
To restrict a contact's portal access to specific sites, deselect the Account (All Sites) checkbox and check only the boxes for the sites the contact is permitted to access.
Optional Setup - Reports
Pathway: Setup > Report Formats > Customer Portal Reports (Tab) and Setup > Accounts > Account Class > Customer Portal (tab)
If reports are available, go to the Report Format Setup screen and open the Customer Portal Reports tab. Review the available reports and set Enable Customer Portal Access to 'Yes' for each report you want to display on the portal. Additionally, the 'Enable Report Access' field must also be set to 'Yes' for the account class.
Related Articles
Bulk Send Portal Invites
Setting Up Portal Access for Contacts
Customer Portal Views
Customer Portal - Manage Autopay
Customer Portal - Make a Payment
Customer Portal - Wallet


