Account Request Management
Last Modified on 07/01/2026 10:50 am PDT
Pathway: Accounts > Accounts Request Management
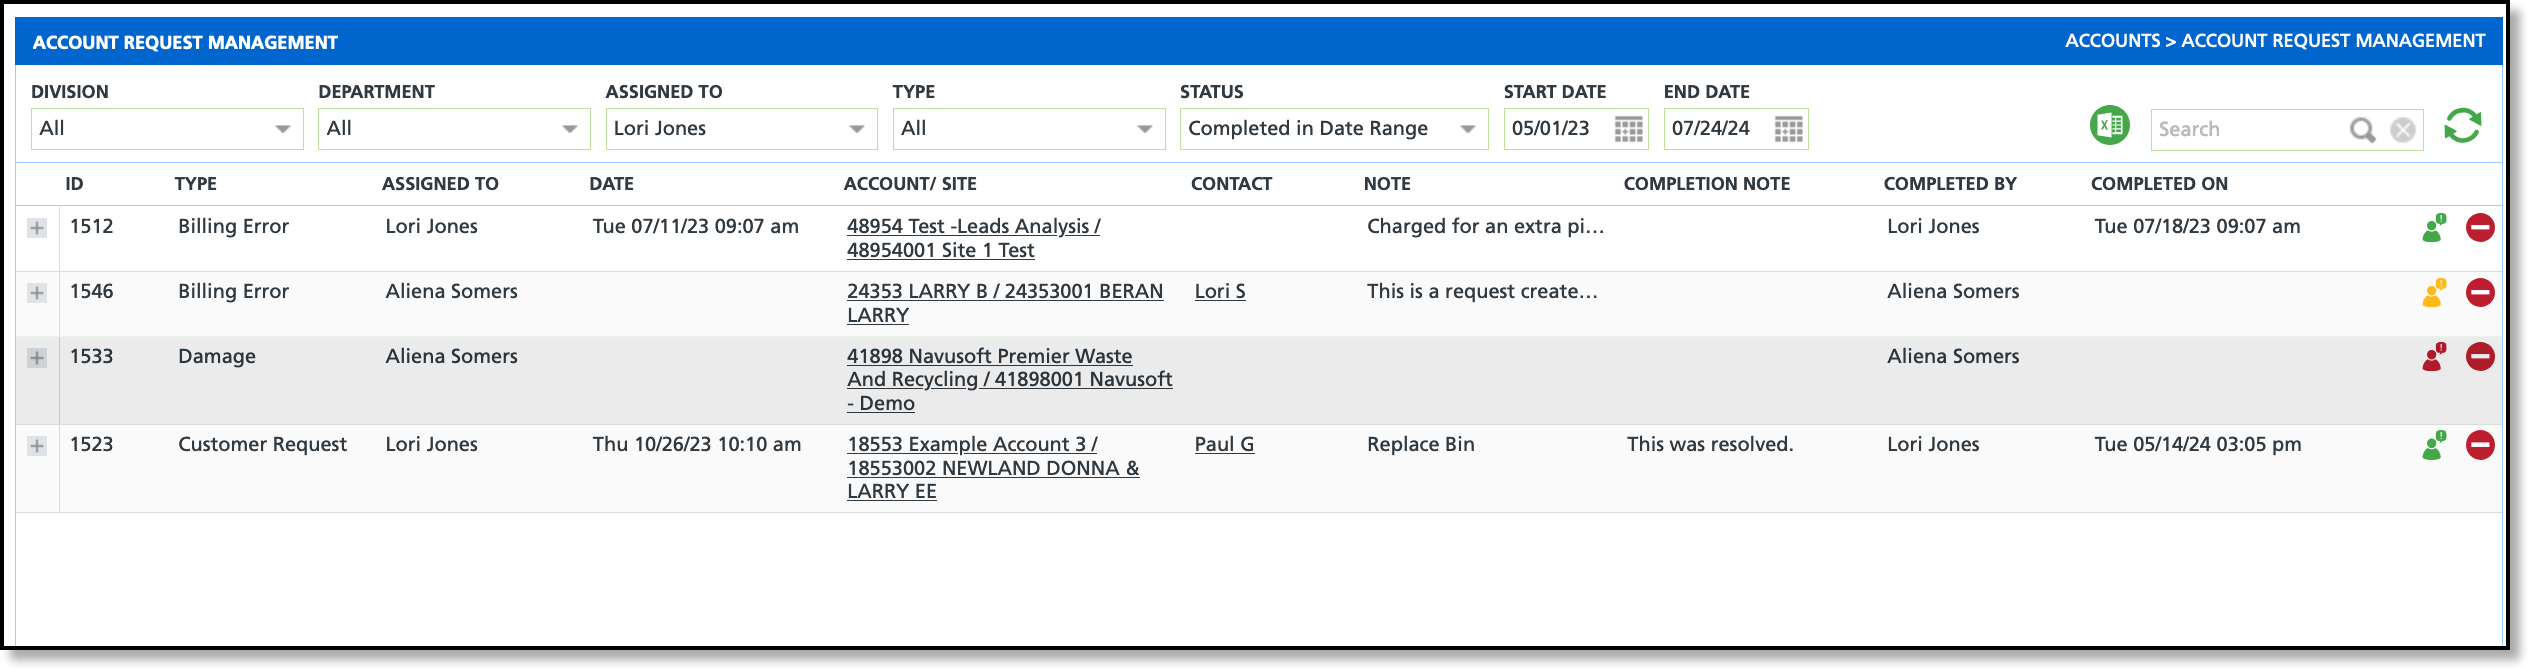
The Account Request Management tool exhibits both customer-initiated and customer service-added account requests for all accounts. Upon entry, all open requests are displayed by default. To narrow down the displayed requests and review closed requests, you can utilize the filtering options located at the top of the screen.
Filter and Field Descriptions
The following filter and field descriptions apply to the Account Request Management screen.
|
Filter/Field
|
Description
|
|
Filters
|
|
Division
|
Select All or one specific division to view only those Account Requests assigned to that division.
|
| Department |
Select All or one specific department to view only those Account Requests assigned to that department.
|
|
Assigned To
|
Select All or one specific user to view only those account requests assigned to that user.
|
|
Type
|
Select All or one specific type of Account Request to view.
|
|
Status
|
Select All or a certain status to view only those Account Requests with that status, for example, only those that are still Open.
|
|
Fields
|
|
ID
|
The system generated ID assigned to the request.
|
|
Type
|
The customer selected reason for the request.
|
|
Assigned To
|
The name of the user the request has been assigned to.
|
|
Date
|
The date the request was created.
|
|
Account/Site
|
The Account/Site ID and name.
|
|
Contact
|
The name of the contact for the account. An email displays when the contacts email address was entered in the name field of the Add Contact tool for the account.
|
|
Note
|
The note the customer entered in the request from the Customer Portal.
|
|
Completion Note
|
The note that was entered in the Completion Note field of the Account Request.
|
|
Completed By
|
The name of the user who resolved the request and changed it to a Completed status.
|
|
Completed On
|
The date a request was completed.
|
Quick Status Check
Using the red, yellow, and green status indicators at the end of each row, users can quickly identify the status of an account request. Clicking on the icon will open the account request details.
- Green: Request is Closed
- Yellow: Request is Open
- Red: Request is on Hold
Edit Account Request
To edit an Account Request, either double click on the row in the Account Request Management screen or click on the colored person status indicator at the end of the row. Upon using either method, the Account Request screen is displayed.

Details Tab - Field Descriptions
|
Fields
|
Descriptions
|
|---|
|
Created On
|
Timestamped with the date the Request was received.
|
|
Created By
|
Displays the name of the account contact who made the request. An email displays when the contact's email address was entered in the name field of the Add Contact tool for the account.
|
|
Type
|
Indicates the reason for the request and helps in identifying next steps (i.e. who the request should be assigned to). Set up these Types in Set Up > Account > Account Request Type.
|
|
Status
|
Indicates the current status of a request. All new requests display as Open and will remain open until changed by a system user. Status' include:
- Open - The request is new or is actively being worked.
- Hold - The request has been reviewed and additional information is needed.
- Completed - The request has been resolved. Completed requests can be reviewed using the Status filter on the Account Request Management screen.
|
|
Assigned To
|
The user assigned to the request.
|
|
Contact
|
The name of the site contact. In some cases, an email displays if an email was entered in the name field of the Add/Edit Contact screen.
|
|
Reason Code
|
The request for internal purposes. Reason codes are created in Set Up > System > Reason Code.
|
|
Note
|
Displays the note entered by the customer.
|
|
Completion Note
|
Option to add a Completion Note detailing how the request was resolved for future referencing.
|
Delete Account Request
When deleting and after confirming via the confirmation prompt, the account request will be permanently deleted and will not be accessible in the future.
There are two ways to delete an Account Request, from the Account Request Management screen or from within the Account Request itself.
1. From the Account Request Management screen, select the red - circle icon.
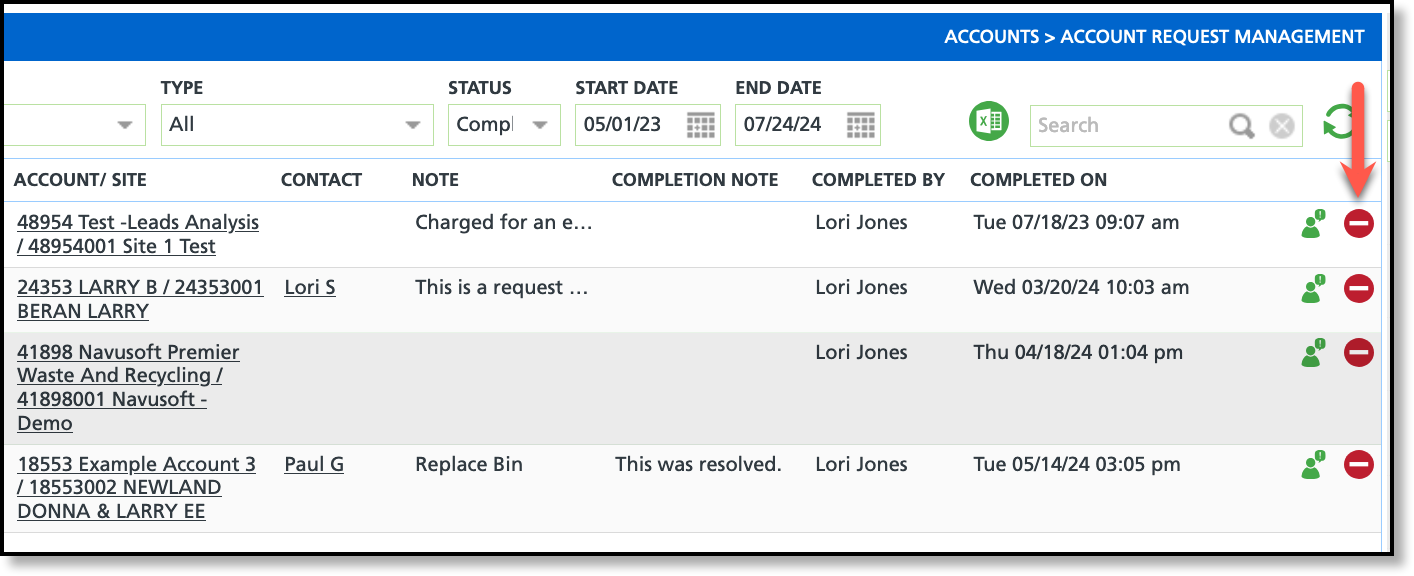
2. From within the Account Request, select the Delete button.

In both cases, after selecting delete, the Delete Confirmation popup will be displayed. Select 'Yes' to permanently delete the account request.

Complete an Account Request
Completing or Closing an existing Account Request includes entering information for auditing and reporting purposes and updating the status.
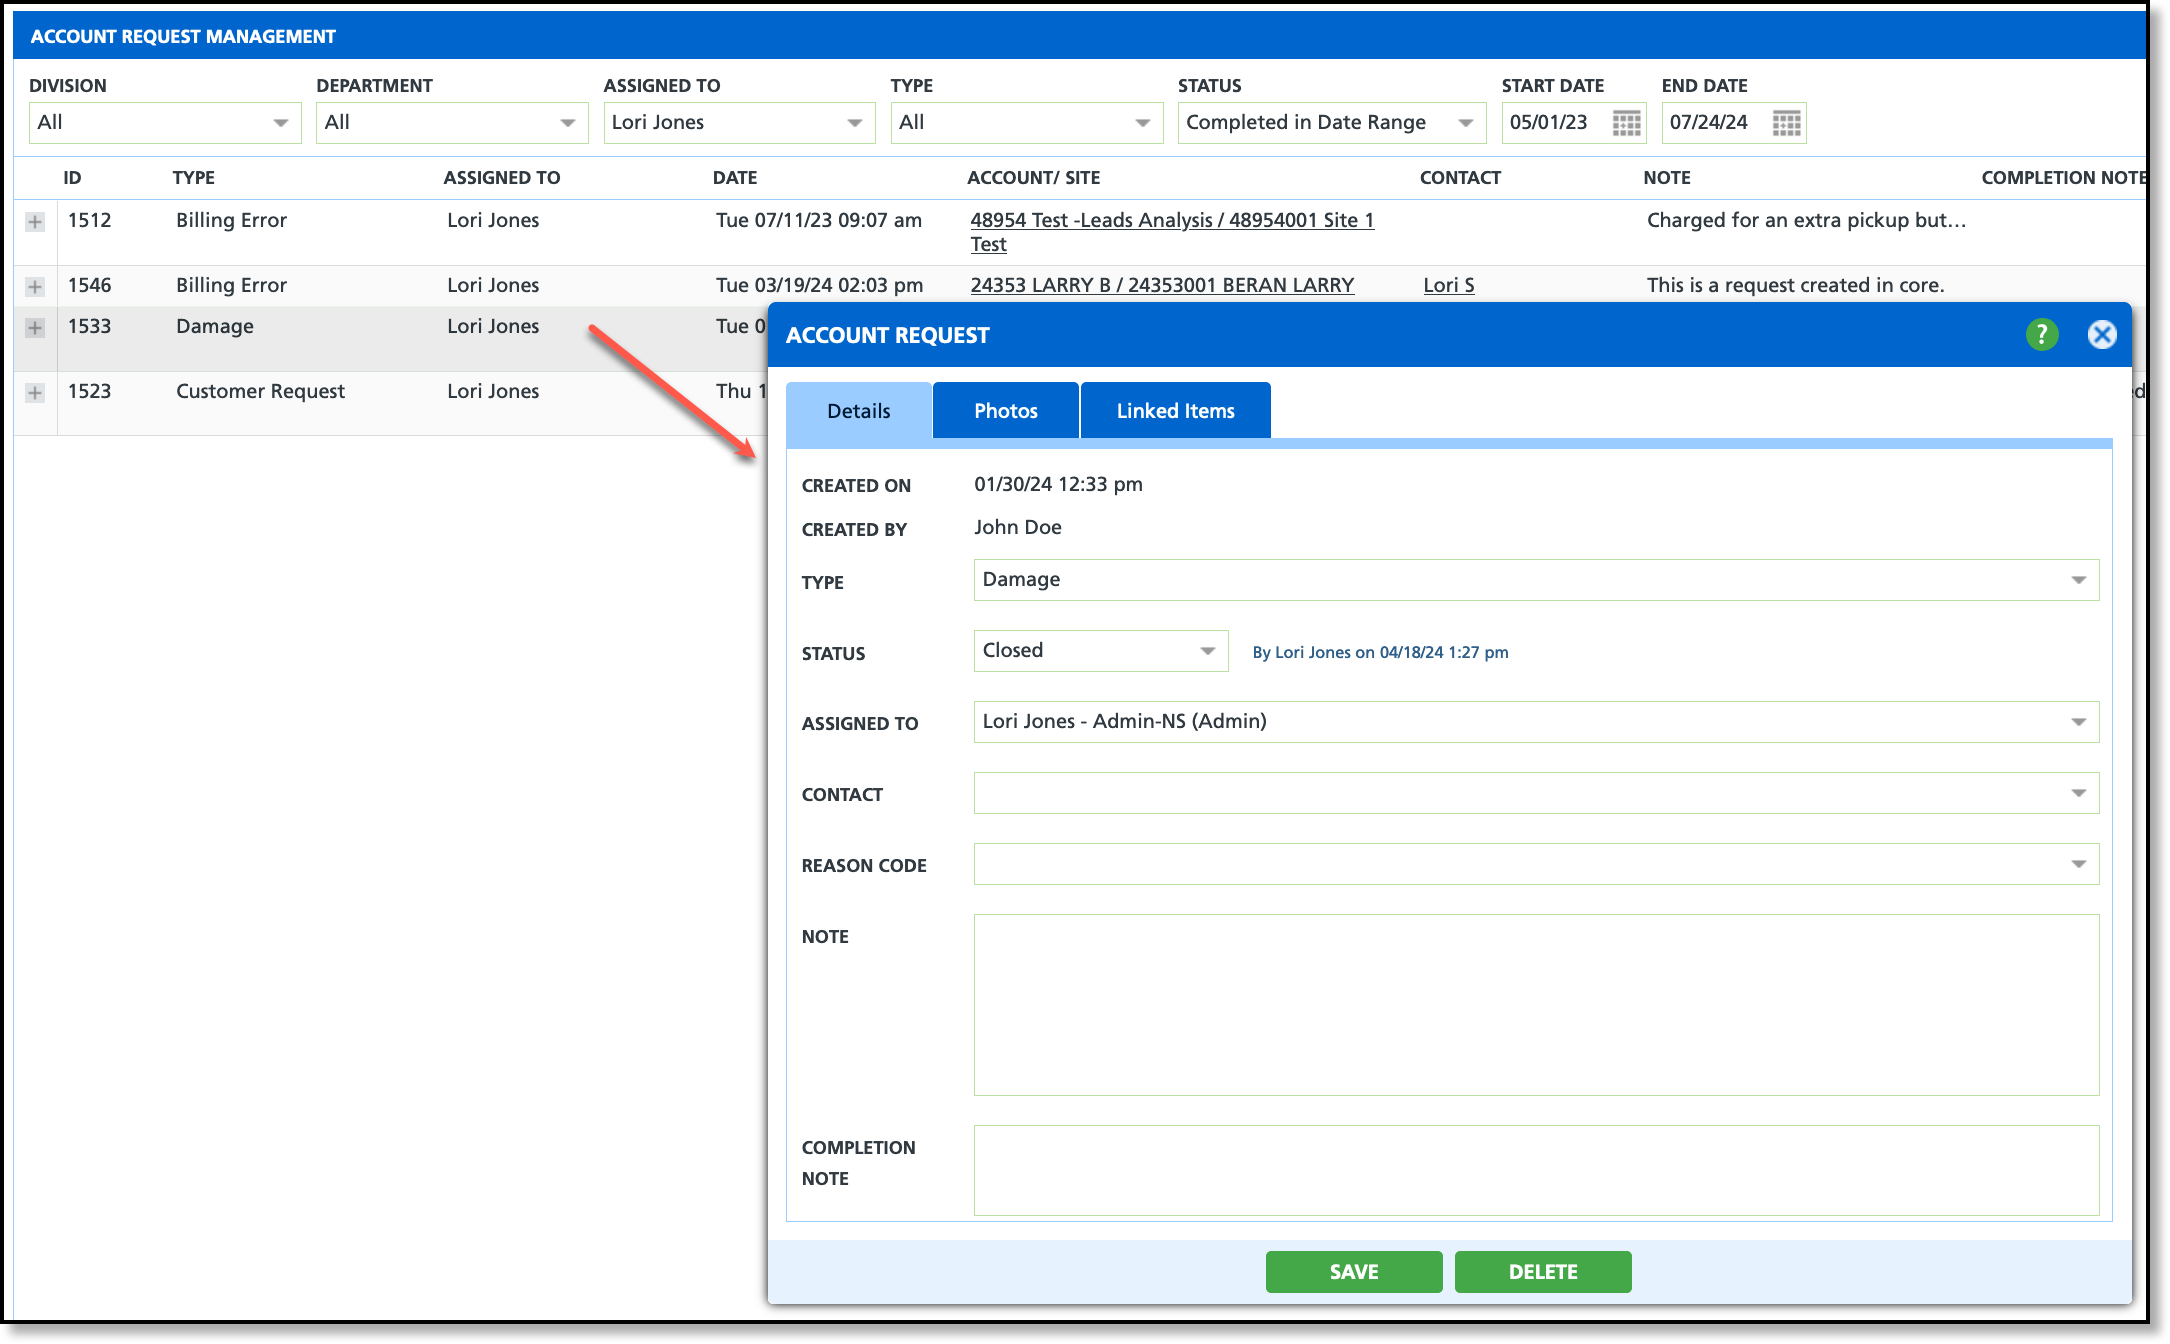
- Double click on request you would like to review.
- Review the Status, Reason Code and Note.
- Select Complete from the Status drop down AFTER the request has been resolved.
 If the request is not resolved, it should be kept in either an 'Open' or 'Hold' status.
- Include a Completion Note to record the resolution and any other notes relating to how the request was completed.
- Click Save when finished.
Completed requests can still be viewed by using the Status filter on the Account Request Management screen.
Add Photos to Account Request
Select the Photos tab to upload and attach photos to the request.
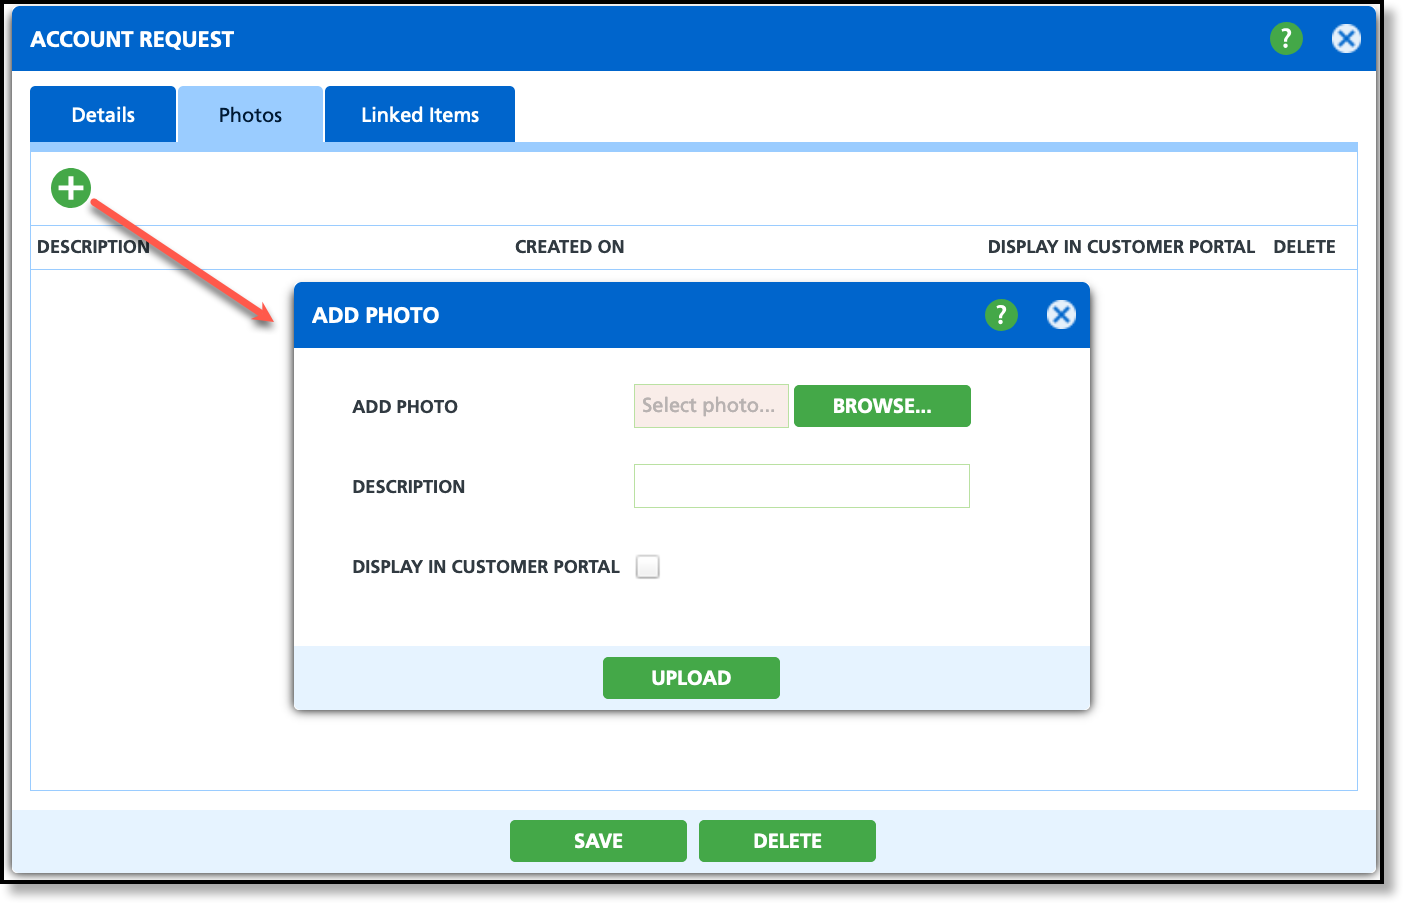
- Click on the Photos tab.
- Use the Browse button to find the photo on your device.
- Provide a brief description.
- Check the Display in Customer Portal box if the photo should be visible to the customer.
- Select Upload.
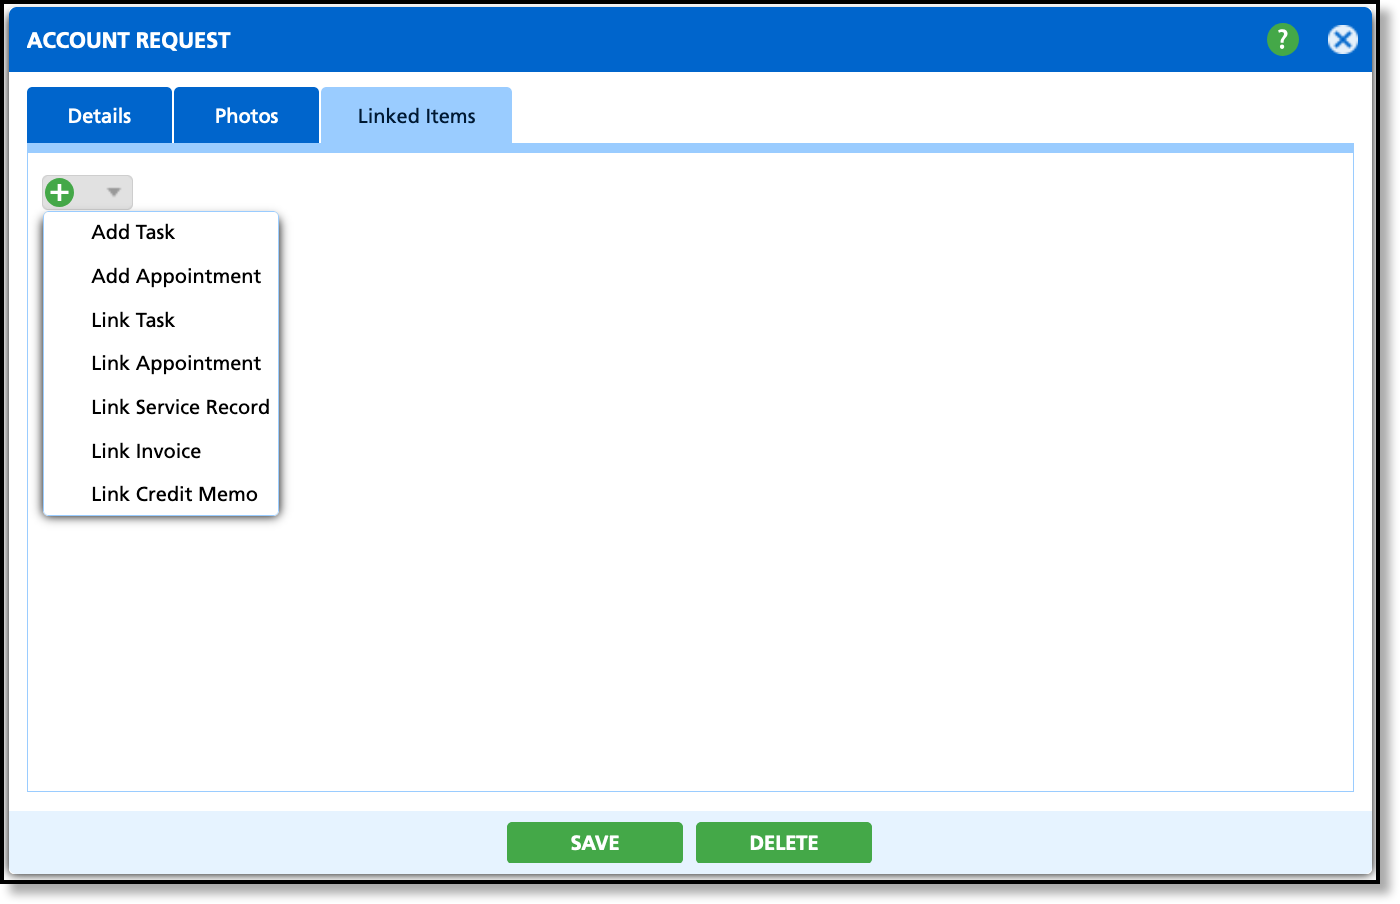
Link Items to an Account Request
Linked Items offers the option to associate or link appointments, tasks, service records, invoices, and credit memos with an account request, streamlining the process for its completion. The Linked Items tab only displays after the request has been created.
| Linked Item Actions |
Descriptions |
|
Add Task
|
If the request can not be immediately resolved and requires additional steps or resources to get involved, a task can be created to record what is needed and assigned to another user if necessary. Upon selection, the 'Add Task' window displays to create the task. Additional information about Tasks can be found here: Add Task
|
|
Add Appointment
|
If the request requires future follow-up, an appointment should be created. Upon selection, the 'Add Appointment' window displays to create the appointment. Additional information about creating appointments can be found here: Add Appointment
|
|
Link Task
|
Option to link an existing task on the account to the request. Upon selection, a listing of open tasks assigned to the account will display. Select the task(s) you would like linked to the request and then click save.
|
|
Link Appointment
|
Option to link an existing appointment on the account to the request. Upon selection, a listing of pending appointments for the account will display. Select the appointment(s) you would like linked to the request and then click save.
|
|
Link Service Record
|
Option to link a Service Record from the account to the request. Upon selection, a listing of service records for the account are displayed. Select the service record(s) you would like linked to the request and then click save.
|
|
Link Invoice
|
Option to link an available invoice for the account to the request. Upon selection, a listing of available invoices created for the account are displayed. Select the invoice(s) you would like linked to the request and then click save.
|
|
Link Credit Memo
|
Option to link a credit memo on the account to the request. Upon selection, a listing of Credit Memos created for the account are displayed. Select which credit memo(s) you would like linked to the request and then click save.
|
Enabling Customer Generated Account Requests
In order for customers to be given the ability to submit account requests themselves, the customer portal must be configured correctly including setup for each Account Request Type. Each type of Account Request can be configured to allow or not allow customers to create from the customer portal. This is set in Account Request Type Setup.
Permissions
The following permissions are required to read, add, edit and delete account requests.
| Permission ID |
Permission Name |
Description |
| 384 |
Account Request Management |
Necessary to view the Account Request Management screen. |
| 383 |
Add / Edit Account Request |
Necessary to edit the requests displayed on the screen. |
| 485 |
Delete Account Request |
Necessary to delete a request. |
Related Articles
Add Account Request
Add Task
Add Appointment
Account Request Type Setup


