Add Account Request
Last Modified on 06/26/2026 2:02 pm PDT
Pathway: Accounts > Search > Customer Account
The following process applies to creating an account request for a customer. An account request is a specific action or information requested by a customer. Different types of account requests and how they behave are configured in Account Request Type Setup.
Within the application, account requests can be created in two locations: the Customer Service Calendar or the Account Menu.
Note: If an account is properly set up with the
Submit Request
configuration for Customer Portal, customers can submit their own requests via the Customer Portal.

Add an Account Request
Account Requests can be added from two locations within the customer service screen: the Account Menu and the Account Calendar.
Add via Account Menu
- Click on the green + icon at the top left of the account screen.
- Select 'Account Request' from the list of options. This will open the Account Request editor.

Add via Calendar
- Right-click on the calendar date the appointment applies.
- Select 'Add Account Request' from the popup that displays. This will open the Account Request editor.

Steps to Add an Account Request
After accessing the Account Request screen via the calendar or the Account menu, follow these steps to add the Account Request:
- Select the Type that best classifies the reason for the request.
Note: The Type options are created in Setup > Account > Account Request Type.
- Select the current Status of the request. By default, a new request's status is set to 'Open.'
- Select the user the request should be Assigned To.
- Select the account Contact to identify who the contact is for additional followup and review.
- Add a Note for further instruction or details regarding the request, contact information and any other supporting information a user needs to complete the request.
- Upload relevant images to the request.
- Click on the Photos tab.
- Provide a brief description.
- Check the Display in Customer Portal box if the photo should be visible to the customer.
- Click Save when finished.
Submit an Account Request - Customer Portal
Customers can create a request from the Customer Portal given certain criteria. For setup instructions and workflow details, refer to the Customer Portal - Submit a Request article.
Link Items to Account Request
Linked Items offers the option to associate or link appointments, tasks, service records, invoices, and credit memos with an account request, streamlining the process for its completion.
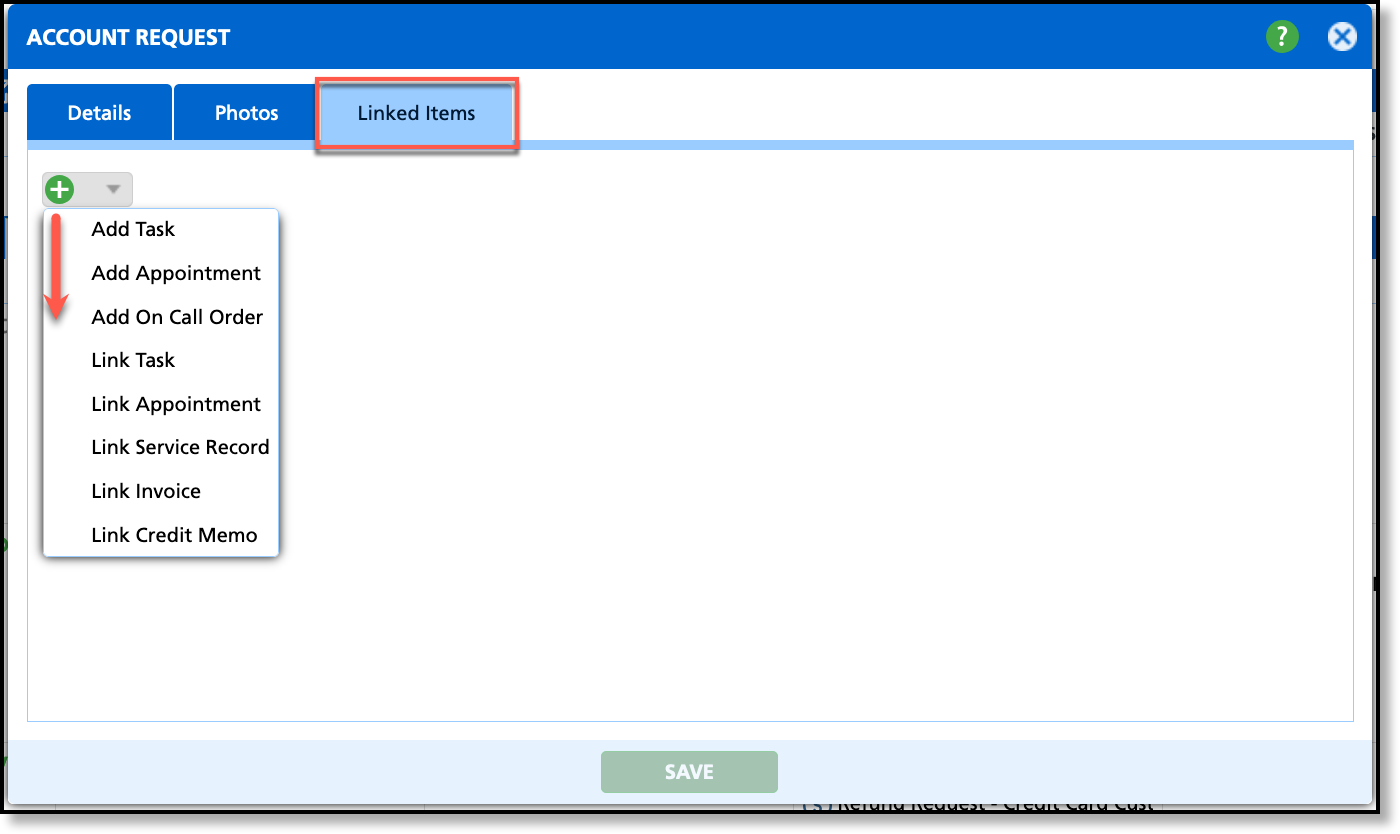
Linked Item Actions
| Linked Item |
Description |
| Add Task |
If the request can not be immediately resolved and requires additional steps or resources to get involved, a task can be created to record what is needed and assigned to another user if necessary. Upon selection, the 'Add Task' window displays to create the task. Additional information about Tasks can be found here: Add Task
|
| Add Appointment |
If the request requires future follow-up, an appointment should be created. Upon selection, the 'Add Appointment' window displays to create the appointment. Additional information about creating appointments can be found here: Add Appointment
|
| Link Task |
Option to link an existing task on the account to the request. Upon selection, a listing of open tasks assigned to the account will display. Select the task(s) you would like linked to the request and then click save.
|
| Link Appointment |
Option to link an existing appointment on the account to the request. Upon selection, a listing of pending appointments for the account will display. Select the appointment(s) you would like linked to the request and then click save.
|
| Link Service Record |
Option to link a Service Record from the account to the request. Upon selection, a listing of service records for the account are displayed. Select the service record(s) you would like linked to the request and then click save.
|
| Link Invoice |
Option to link an available invoice for the account to the request. Upon selection, a listing of available invoices created for the account are displayed. Select the invoice(s) you would like linked to the request and then click save.
|
| Link Credit Memo |
Option to link a credit memo on the account to the request. Upon selection, a listing of Credit Memos created for the account are displayed. Select which credit memo(s) you would like linked to the request and then click save.
|
User Notification of Assigned Requests
After a request is created and saved, the assigned user will receive a notification, and the request will appear in their Account Requests Home screen display.
Managing Account Requests
Once a request is made from the application or from the customer portal, it is sent to the Account Request Management tool, where it can be tracked, updated, and managed through every stage of the process, ensuring efficient communication and task completion. It is also visible in the Assigned user's Account Request notifications.
Permissions
The following permissions are required to use the Add Account Request feature:
| Permission ID |
Permission Name |
5
|
View Account |
6
|
View Site |
383
|
Add/Edit Account Request |
Related Articles
Account Request Management
Basic Navigation
Account Request Type Setup
Customer Portal - Submit a Request


