User Accounts
Last Modified on 08/20/2025 10:46 am PDT
Pathway: Setup > System > User
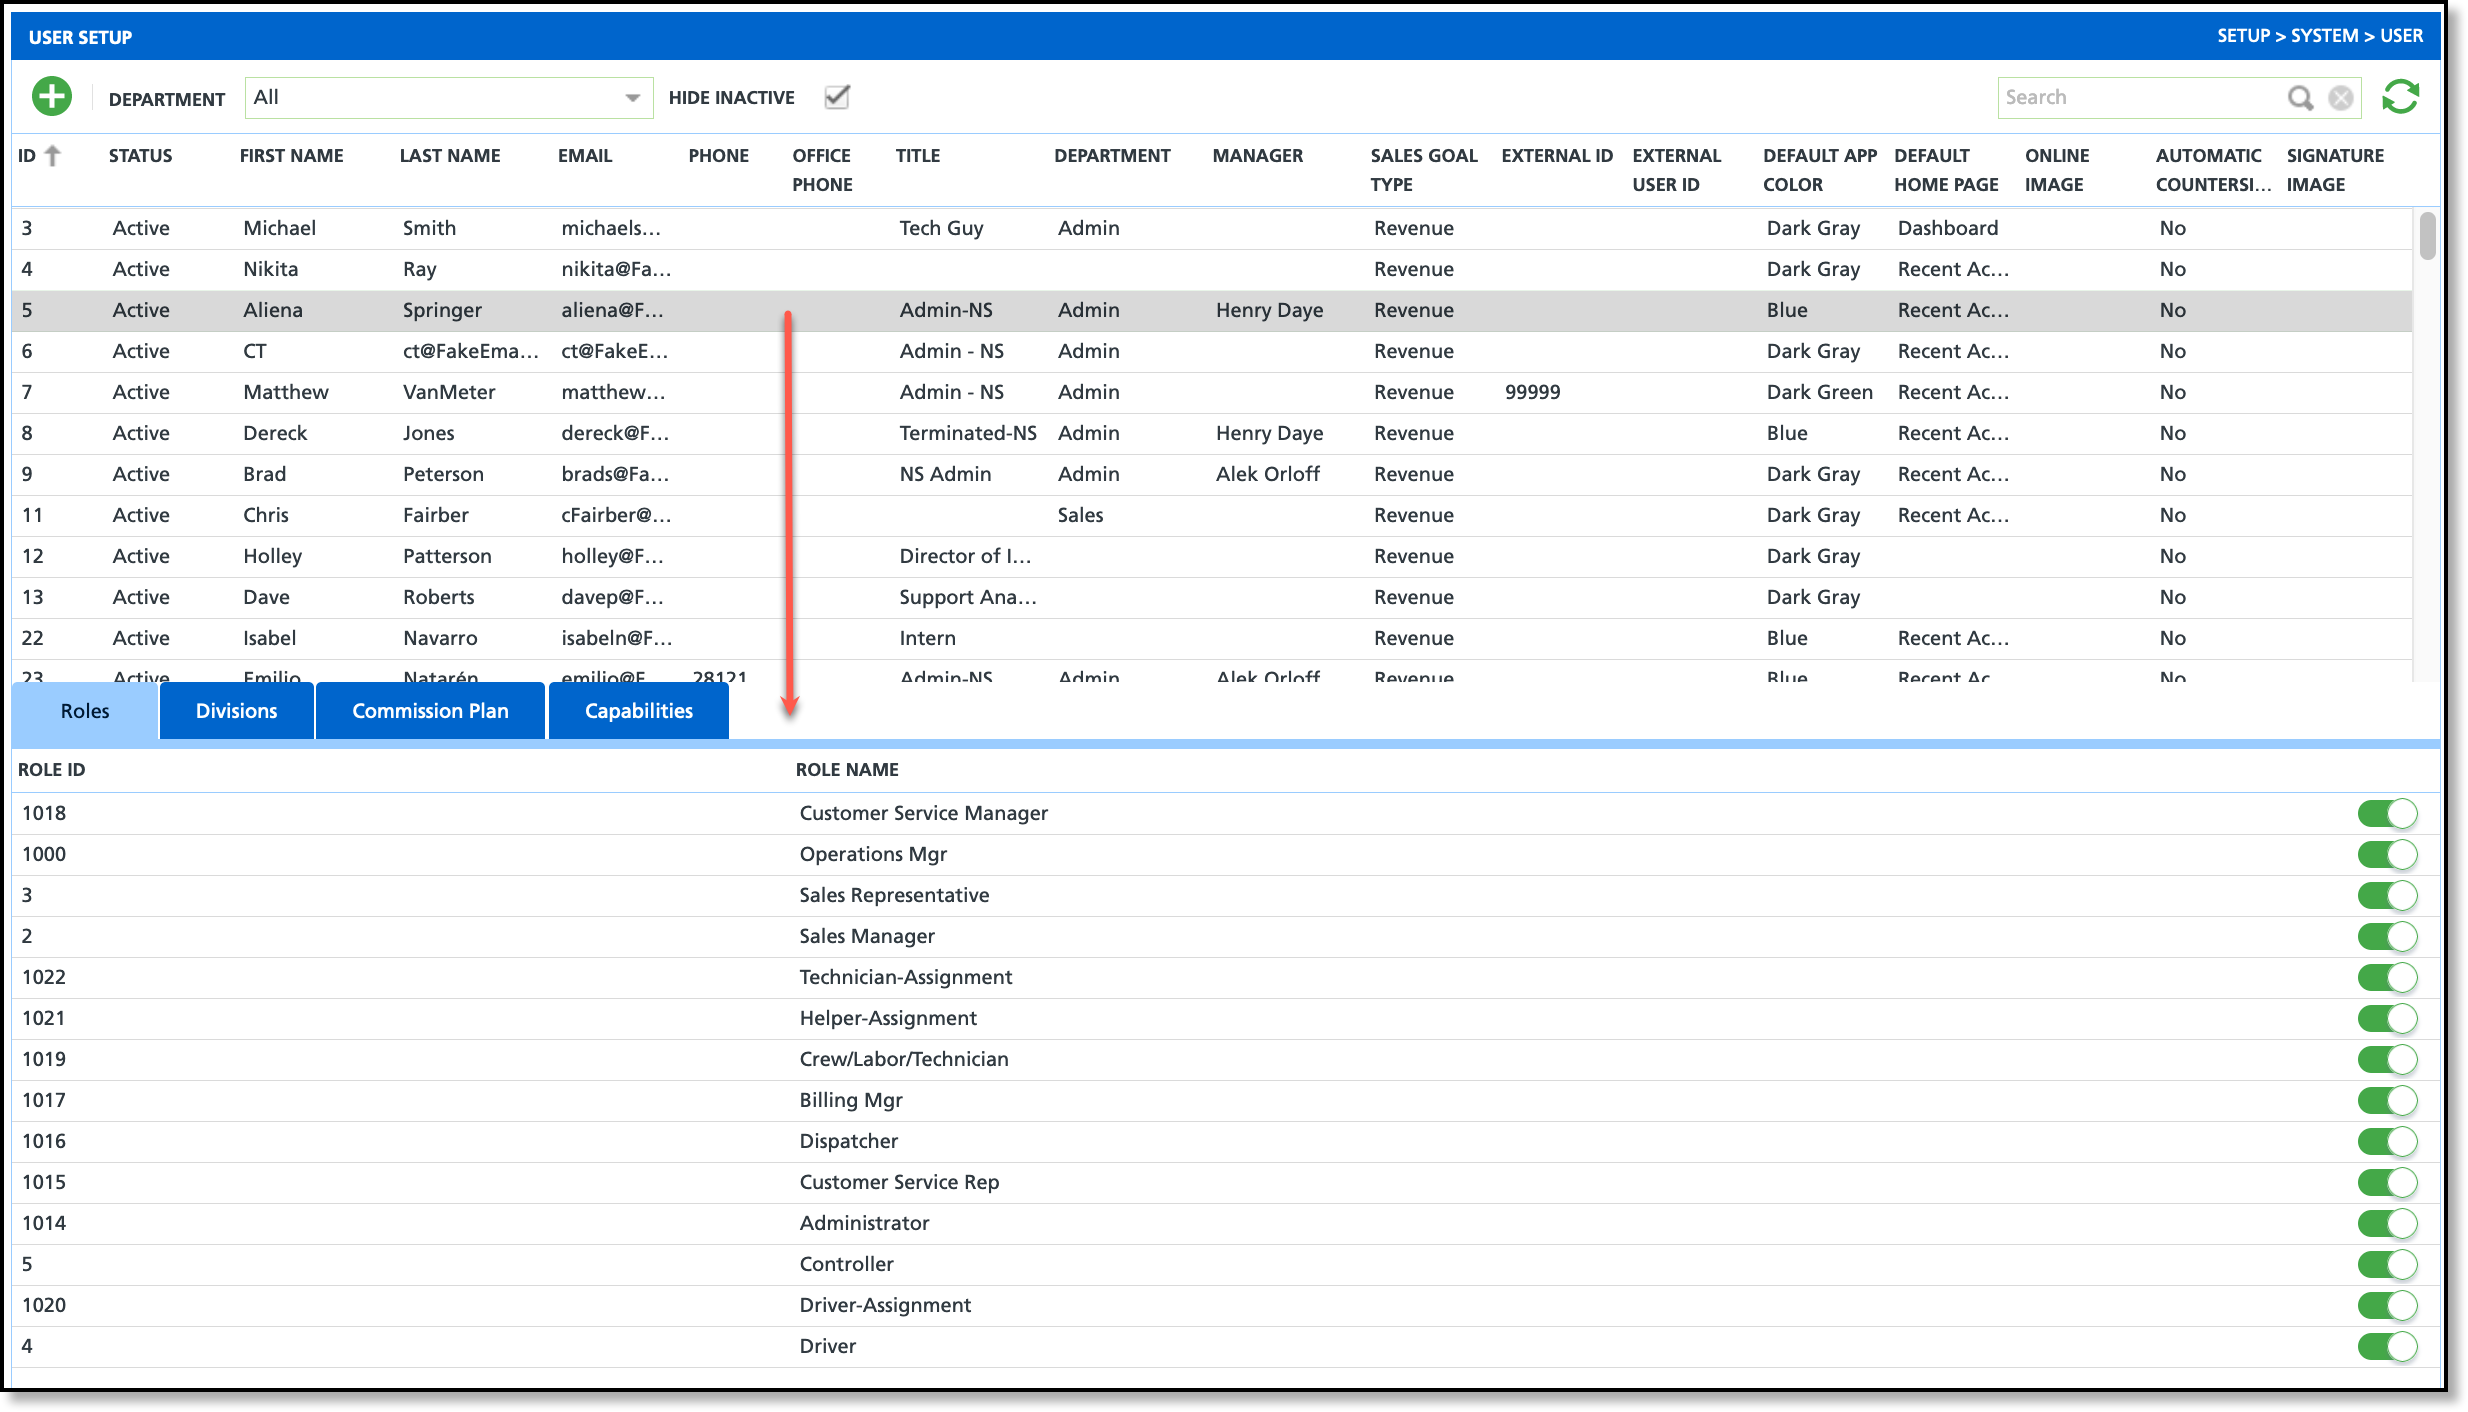
The User Setup screen manages the setup and activation status of all user accounts. In here, roles and division access can be added and removed from a user's account. This tool provides an option to filter the User Setup screen by department and defaults to hide inactive accounts from view.
Permissions
The following permissions are required to add and edit user accounts:
| Permission ID | Permission Name |
| 95 | Setup Main Menu |
| 120 | Setup \ System and Security |
Add a New User
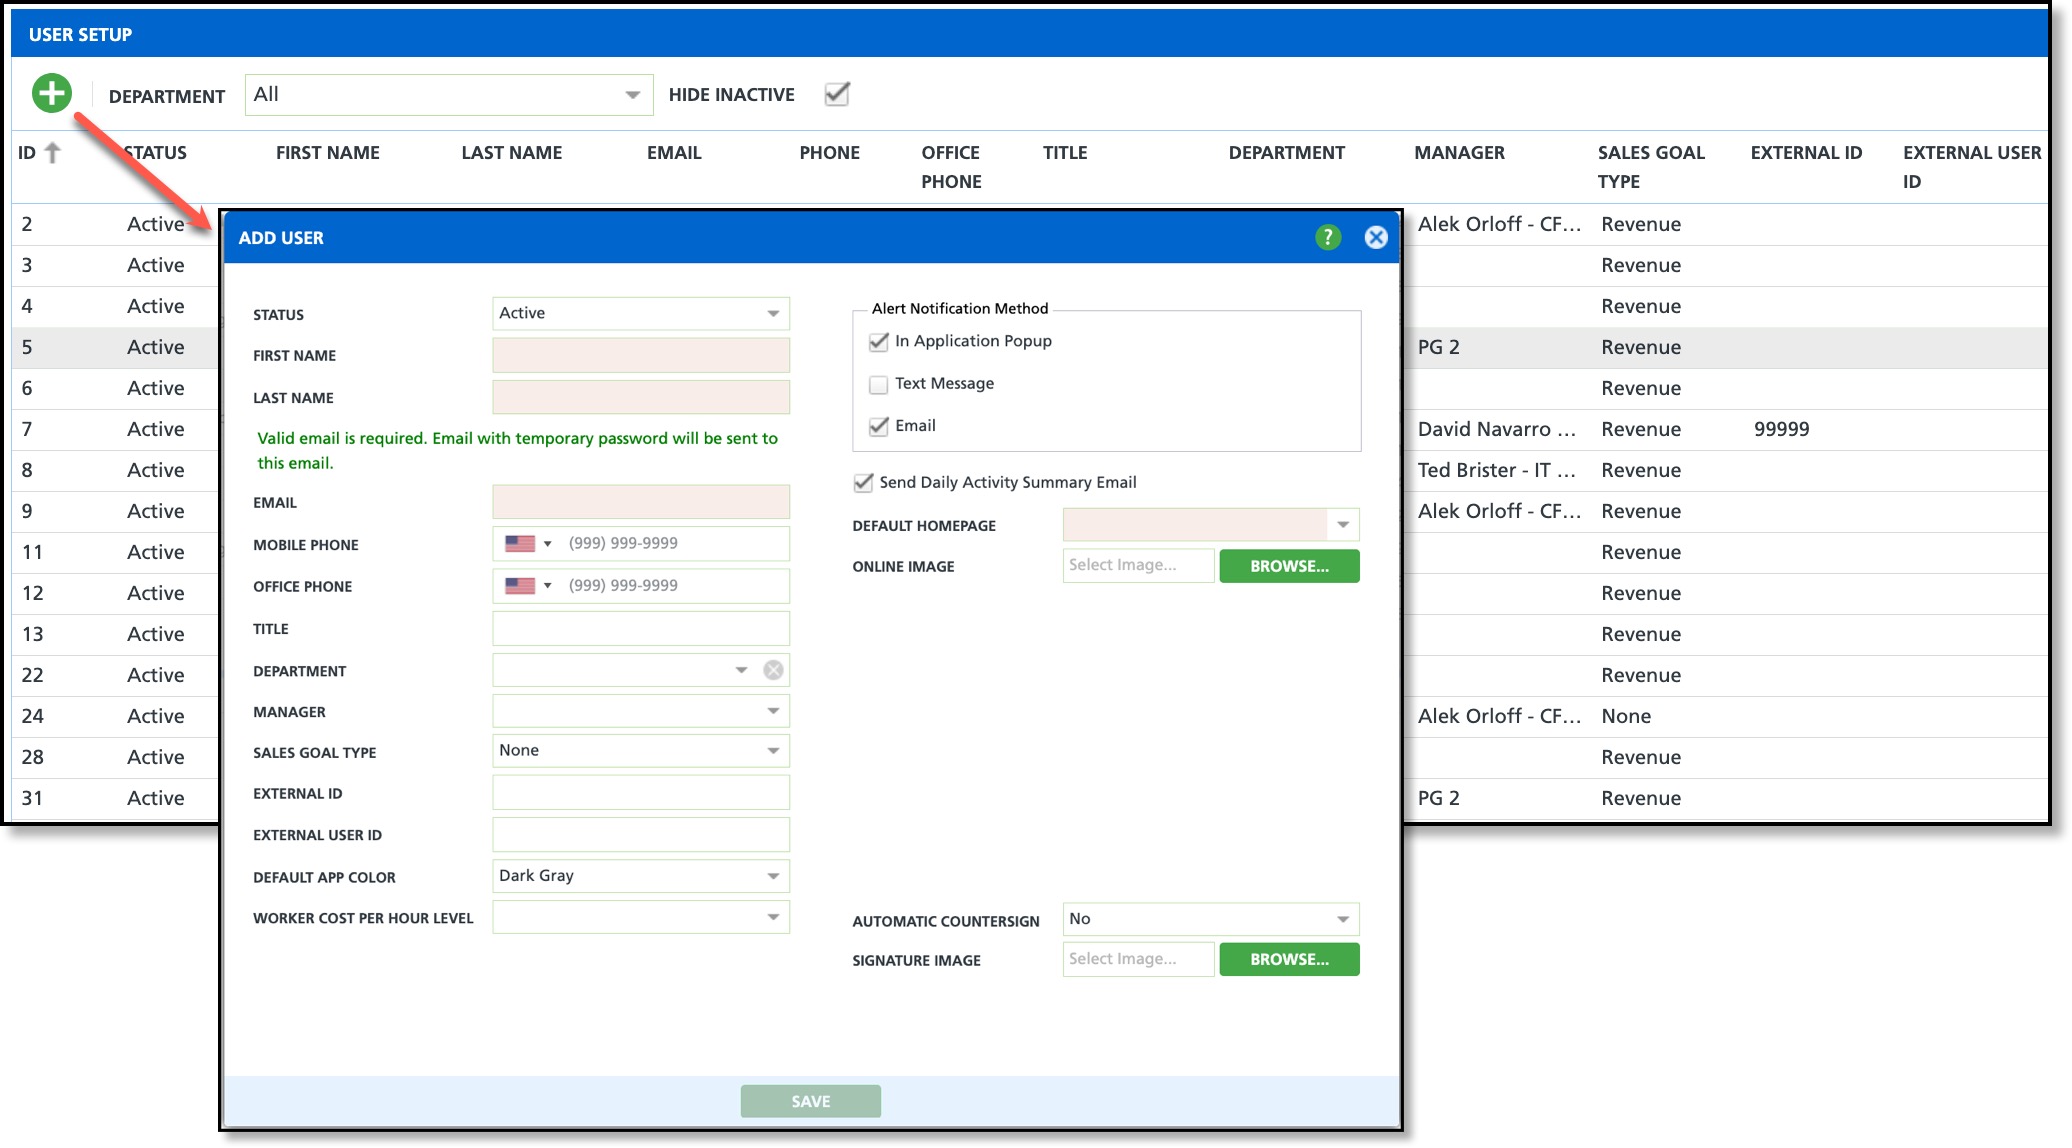
The following process applies to the creation of new user accounts. Fields highlighted in red are required.
Field Descriptions
| Field | Description |
| Status | Status refers to the current state of the individual account within the system. An active account allows users to access and use associated tools and features, while an inactive account indicates deactivated access. |
First Name / Last Name
Required | Fields to enter the user's first and last name. First and Last name display in various areas the user's name is referenced in the application. |
Email
Required | Enter a work email for the user. |
| Mobile Phone | The user's cell phone number. The system will not allow a save if the phone number is not a registered and active number. |
| Office Phone | Option to add a user's office phone. |
| Title | Option to add the user's title. When a title is entered it will display beside the user's name in various screen locations. Example: Dispatch |
| Department | The user's department determines the specific area they work in. Application tools such as Tasks provide the option to filter and view or assign responsibilities based on the department. |
| Manager ID | Option to enter the ID of the manager the user reports to. |
| Sales Goal Type | Preset to display 'Revenue'. |
| External ID | Option to enter an ID. |
| External User ID | Option to enter an external User ID for third party systems. |
| Default App Color | Controls the color schema of the user's application. Options include:- Blue - Headers and tabs will display blue.
- Dark Gray - Headers and tabs will display gray.
- Dark Green - Headers and tabs will display green.
Users may also change their default app color from their User Profile. |
| Worker Cost Per Hour | Option to record the worker's pay grade. Selection options for this drop down are created in Setup > Operations > Equipment Maintenance > Worker Cost Per Hour |
| Alert Notification Method | Identifies which method the user should receive alert notifications from the system. Options include:- In Application Popup
- Text Message- Must be a valid phone number for a device that can receive text messages.
- Email- A valid email address must be entered.
|
| Send Daily Activity Summary Email | Emails a summary of the Recent Activity home screen to the user. |
Default Homepage
Required | Determines what homepage the user will see upon logging in to their application. Options include:- Dashboard
- Recent Activity
- Sales Representative
* Users can temporarily change their homepage view by right-clicking on the Home module and selecting another option. Users may also permanently change their default homepage from their User Profile. |
| Online Image | Option to upload an image that will display in Navu Chat by the user's name.
Users may also change their online image from their User Profile. |
| Automatic Countersign | Option for user's to enable automatic countersigning for contracts and other system prompted signature requests.
Users may update the Automatic Countersign option from their User Profile. |
| Signature Image | If Automatic Countersign is set to 'Uploaded Signature', browse and upload the signature here.
Users may also update their signature image from their User Profile. |
Assign Users Roles
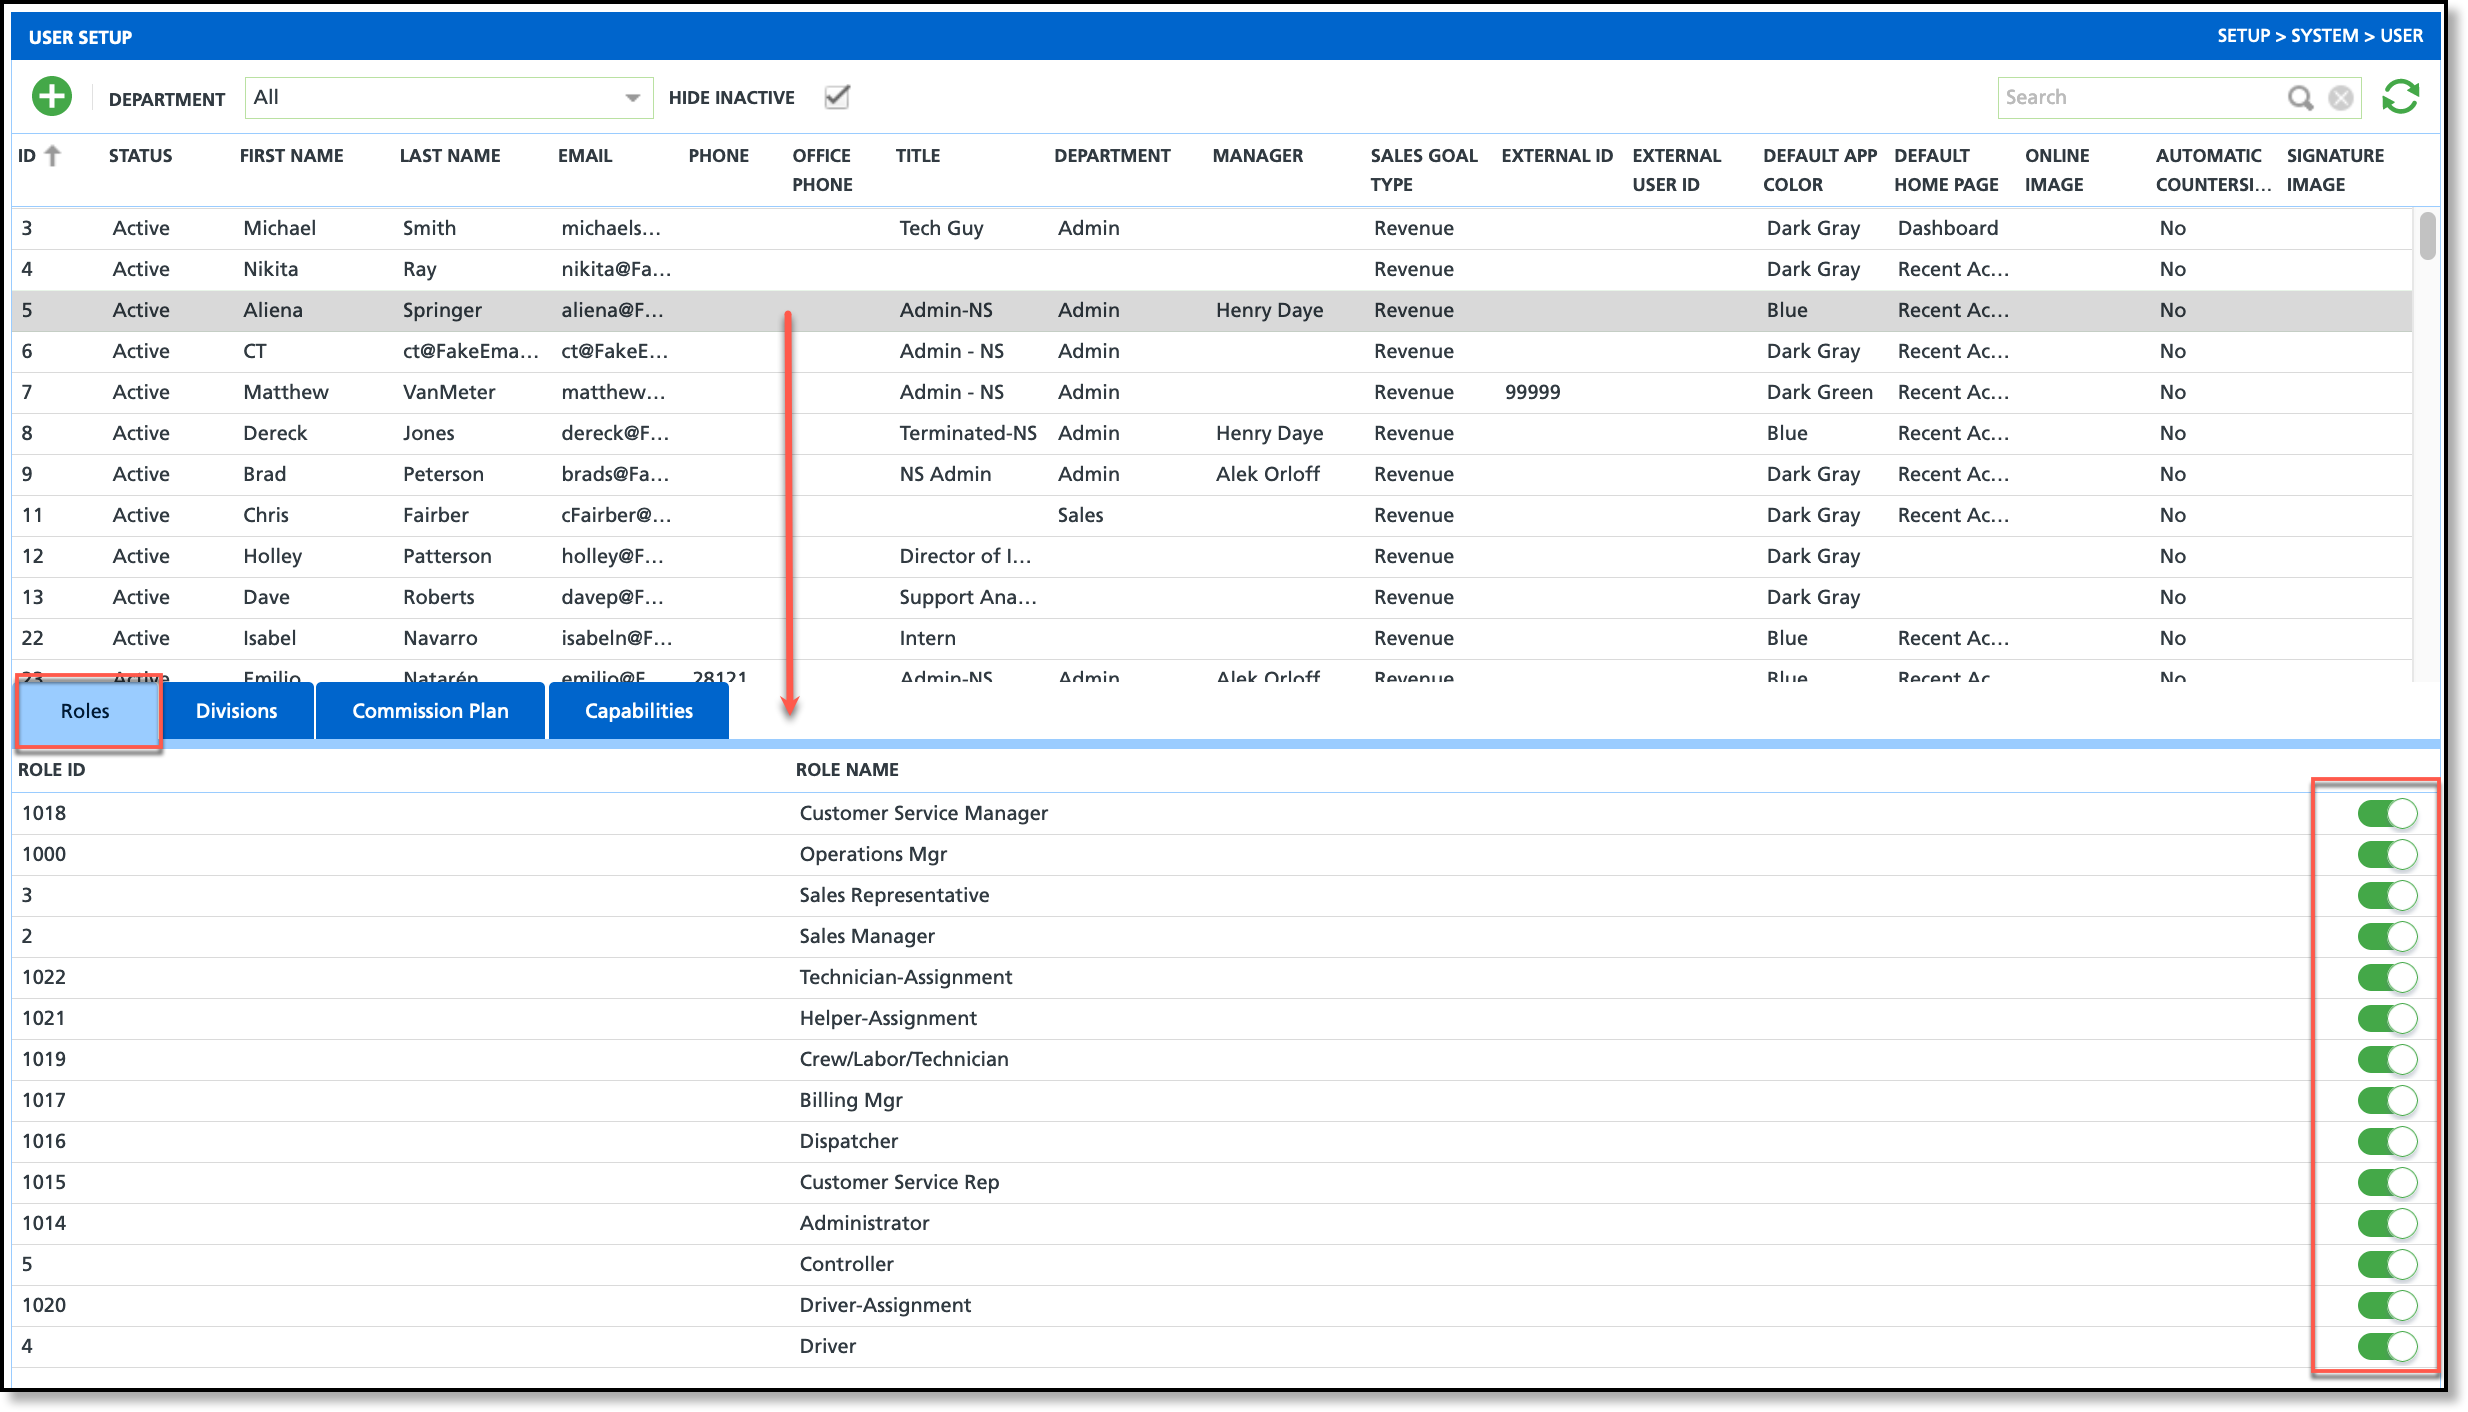
Roles are grouping of permissions users must be assigned to work within the Navusoft application. Roles are created and maintained by a system administrator and display under the Roles tab in a user's account.
Add/Remove Roles
- Select the user account you would like to assign roles to from the upper grid.
- Select the Roles tab to display the list of roles in the lower grid.
- Use the toggle buttons associated to the roles to either add or remove them from the user's account.
Related Articles:
Role Setup
Permission Setup
Assign Users Divisions
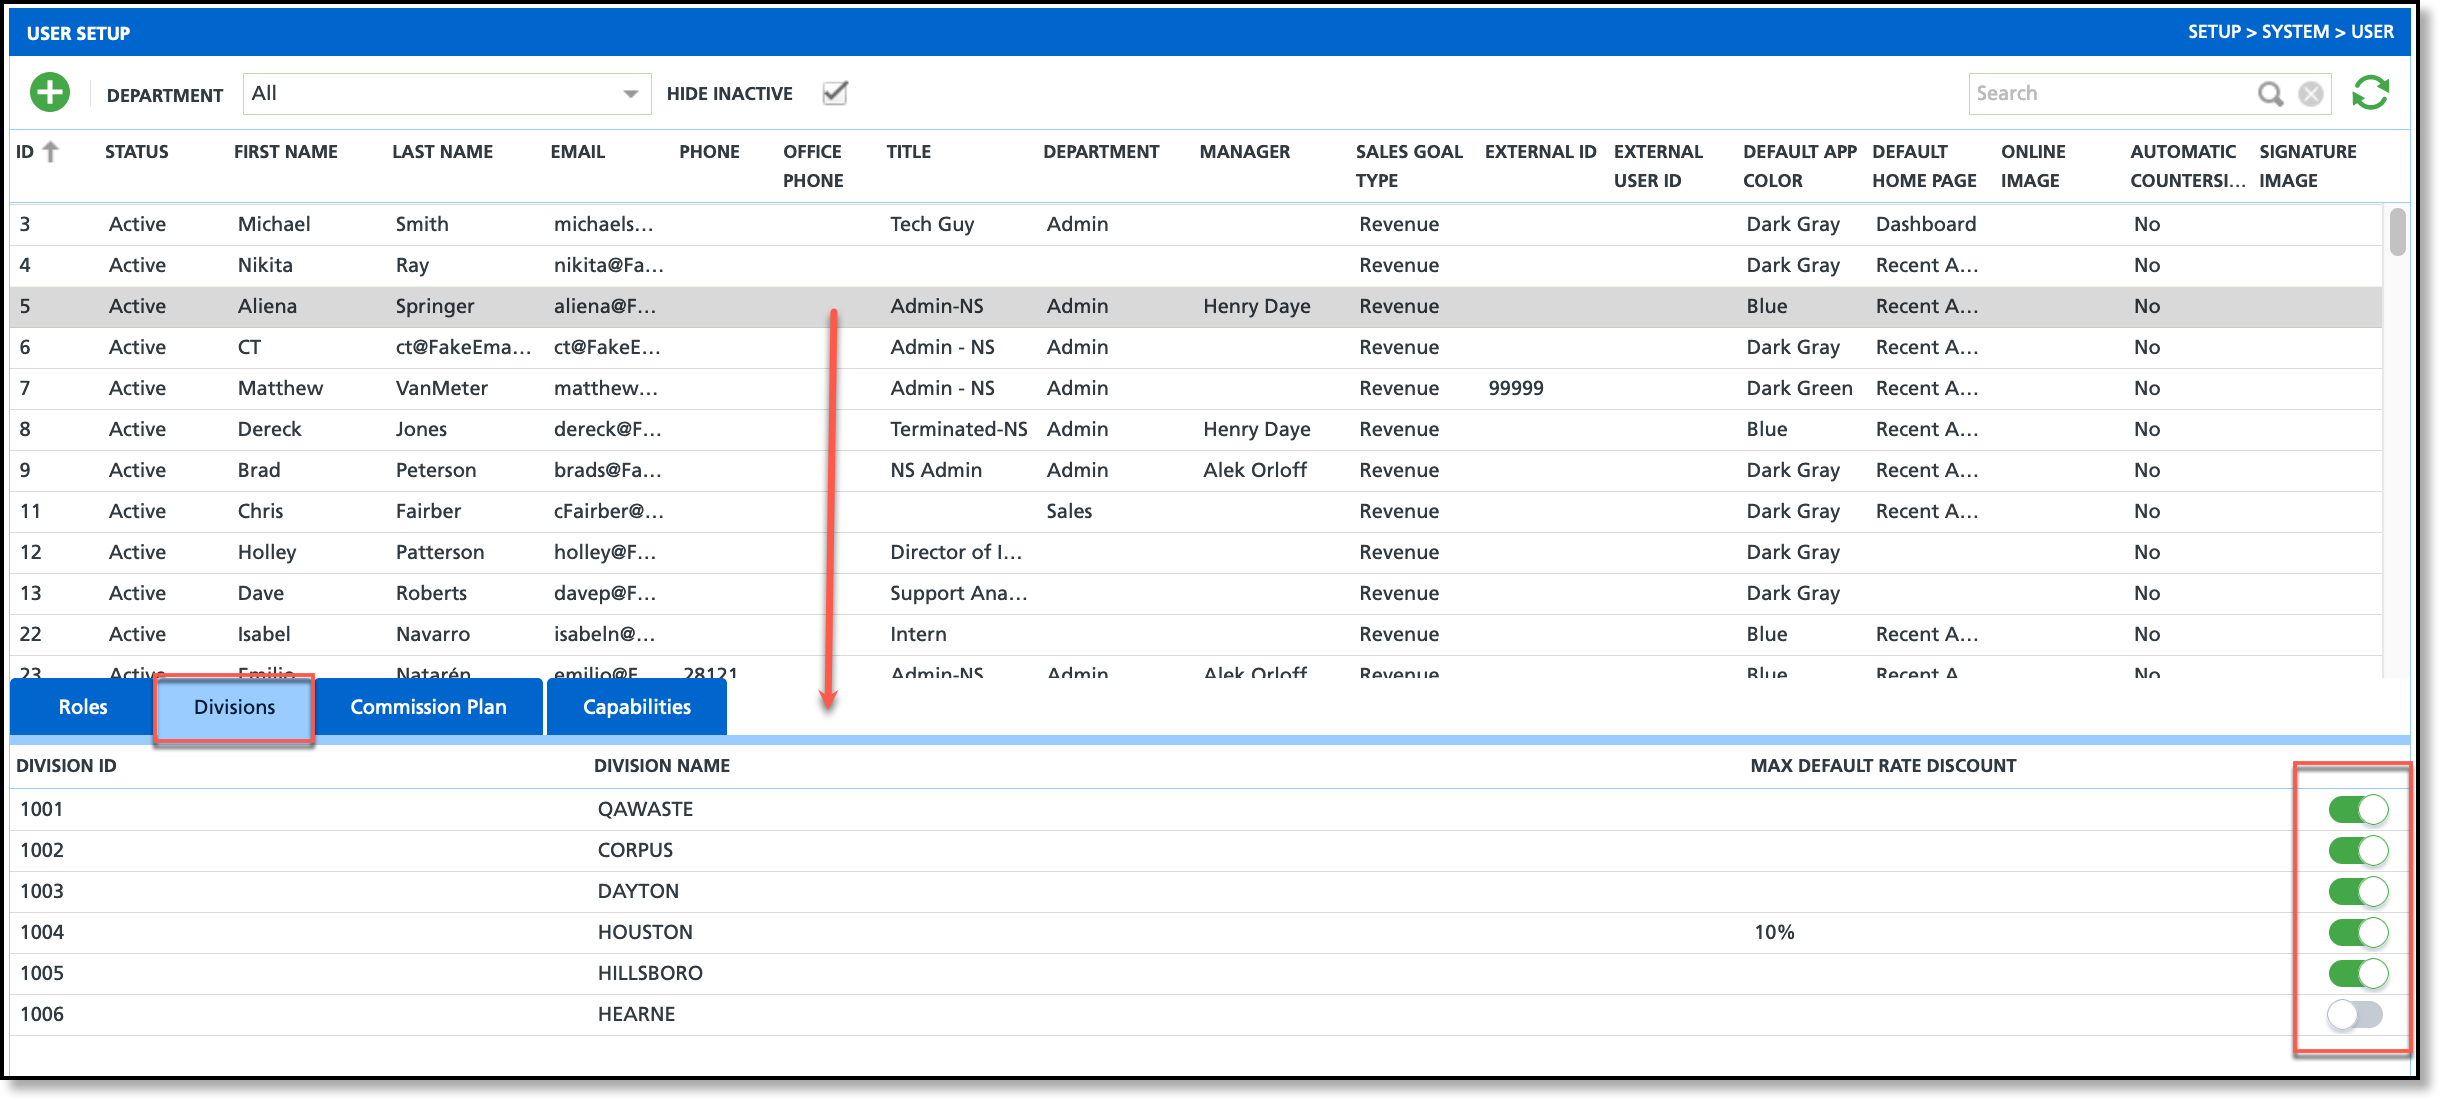
Divisions represent distinct operational locations, regions, or municipalities where a company serves its customers. They allow companies to effectively cater to specific areas. For instance, a waste management company may establish a division in Houston to serve residents there, while maintaining another division in Austin for the Austin residents. Each division is associated with a user's account, granting them access solely to the information pertaining to that particular division.
Manager User Division Assignment
- Select the user account you would like to assign Divisions to from the upper grid.
- Select the Divisions tab to display the list of divisions in the lower grid.
- Use the toggle buttons associated to the divisions to either add or remove them from the user's account.
Related Articles:
Division Setup
Inactivate a User
To prevent unauthorized access from employees who have left, an employee's user account should be inactivated upon their employment end date.
Consider also removing an inactive or terminated employee from the Roles and Divisions to which they are assigned.
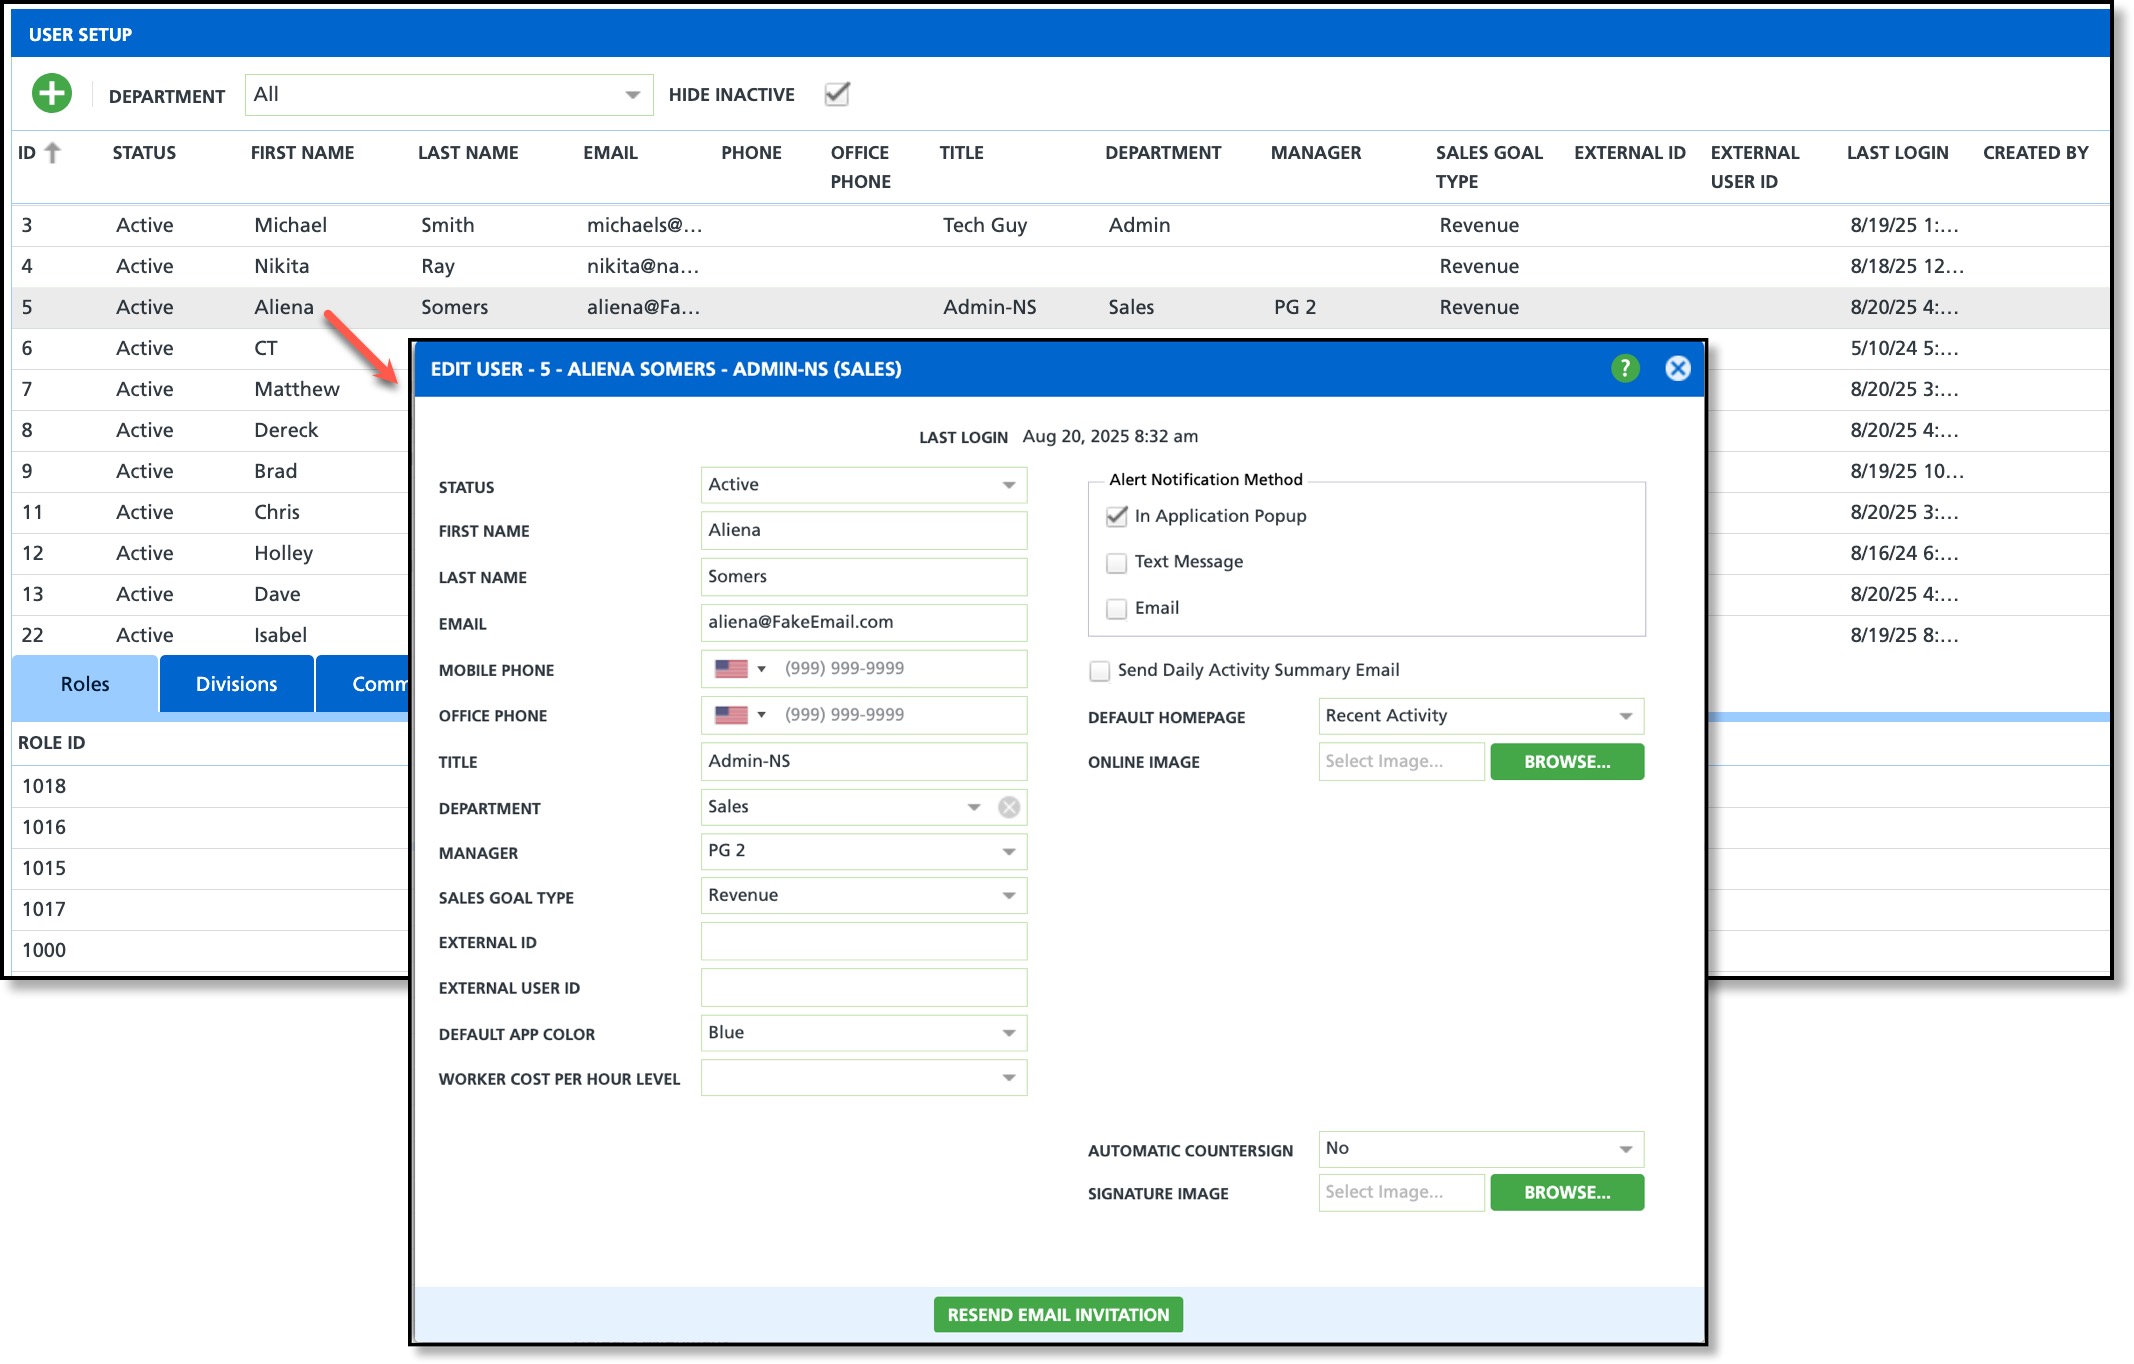
- Double-click on the user to display the Edit User screen.
- Select Inactive from the Status drop down field.
- The system auto-saves upon selection.
- Close the Edit User screen and confirm the Status column in the User Setup screen is now displaying as 'Inactive' for the affected user account.
- By default, inactive accounts are hidden. Uncheck the 'Hide Inactive' check box from the top of the User Setup screen to search and view inactive user accounts.
Related Articles:
User Security Basics
Permission Setup
Role Setup


