Route Setup
Last Modified on 10/12/2026 7:49 am PDT
Pathway: Setup > Operations > Route
Route Setup establishes the routes used for servicing sites. Active routes display in Dispatch and Active Dispatch once a service record has been assigned.

Permissions
The following permissions are required to use the Route Setup screen:
| Permission ID |
Permission Name |
|
24
|
Setup \ Operations |
Route Setup Filters
Use the filtering options displayed at the top of the screen to limit the routes that display.
| Filter |
Description |
Division
|
Filters to display only the routes assigned to the Division selected.
|
LOB
|
Filters to display only the routes assigned to the Line of Business selected. |
Add Route
Add Route is used to create new routes for assigning and servicing sites from. To edit an existing route, double click on the route record you would like to edit and the Edit Route screen will display.
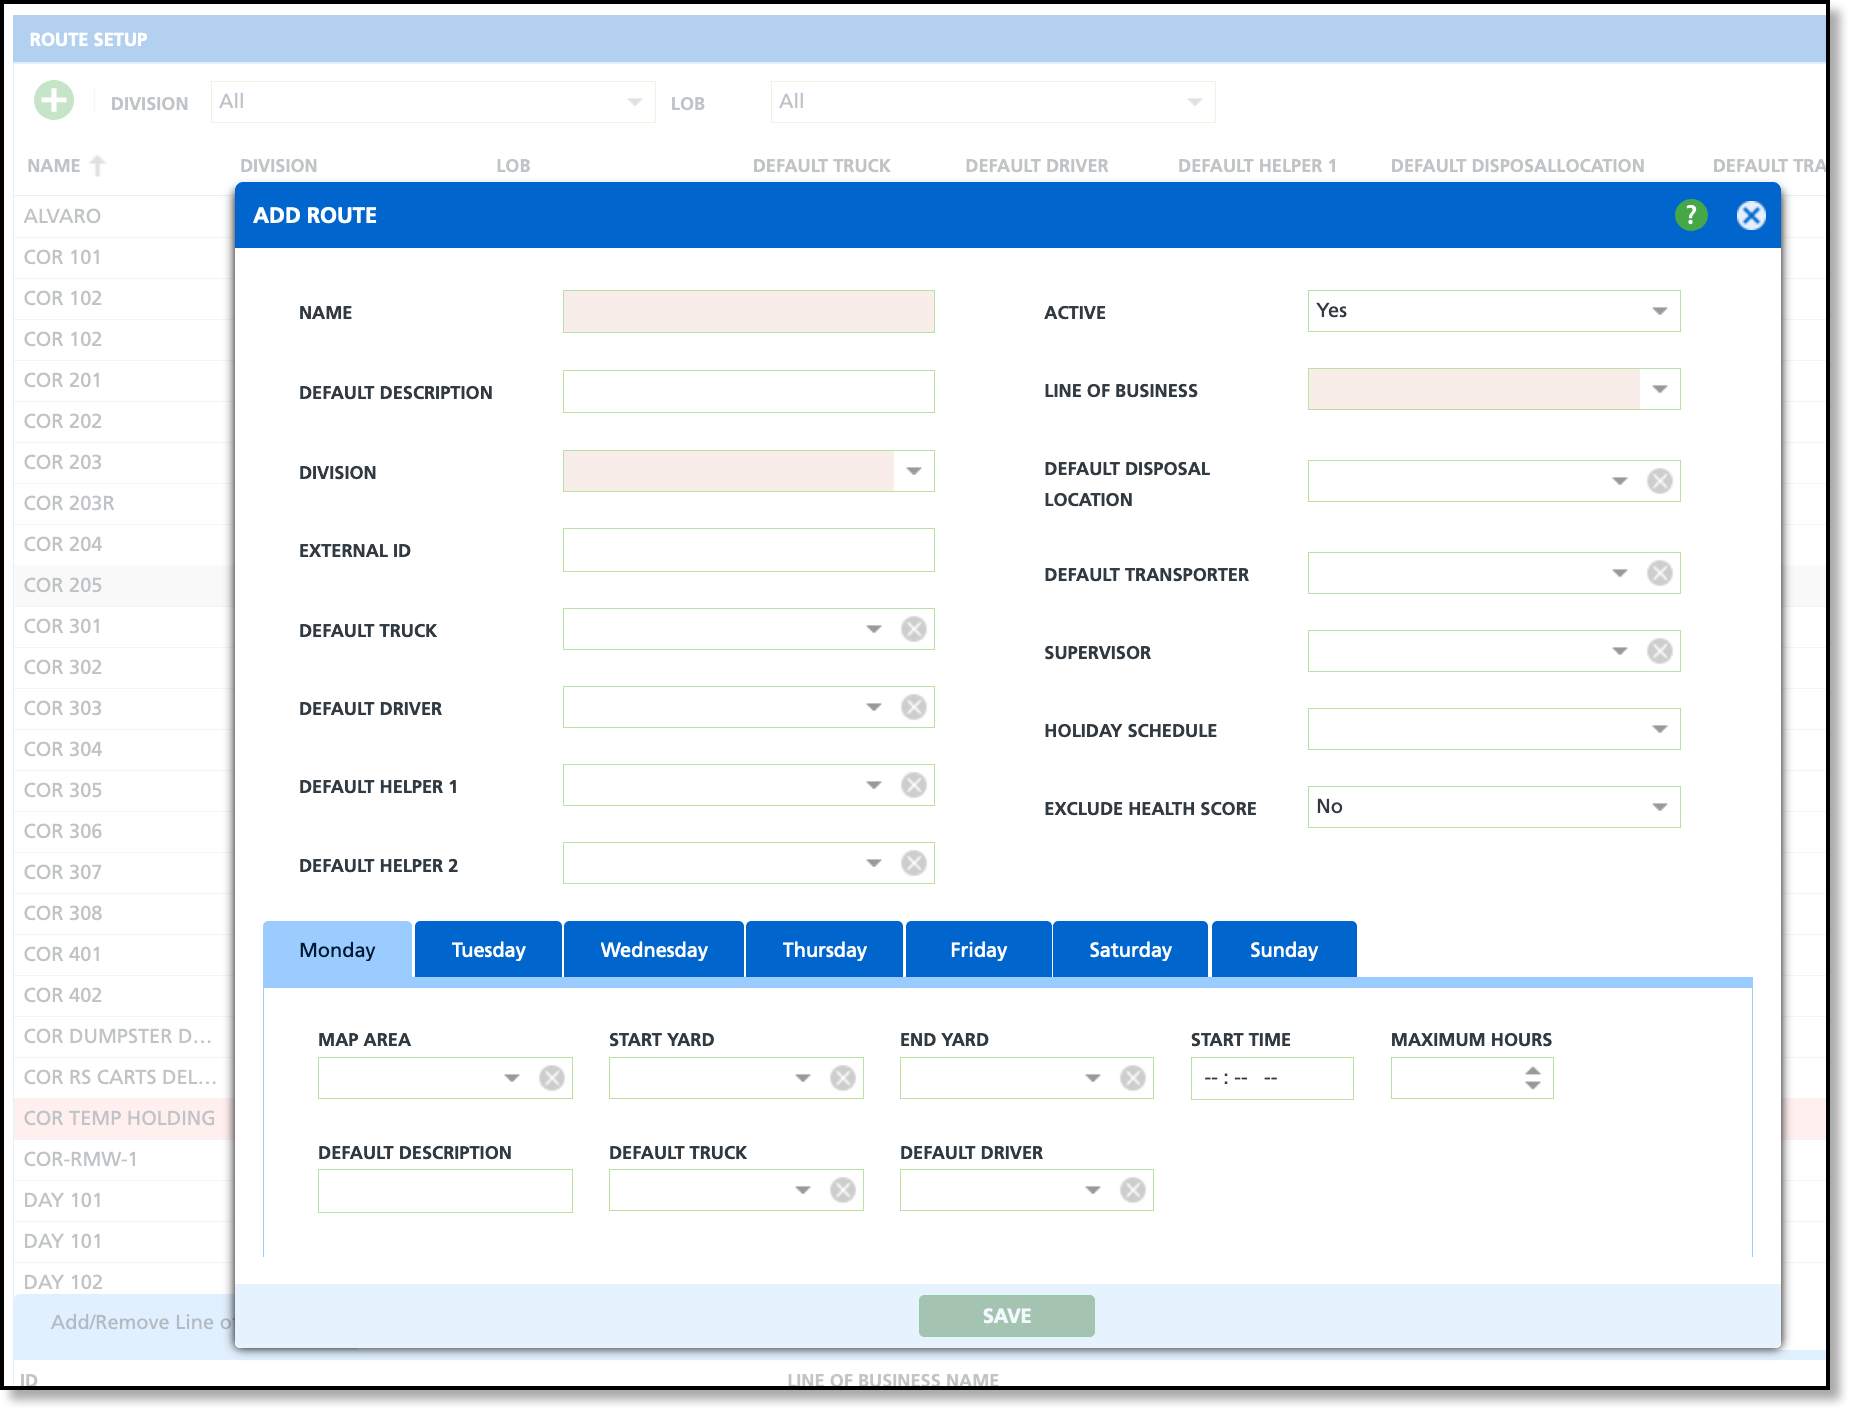
Add Route Field Descriptions
| Fields |
Descriptions |
Name
Required
|
The name of the route.
|
| Default Description |
Option to add a customized label that will display in parenthesis after the route name in dispatch.
|
Division
Required
|
The Division the route is assigned to. Routes can only be assigned to sites in the same division.
|
External ID
|
The external identification number used for mapping and importing a route.
|
Default Truck
|
Option to assign a specific truck to route. Default truck assignments display in Dispatch where they can be edited as needed. For more details on trucks, see Truck Setup.
Note: A selection from Division and Line of Business are required for trucks to display in the selection drop down. |
Default Driver
|
Option to assign a specific driver to a route. Default driver assignments display in Dispatch where they can be edited as needed.
|
Default Helper 1 and 2
|
Option to assign a helper or assistant to the route. Default helper assignments display in Dispatch where they can be edited as needed.
|
Active
|
Indicates if the route is active or inactive. Inactive routes do not display in the Route drop down field in Add/Edit Service Record. |
Primary Line Of Business
Required
|
The Line of Business the route is assigned and allows for filtering on the Dispatch screen and in reports.
|
Default Disposal Location
|
Option to assign a default disposal location to a route. A selection here populates the Destination / Origin field on the Add Route Disposal screen in Dispatch (Disposal column). For more details on disposal locations, see Facility Setup.
|
Default Transporter
|
Option to assign a default transporter to identify the company that will be picking up and transporting the waste. *Applies to regulated waste. |
Supervisor
|
Indicates who will manage the route and any task assignments that come back from the driver.
|
Holiday Schedule
|
The Holiday Schedule the route will follow. Helps prevent dispatch operators from scheduling the route on a day that is an observed holiday.
|
Exclude Health Score
|
|
| Weekday Tabs |
Start Yard
|
The Yard the truck will be leaving from to begin the route for that day. Additional setup is required in Setup > Operations > Yard. |
End Yard
|
The Yard the truck will return to after the route is complete for that day. Additional setup is required in Setup > Operations > Yard. |
Start Time
|
The time the route will start on that specific day.
|
Maximum Hours
|
The maximum amount of time to service the route and establishes a time frame using the time entered in Start Time.
|
| Default Description |
Option to add a default description specific to a day of the week. When a description is added, it will display in parenthesis behind the route name in Dispatch.
|
| Default Truck |
Option to assign a default truck to a route for a specific day of the week.
|
| Default Driver |
Option to assign a default driver to a route for a specific day of the week.
|
Add Route
- Select the green + to open the Add Route tool.
- Complete the following required fields:
- Enter the Name for the Route.
- Select the Division the Route is assigned to.
- Set the Line Of Business for this Route.
- Complete additional fields based on your company's setup requirement.
- Click Save when finished.
Add/Remove Line of Business
In certain cases, trucks may be equipped to handle multiple lines of business on the same route (for example, a shredding truck servicing sharps). When this occurs, additional lines of business can be assigned from the Add/Remove Line of Business tab. To add one, select a route from the upper grid to display the tab in the lower grid, then use the toggle buttons to add or remove lines of business as needed.
Route Goals
Route goals can be set and configured periodically throughout the year and tailored by the Day of the Week and Effective Date. Future enhancements will display these goals on Route Sheets and the app giving drivers clear expectations for the shift completion times, stops, and distance.

Route Goals can be created and then modified but they can not be deleted. Not allowing a delete provides a historical audit of past goals.
Add Route Goal
- Click the green + icon to open the Add Route Goal popup. The Route field auto populates and cannot be modified.
- Enter the following required fields:
- Day of Week: Specifies the day the goal applies to.
- Effective Day: Sets the starting date for the goal.
- Current Stop Count: Target number of stops for the route.
- Expected Hours: Expected time to complete the route.
- Expected Distance: Expected mileage/distance that will be traveled for the route (automatically displays using the system's default UOM).
- Expected Facility Trips: Expected number of trips to disposal or transfer facilities.
- Click Save. The goal will be added with a Created By and and Created timestamp.
Related Articles
Truck Setup
Yard Setup
Facility Setup
Dispatch Basics


