Refund Request Management
Last Modified on 07/28/2026 5:14 am PDT
Pathway: Accounting > Refund Request Management
The Refund Request Management screen is used to review and process refund requests submitted through the Refund Request feature available from an account's menu. Refund requests may be created for reasons such as closing an account and returning unapplied deposits or issuing refunds for payment transactions in AR History. Once submitted, the request is routed to this screen for review and processing by an authorized user.

Permissions, Logic and Setup
Permissions
The following permissions are required to process refund requests:
| Permission ID | Permission Name |
| 465 | Create and Submit Refund Request |
| 466 | Refund Request Management Screen |
| 467 | Approve or Reject Refund Request |
| 468 | Review Refund Request |
| 487 | Edit Issued Rebate / Refund Check
|
Logic
- The user's role (Setup > System > Role) must have a Refund Approval Limit defined.
- If a user does not have any of the Refund Request permissions, the Edit Refund Request screen is view-only.
- Status logic based on the current status and the permission the user has:
| Current Status of Request | With Permission 465... | With Permission 467... | With Permission 468... |
Submitted for Review
| User can change status to Returned to Submitter or Voided | User can change status to Returned to Submitter, Rejected or Voided | User can change status to Reviewed (Submitted for Approval), Returned to Submitter, Rejected, or Voided |
| Reviewed (Submitted for Approval) | Status is read-only | User can change status to Returned to Submitter, Approved, Rejected, or Voided | User can change status to Returned to Submitter, Rejected or Voided
|
| Returned to Submitter | User can change status to Submitted for Review or Voided | User can change status to Returned to Submitter, Approved, Rejected, or Voided | User can change status to Reviewed (Submitted for Approval), Rejected, or Voided |
| Approved or Rejected | Status is read-only | User can change status to Returned to Submitter, Approved, Rejected, Issued, or Voided | Status is read-only |
| Issued | Status is read-only | User can change status to Voided | Status is read-only |
| Voided | Status is read-only | Status is read-only | Status is read-only
|
Setup Areas
Reason Code
The Reason filter limits the records displayed on each tab to refund requests created with the selected reason code. Reason codes are configured in Setup > System > Reason Code under the Refund Request type.
Review the
Reason Code Setup documentation to learn how reason codes are configured and how they are used throughout the application.

The reason codes displayed in this documentation are examples and may differ from those configured in your system.

Screen Overview
The Refund Request Management screen is organized into three tabs that guide a refund request through its lifecycle, from submission to review and final processing. Depending on the requested refund amount, additional approval requirements may be enforced to ensure compliance with user approval limits.
Review / Approval [tab]
Refund requests are displayed here when:
- The amount requested exceeds the requesting users Refund Approval Limit defined in the user role.
- The requested refund amount exceeds the Refund Amount Requiring Two Approvals setting defined for the division associated with the account.
- The request will remain in this tab-view until both required approvals are complete.
- The status of the request is: Pending Approval, Submitted for Review, and Returned to Submitter
Pending Issuance [tab]
Refund requests are displayed here when:
- Reviewed requests have met all approval requirements.
- The amount requested is below the requesting users Refund Approval Limit defined in the user role.
- In this case, the request will go directly to the Pending Issuance tab once the user has created the request for the account.
- The status of the request is: Approved
History [tab]
Refund requests are displayed here when:
- The status of the request is: Issued or Voided
- A voided status can not be changed and the request must be submitted again.
Approval Workflows and Setup Configurations
Refund requests do not all follow the same approval process. The workflow a refund request follows after submission depends on the requesting user's refund authorization limit and the approval settings configured for the account's division. Expand the workflow below to see how refund requests are processed based on your system settings.

No Approval Required
When the requested refund amount falls within the Refund Approval Limit configured in Role Setup for the submitting user's assigned role, the refund request is automatically approved and displayed on the Pending Issuance tab of the Refund Request Management screen.
One Approval Required
When the requested refund amount exceeds the Refund Approval Limit configured in Role Setup for the submitting user's assigned role, the refund request is first displayed on the Review / Approval tab of the Refund Request Management screen. Once marked approved, it will then move to the Pending Issuance tab.
Require 1 Approval (Setup)
Pathway: Setup > System > Division; Role
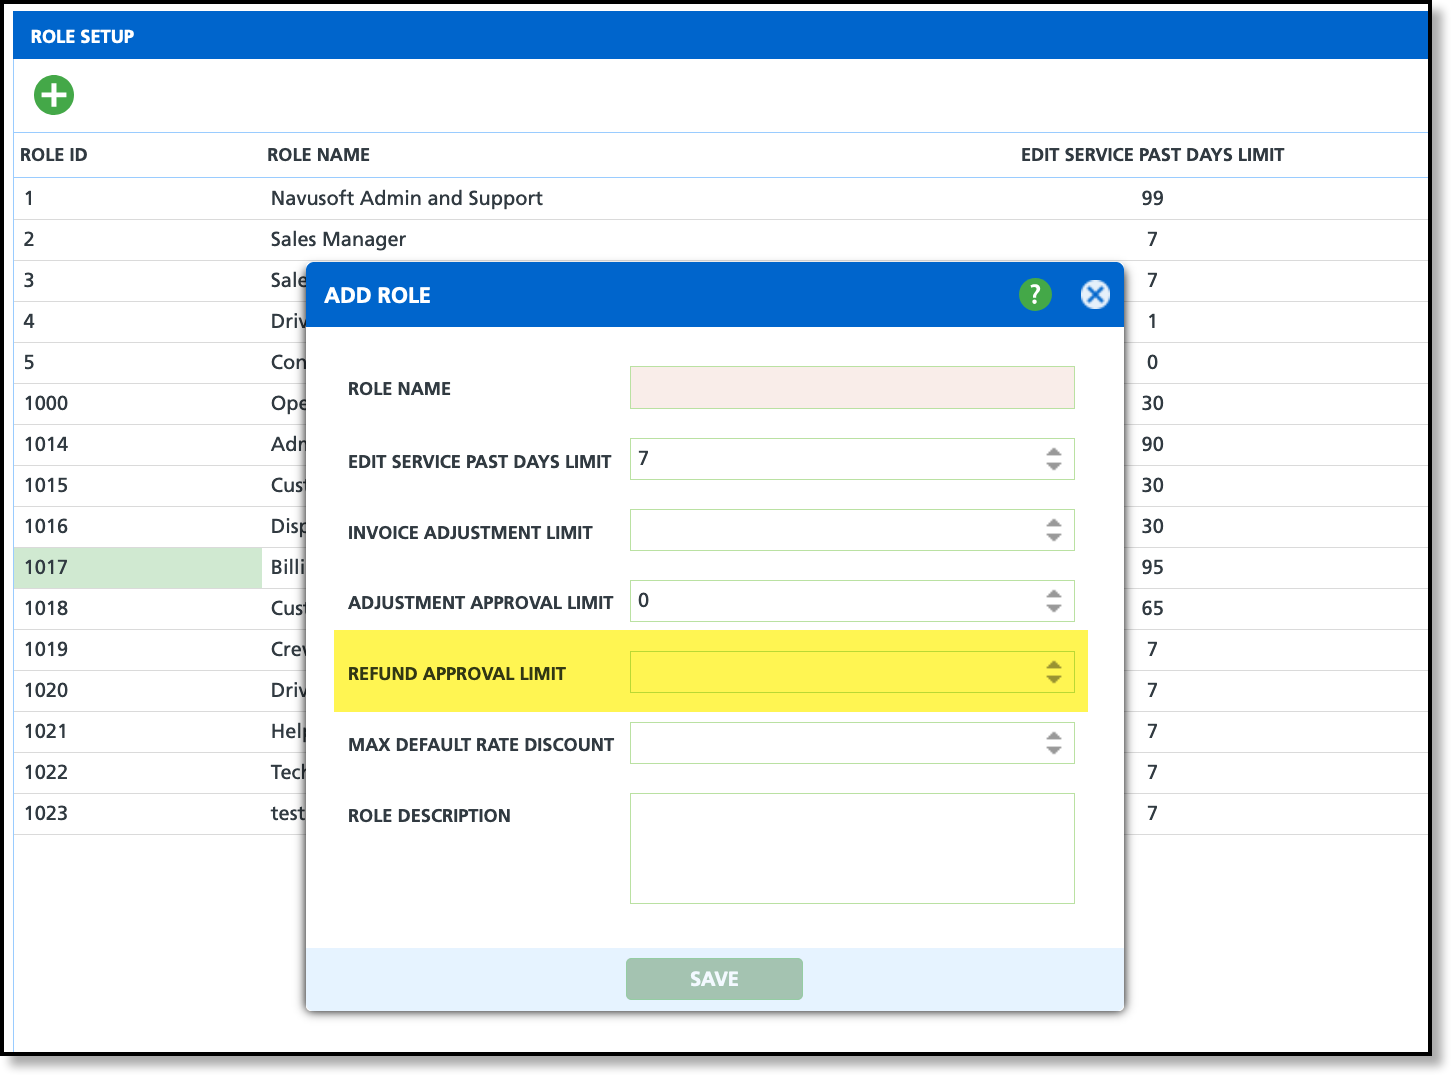
Role Setup
Set the maximum refund amount users assigned to the role are authorized to approve. When reviewing refund requests on the Review / Approval tab of the Refund Request Management screen, the Approve option is available only for requests that are within the user's approval limit.
Two Approvals Required
When the requested refund amount exceeds the Refund Approval Limit configured in Role Setup for the submitting user's assigned role and also exceeds the Refund Amount Requiring 2 Approvals set for the division, the refund request is displayed on the Review / Approval tab until approval from two different users has been met.
Require Two Approvals (Setup)
Pathway: Setup > System > Division; Role
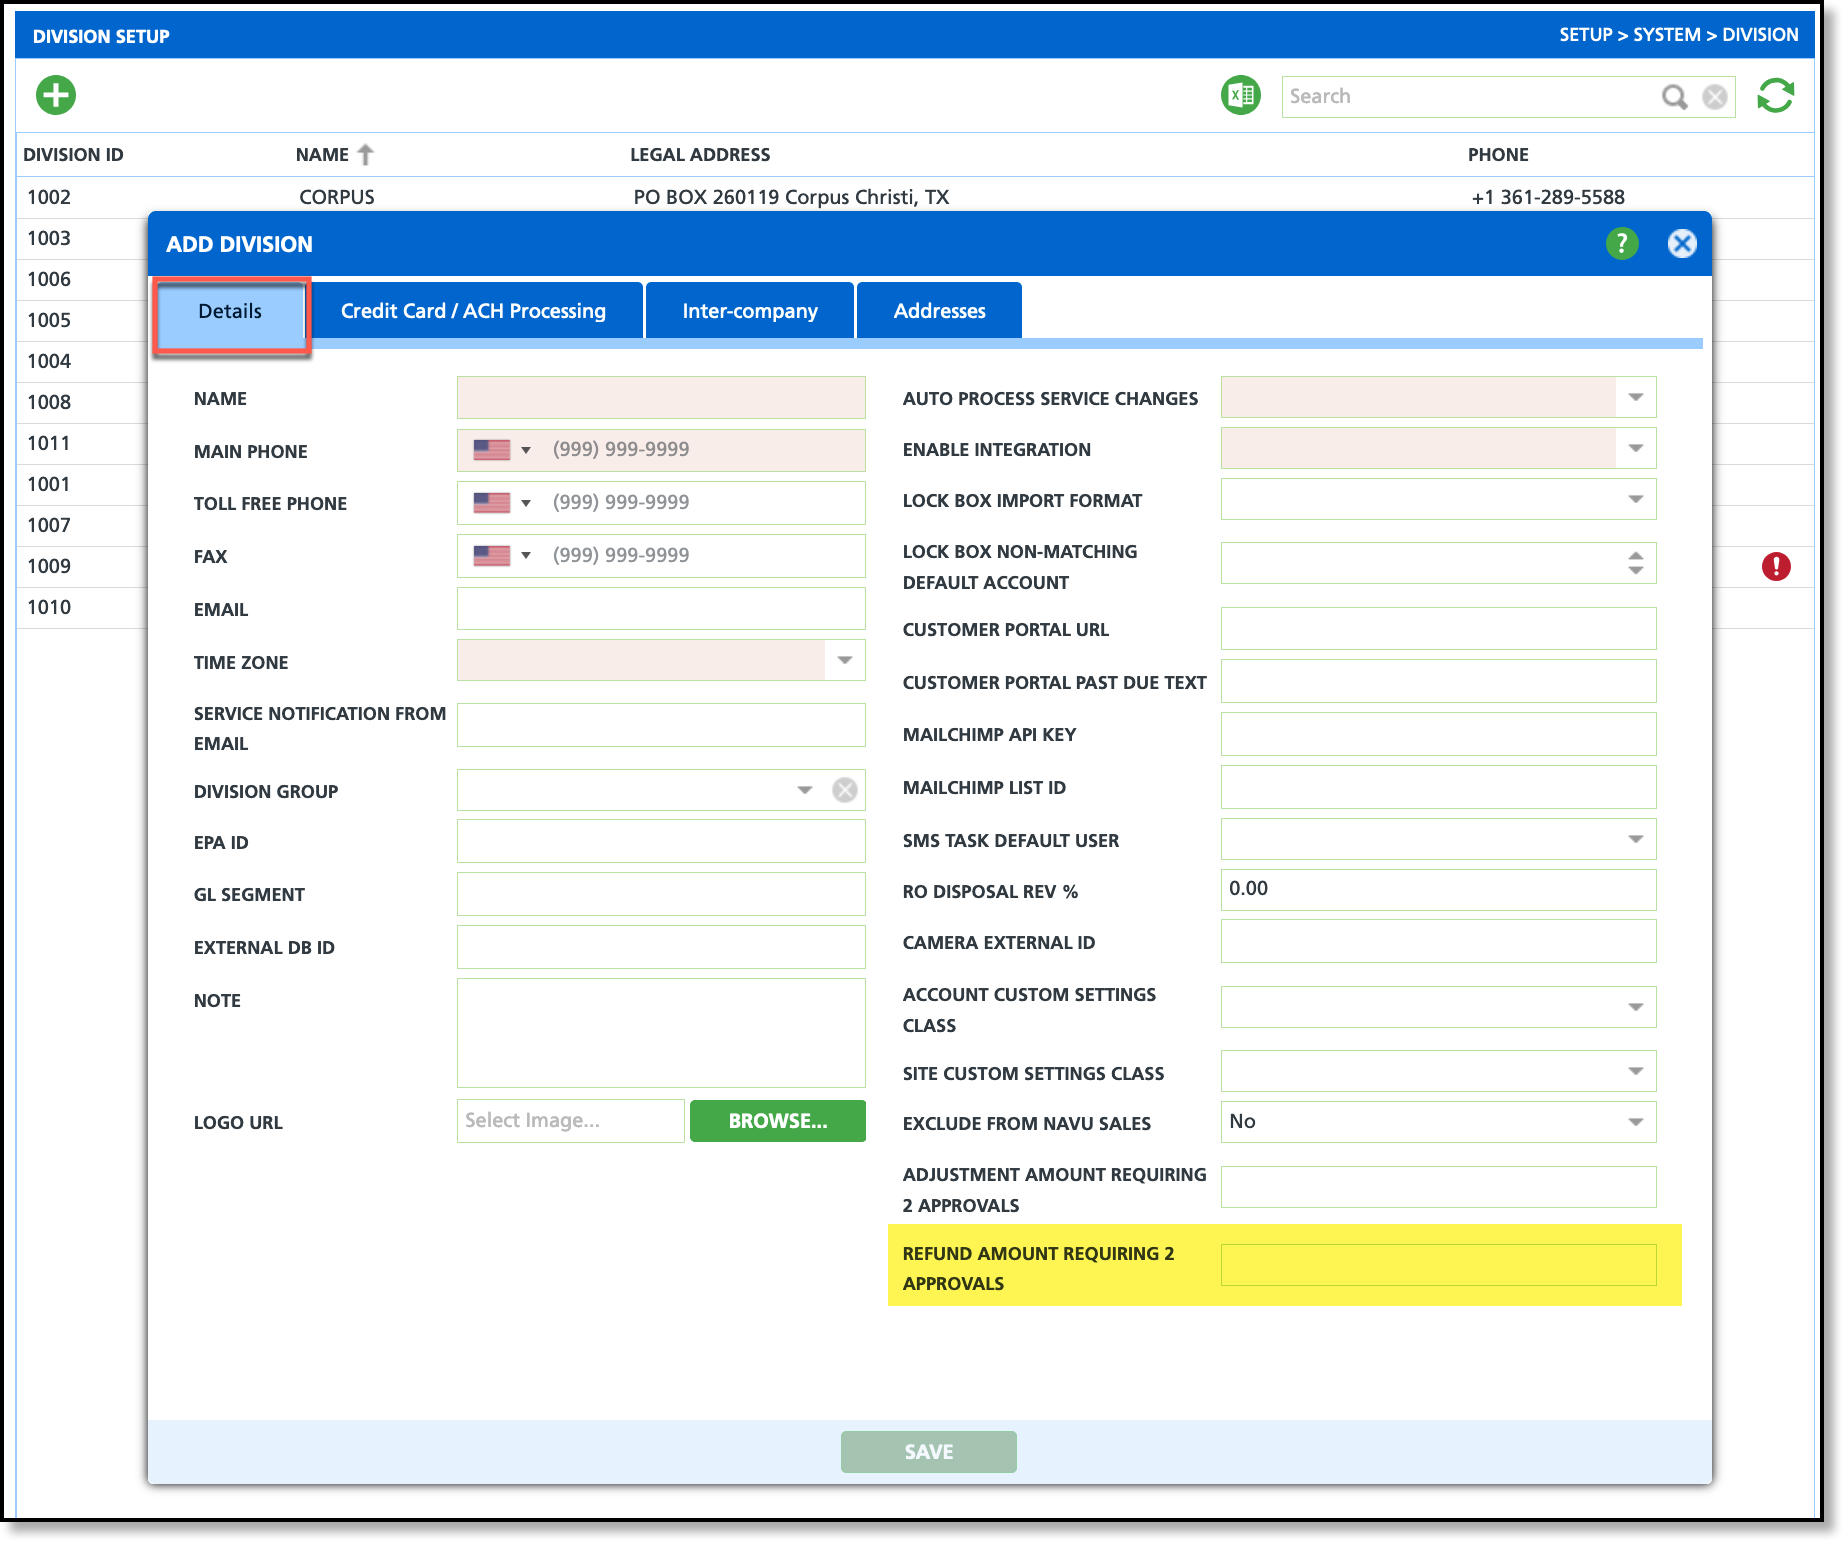
Settings in the Division and Role setup screens include an option to require a second approval for refund requests that exceed a specified amount before they can be processed.

Role Setup
In Role Setup, set the maximum refund amount users assigned to the role are authorized to approve. When reviewing refund requests on the Review / Approval tab of the Refund Request Management screen, the Approve option is available only for requests that are within the user's approval limit.
Division Setup
In Division Setup, set the Refund Amount Requiring 2 Approvals field to define the refund amount that requires two approvals. Refund requests exceeding this amount must receive two approvals before they are moved to the Pending Issuance tab. Each approval must be performed by a user whose Refund Approval Limit, as configured in Role Setup, is sufficient to approve the requested refund amount.
Approve and Issue a Refund
Although the workflow may vary based on your refund approval settings, the steps for processing a refund request remain the same. This section explains how to update the status of a refund request, record the issuance check number, and mark the refund as Issued.
Mark a Refund Approved
From the Review / Approval tab, double-click the refund request to open the Edit Refund Request screen. Review the request details, then select Approved from the Status drop-down and click Save.
If a second approval is required, the first approval is recorded when the request is saved; however, the request remains on the Review / Approval tab with a status of Pending Approval. The name of the first approver, along with the approval date and time, is displayed until the second approval is completed following the same process outlined here.

Second Approval Required Example

{{snippet.expandEnd}
Issue a Refund
Step 1: Mark the Request Issued
After a refund request has met all approval requirements, it is moved to the Pending Issuance tab with a status of Approved. To record the issuance of the refund, double-click the request to open the Edit Refund Request screen.

Step 2: Record the Check Number for the Cut Check
Once the Status has been changed to Issued, select the Issued Refund Transactions tab and click the Pending AP Processing link displayed below the Reference No. In the Check # field, replace Pending AP Processing with the check number that was issued for the refund and select Post.
This step assumes the refund check has already been cut. Entering the check number records the issued check in the customer's AR History and does not generate or print the refund check.

Step 3: Verify the Check Number is Linked to the Issued Amount
After the check number has been recorded and posted, it is displayed in the Reference No column. A green toggle indicates the check number has been linked to the refund amount. If the refund was issued using multiple checks, each check number is displayed with its own toggle, allowing the appropriate refund amount to be mapped to the corresponding check.

Related Articles
Refund and Payment Chargeback
Refund Request
Role Setup


