Create and Send a Service Contract
Last Modified on 09/10/2025 11:32 am PDT
Pathway: Accounts > Search > Account (Customer Service Screen) > Orders, Quotes and Contracts
This article details the process of creating a service contract. A service contract is a legally binding agreement between a service provider and a customer. It outlines the terms and conditions under which a specific service will be provided. There are two options to create a service contract: convert an existing proposal to a contract, or create it new. Once a contract is created, it is tracked in the following CRM tools:
Convert an Existing Proposal to a Service Contract
If there is an existing proposal, it can be converted into a contract by updating the Document Format field to one of the available service contract options.
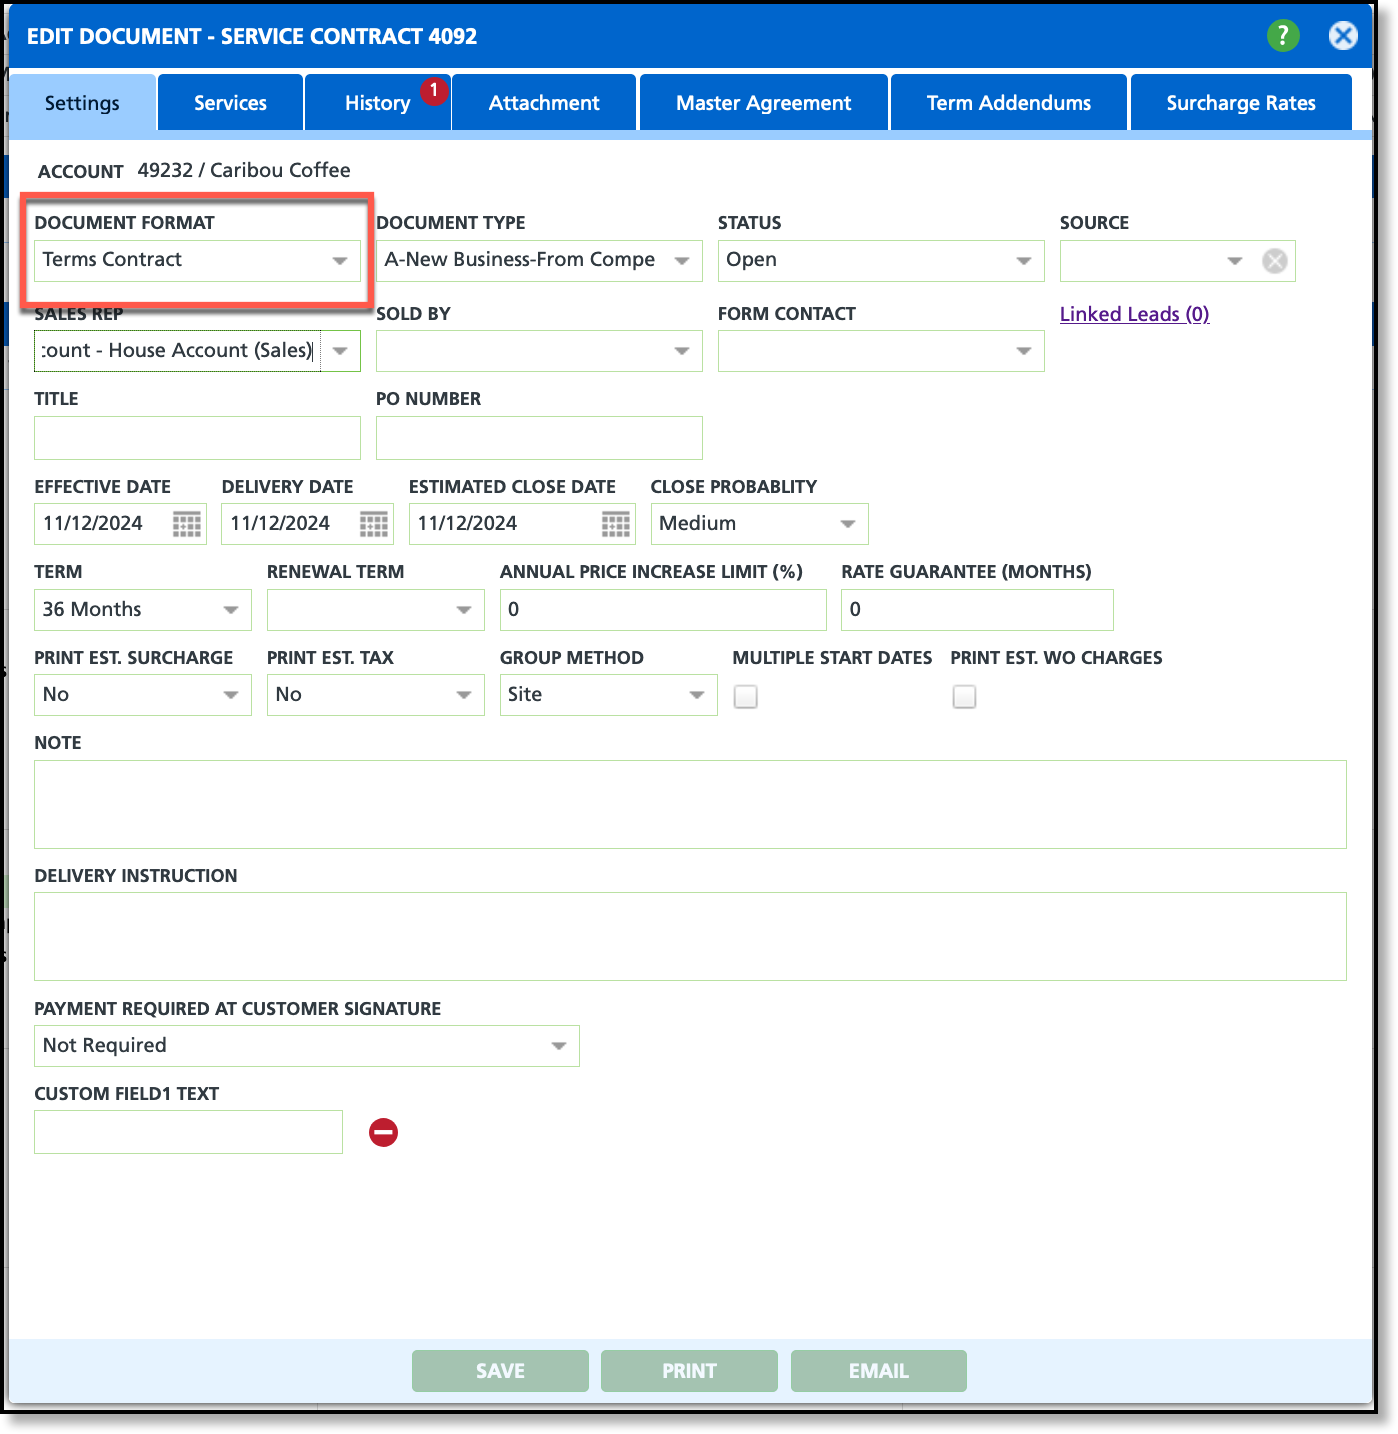
Convert a Proposal to a Service Contract
- Select the proposal from the Orders, Quotes and Contracts section of the account and the Edit Proposal popup window will display.
- Select one of the contract options listed for the Document Format field.
- Document formats are set up and maintained in Setup > Document Formats.
- Select the Document Type from the drop down list of options.
- Document types are set up and maintained in Setup > Document Formats > Type.
- Select a Renewal Term from the drop down list of options.
- Click Save when finished.
Create a New Service Contract
To create a contract independent of an existing proposal, or in the absence of a proposal, the option to create a new contract document is available. Review the following sections below which outline the various tabs and their functionalities when creating a new contract.
Settings
The Settings tab establishes the basics of the document and qualifies it as either an 'Opportunity' or 'Quote'. Because a contract includes a signature section it is considered a quote and tracked in the Pipeline Opportunities dashboard using the 'Quote' filter option.
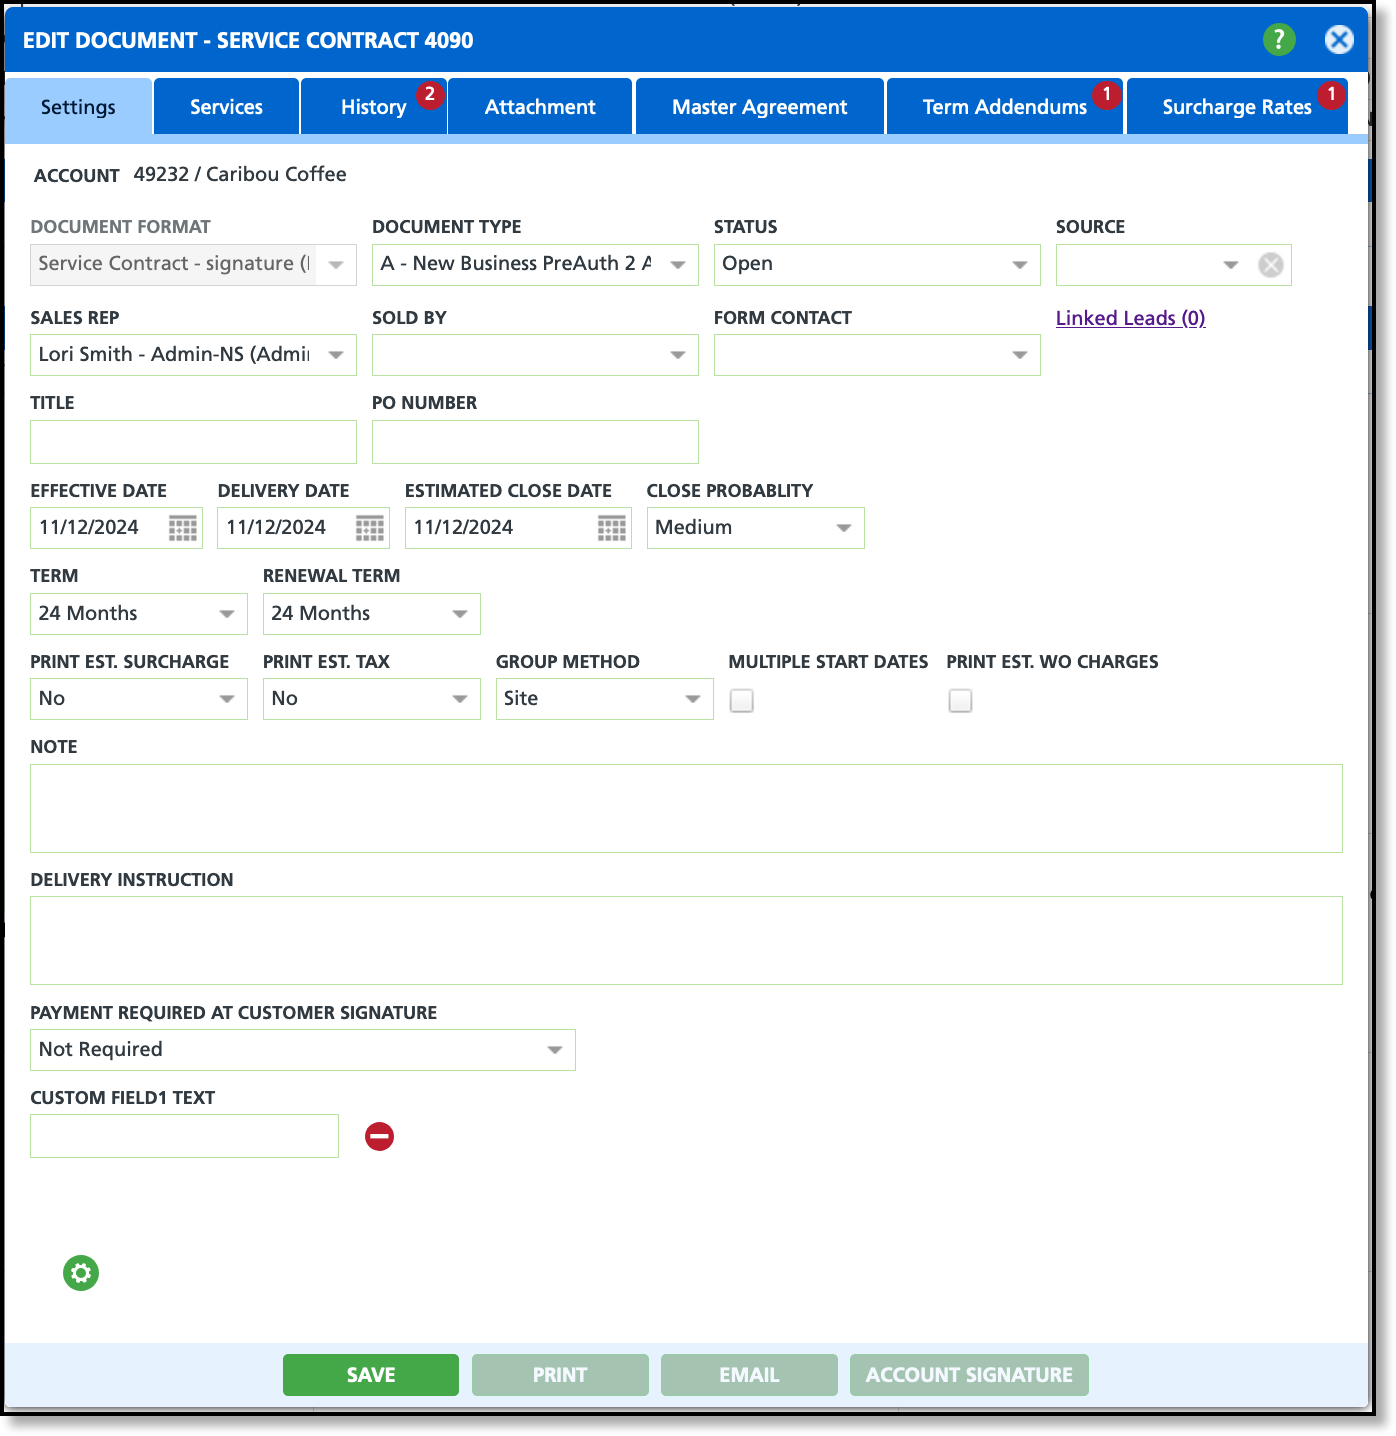
Field Descriptions
| Field |
Description |
| Document Format |
Identifies the document's format (proposal formats do not include a signature section where as contracts do) and determines how/where it will be tracked in the Sales Pipeline CRM tools.
Form Format setup is located in Setup > Document Formats > Format. |
| Document Type |
Indicates a reason code for the service contract (the purpose this contract serves).
Example: Change In Service, New Business, Increase in Service, etc.
Document Type setup is located in Setup > Document Formats > Type. |
| Status |
Indicates the current status of the contract and will automatically update if the contract is sent, viewed or signed in the system. Status options include: - Lost
- Select Lost to indicate the contract was lost (i.e. went with a competitor).
- 'Lost' status prevents edits to fields in the Settings tab.
- Open
- Applies once a contract is created.
- 'Open' status allows for edits to fields in the Settings tab.
- Refused to Sign
- Manual status change to indicate the customer is not interested in signing the contract.
- Refused to Sign contracts do not move forward in the sales process.
- Submitted to Client
- Displays after the contract has been emailed from the system to the customer or prospect.
- 'Submitted to Client' status allows for edits to fields in the Settings tab.
- Sold
- Displays once a signature has been received for the Agreement via a browser link. If the contract was printed and signed, the status must be manually updated to sold and the signed agreement uploaded as a PDF.
- When the status is marked as Sold, and no signed PDF exists, an attachment button displays to attach the signed pdf to.
- 'Sold' status prevents edits to fields in the Settings and Services tabs.
- Submitted to Client
- Displays as soon as the contract was emailed to the client.
- Verbal Approval
- Manuel status change if the contract was verbally agreed upon.
- Verbal approval treats the contract as sold but still allows the customer to sign.
- Void
- Select Void to indicate the contract was either created in error, or is no longer being pursued.
- 'Void' status prevents edits to fields in the Settings tab.
|
| Source |
Indicates how the sale originated (referral, internal, employee, and etc.).
|
| Sales Rep |
Identifies the sales representative responsible for the contract. Form notifications, dashboard tracking and credit for a sale/approval are sent to the sales representative selected.
|
| Sold By |
Identifies who made the sale. Provides flexibility to record who made the sale if it was someone other than the sales representative. |
| Form Contact |
Identifies the account contact the contract will be sent to. Account contacts must be created first or they will not display as a drop down selection.
Related Article: Add Account Contact |
| Linked Leads |
Option to link an existing lead service to the contract agreement. Linked leads reduces double entry by allowing a user to copy services from the lead to the quote.
*Important - Leads will continue to populate in the Sales Pipeline - Leads dashboard until linked. Linking to a document closes the lead.
Related Articles: Add a Lead; Pipeline Leads |
| Title |
Option to enter the title for the Form Contact.
|
| PO Number |
Option to enter a PO number if one exists.
|
| Effective Date |
The date contracted services and billing will begin.
|
| Delivery Date |
Indicates the customer’s preferred date to receive service equipment.
|
| Estimated Close Date |
The expected date the sale will close and drives the Sales Pipeline Opportunities dashboard.
|
| Close Probability |
Probability of a successful sale (identified by the sales representative).
|
| Term |
The initial term length of the service agreement.
|
| Renewal Term |
Indicates the automatic renewal term length.
|
| Note |
Notes added here display in the Comments section of the contract.
|
| Delivery Instruction |
Internal note that displays on the delivery work order for the driver to see and does not appear on additional service work orders.
|
| Custom Field1 Text |
Open field to print additional information not otherwise included on the contract agreement. Field name can be customized in Setup > Document Format > Formats (Settings tab).
|
| Payment Required at Customer Signature |
Option to require a deposit for services to begin. If a payment is required, the signed contract can not be saved until payment has been collected using either a bank account or Credit Card. Payment requirement options include:
- Not Required (default)
- Customer and Sales Rep can sign the contract without collection of a deposit.
- Specific Amount
- Upon signing, the customer will be required to enter a payment using either a bank account or credit card. If selected, a "Required Payment Amount" field is displayed to enter the required amount.
- One Month Recurring Fees Including Taxes and Surcharges
- System calculated based on service rates, and the taxes and surcharges that apply.
- One Month Recurring Fees
- System calculated based on the service rates.
|
| Print Est. Surcharge |
Option to display estimated surcharges on a printed proposal. Defaults to 'No' for service contracts.
Surcharge group must be assigned to site prior to adding services to the proposal. To re-calculate the estimated surcharges the service rate must be updated or removed and re-added to the form. |
Print Est. Tax
|
Option to print the estimated tax on the contract. Service fees must be entered on the Services tab to calculate. |
| Group Method |
Option to group services/charges on the contract by Site, Line of Business (LOB) or Material.
|
| Multiple Start Dates |
Allows the user to define a unique start date for each service added to the form and is primarily used for broker agreements and not a regular sales contract. |
| Print Est WO Charges |
Option to include the (estimated) work order charges on the contract.
|
Services
The Services tab displays the included service(s) and any extra fees in the service contract. Services can be added by copying from a lead or manually entering them.
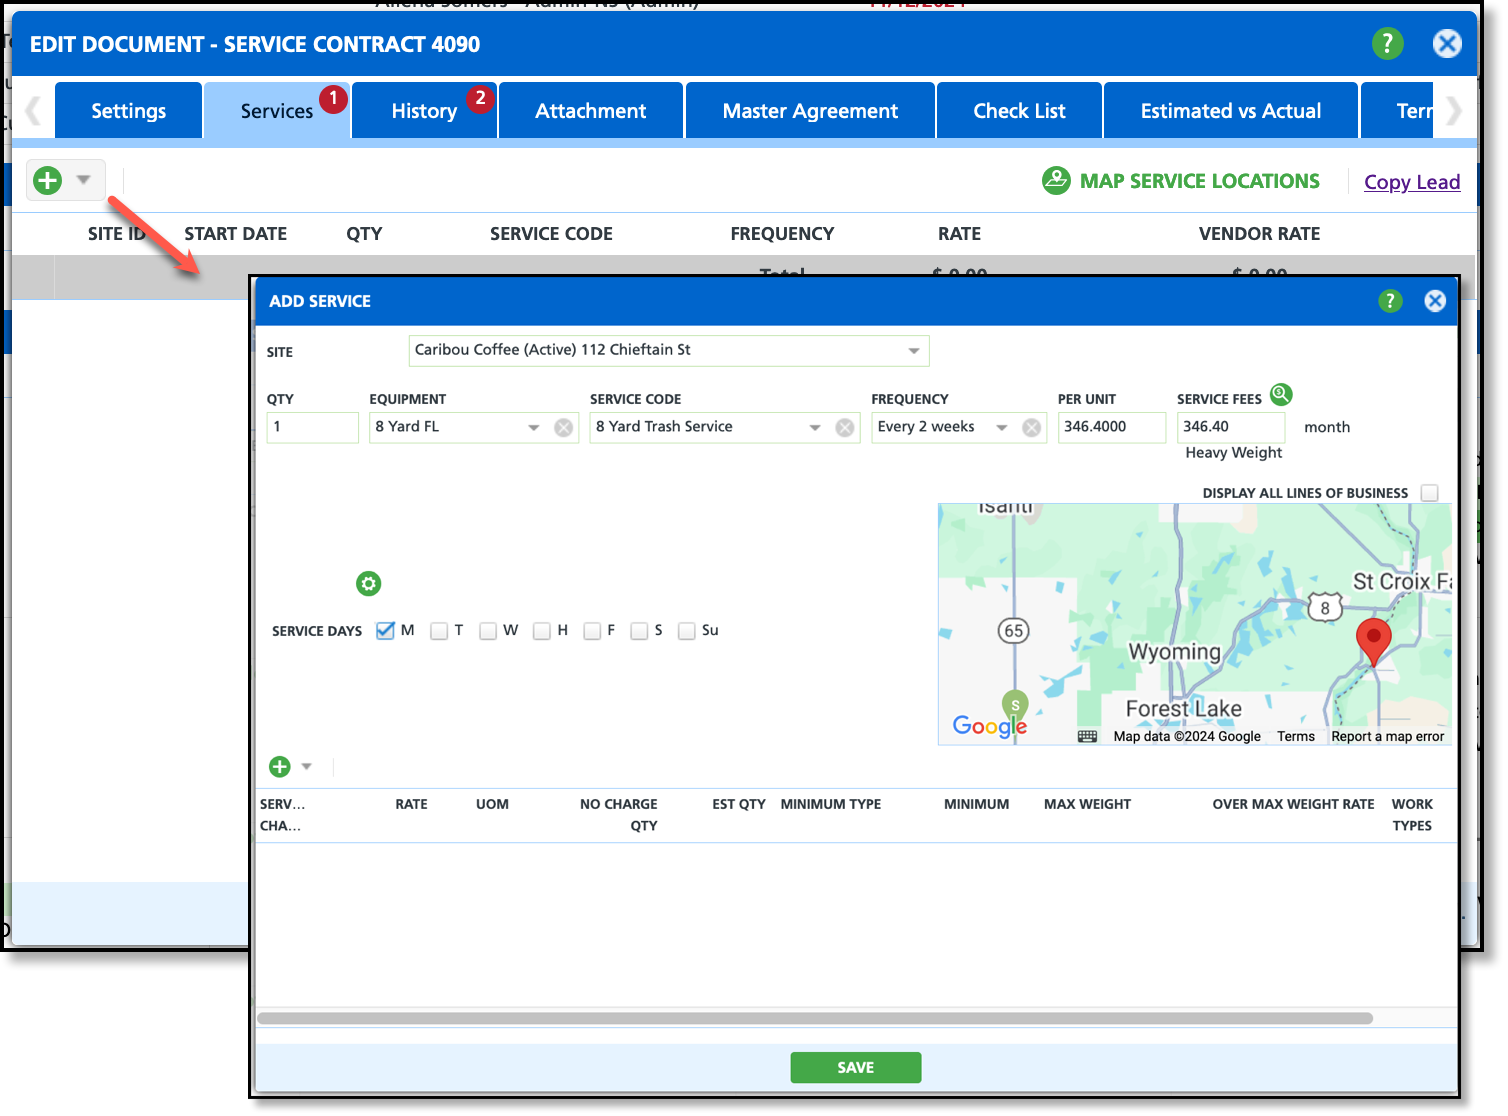
Add Service
- Click the green '+' icon from the Services screen.
- Select the Line of Business the service is for.
- Enter a Quantity amount for the equipment.
- Select the Equipment the service requires.
- Select the Service Code.
- Select the Frequency the site will be serviced.
- Enter a rate in the Per Unit field. The amount entered here will be multiplied against the value entered in the QTY field to calculate the Service Fees.
- Optional: if a daily inactivity rental fee applies to the equipment, enter it in the Daily Rate field.
Add Service Charges to a Service
Add additional rates in the Service Charges section for anything the customer may call in and request. The account is only charged when the added service is used.
- Select the green '+' icon displayed in the Service Charges section of the Add Service screen (bottom grid).
- Select the service charge you would like to add.
- Click within the Rate column of the service charge line item to enter a rate for the service.
Copy Lead
If a lead was previously created for the account, and the service(s) recorded in the lead matches the service contract, select Copy Lead to auto-fill the fields in the Add Service screen.
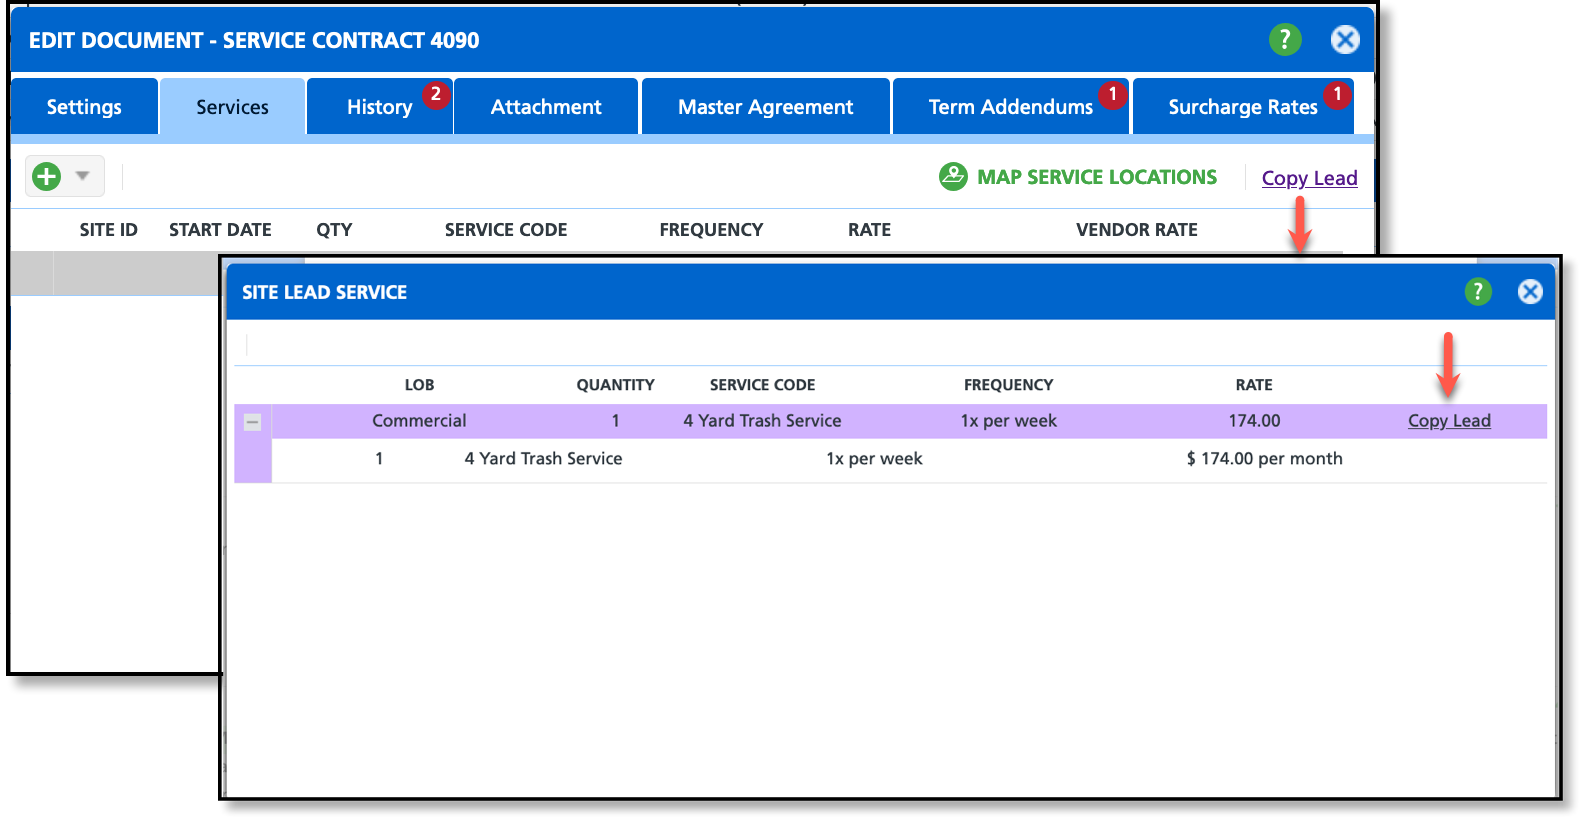
- Select Copy Lead from the Services tab of the Add/Edit Contract screen.
- Review the service(s) displayed in the customer service 'Site Lead Service' screen and select Copy Lead link for the service you would like copied. Upon selection, the 'Add Service From Lead' screen will open.
- Review the service information copied into the 'Add Service From Lead' screen and edit and/or complete additional fields as needed.
- Select Save when finished.
Map Service Locations
Select ‘Map Service Locations’ to display a Satellite or Map view of the sites included in the contract. When the map opens, a location pin displays over each site. If needed, use the drag and drop feature to relocate a site's pin to the approximate location the site should be serviced from. For example, if the service container is located on the west side of the parking lot, drag and drop the pin in that location to direct the driver where to go.
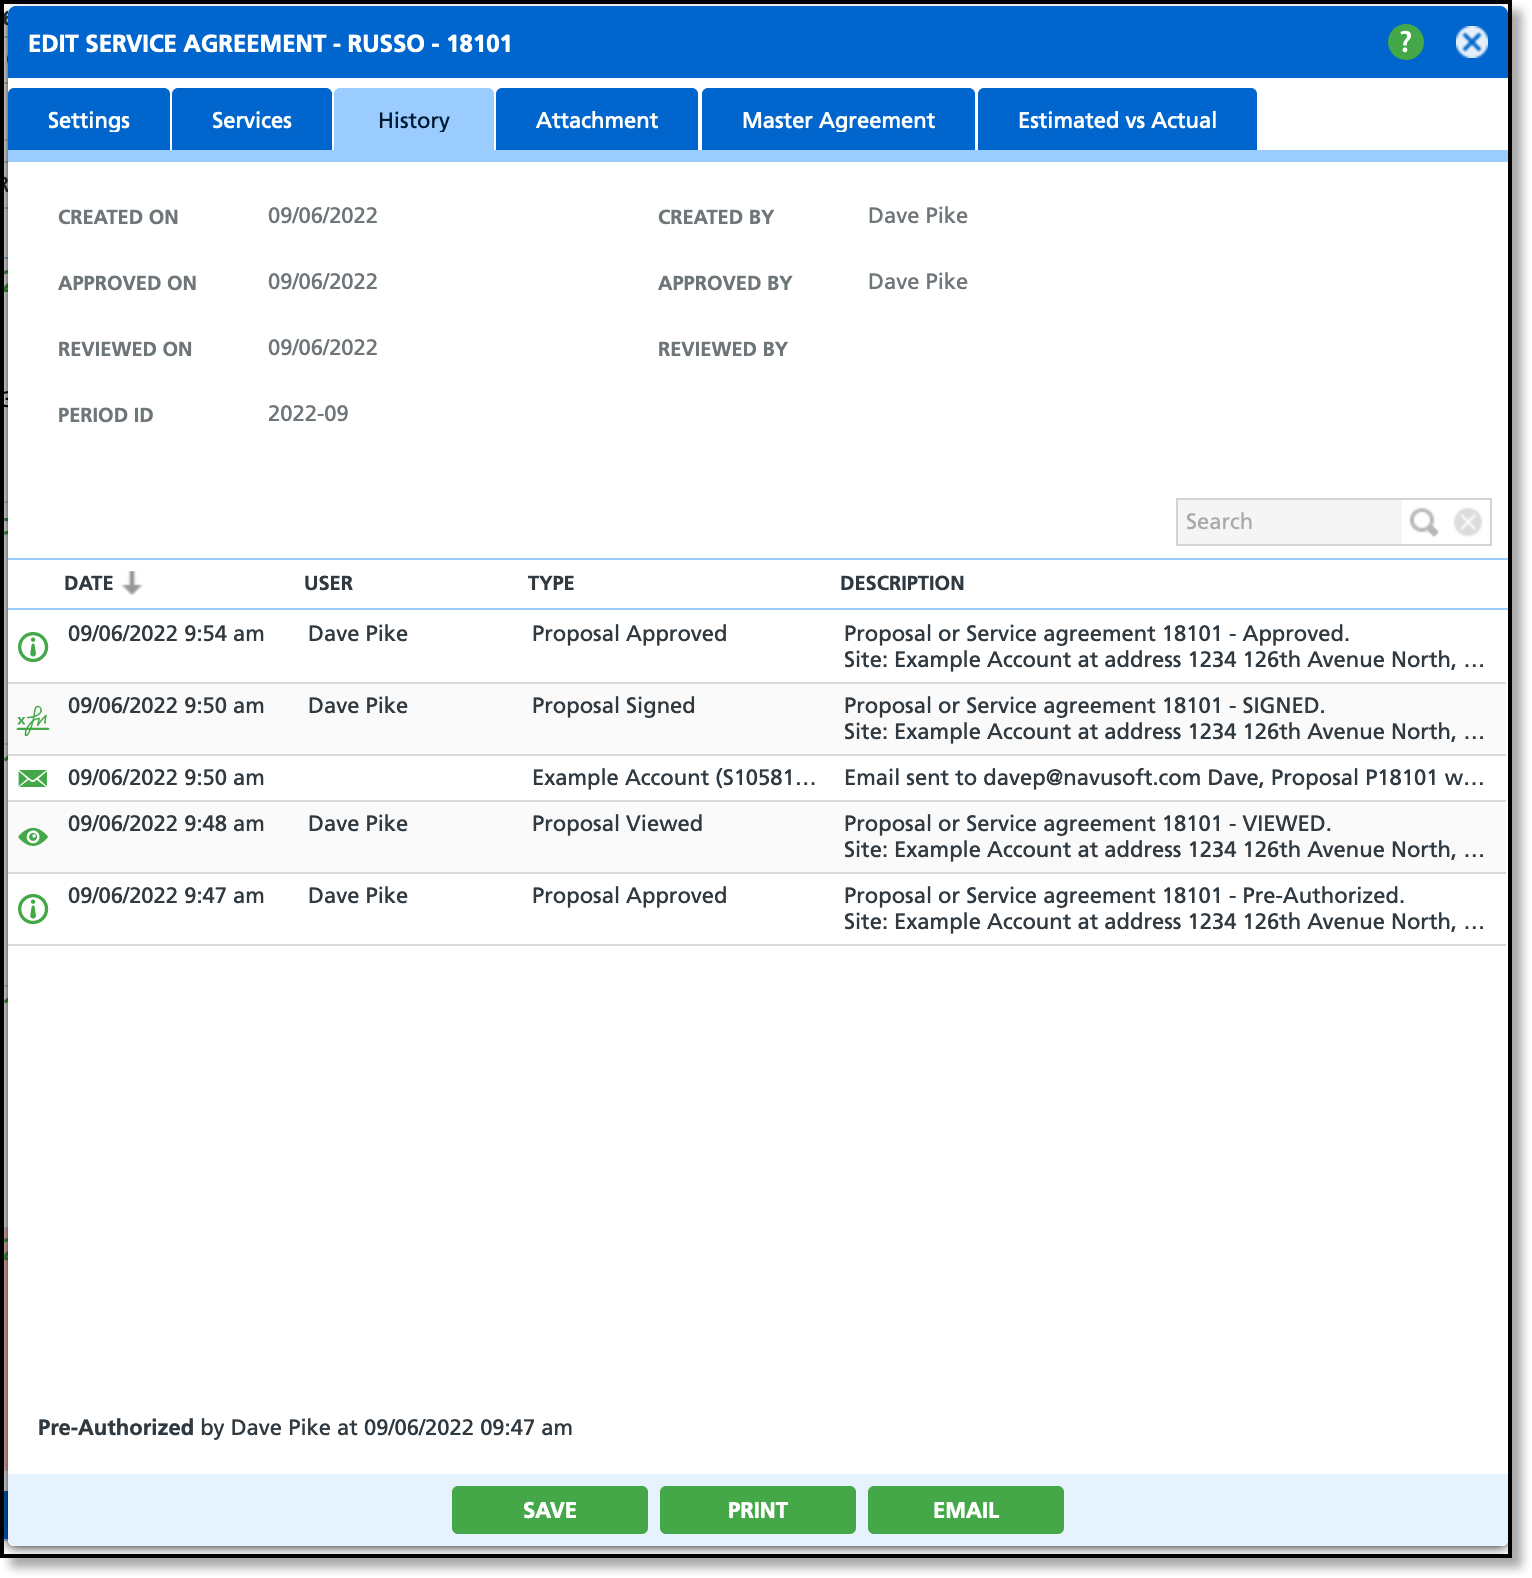
History
The History tab provides a log of actions performed on a document, ensuring full transparency and accountability. It captures key activities such as:
- Email history
- Each instance the contract was viewed
- The date the contract was approved
- The signature date the contract was signed
Attachment
Use the Attachments tab to attach and save PDF documents with the contract.
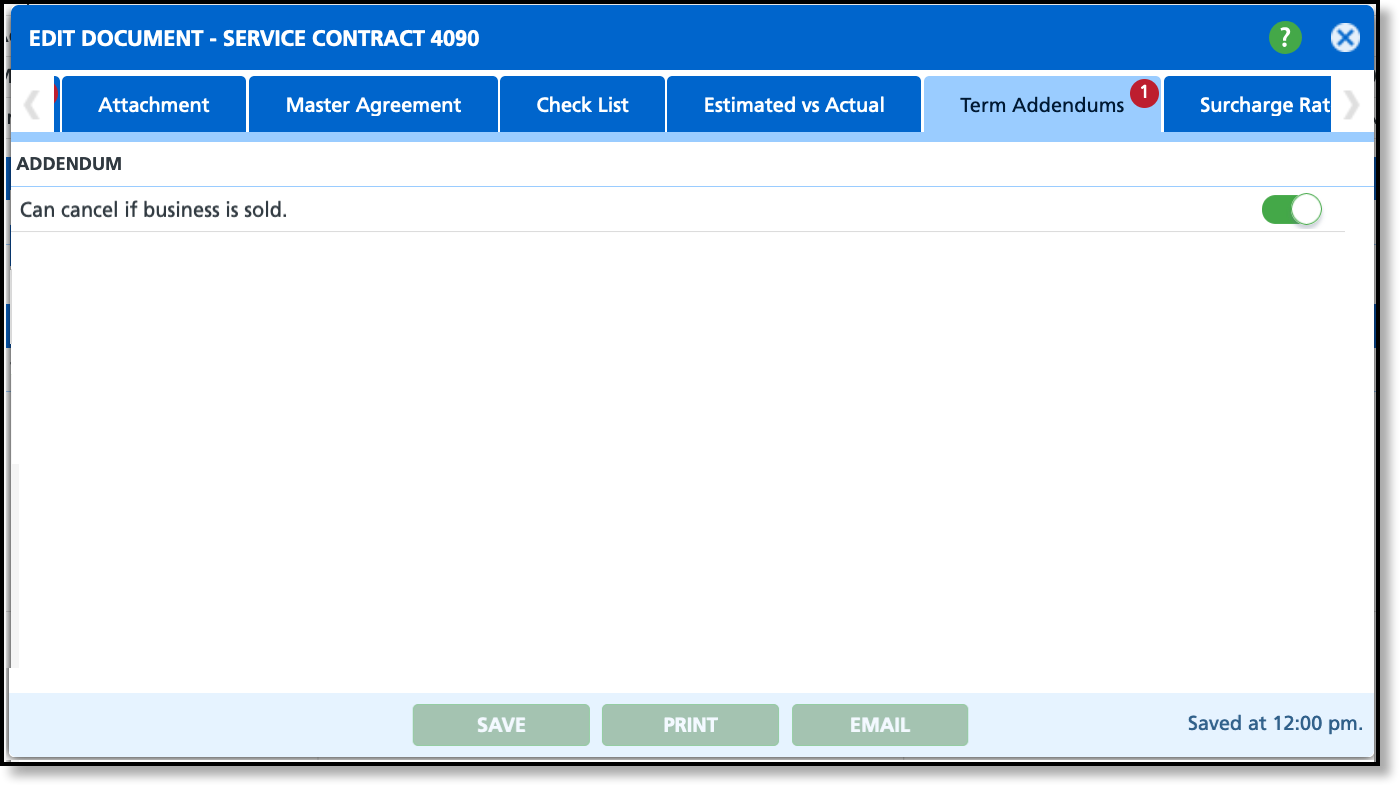
Term Addendums
If Term Addendums apply to a proposal, they can be enabled on the Term Addendums tab.
Addendum availability is managed in Setup > Document Format > Format and depends on the Form Type. Additionally, an optional pre-authorization process can be configured to ensure approval before sending the proposal to the customer if it includes an addendum.
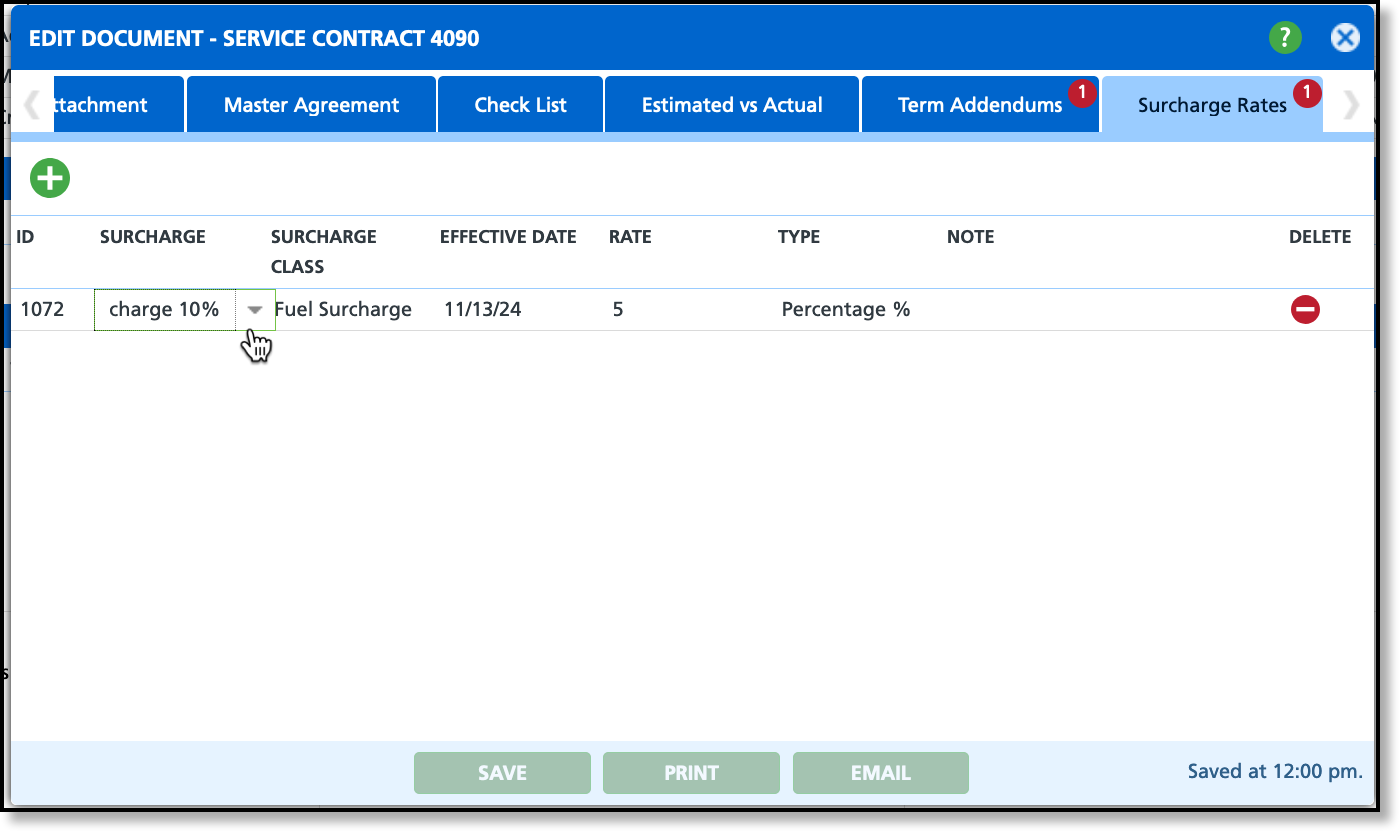
Surcharge Rates
If surcharge rates apply to a service, they can be added from the Surcharge Rates tab.
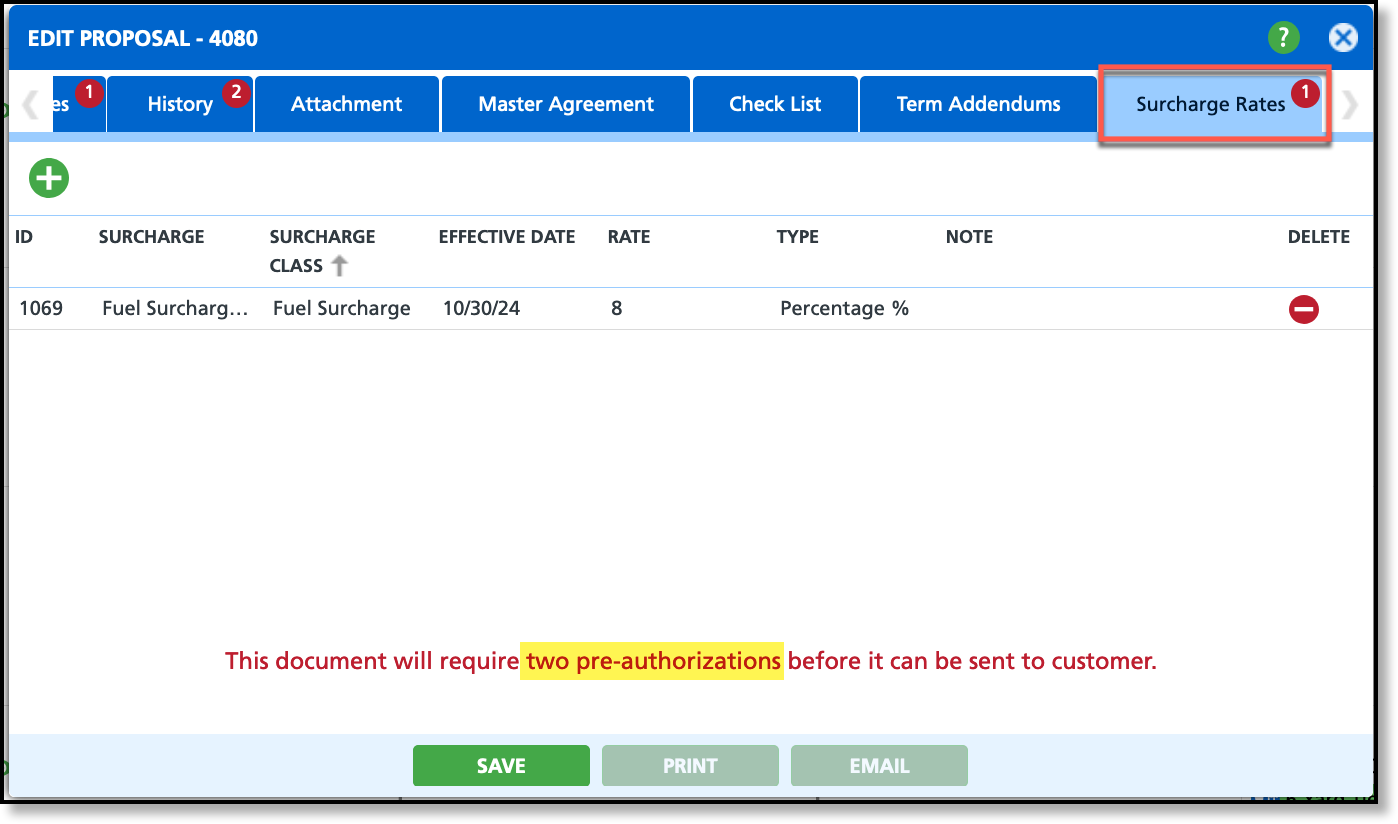
After selecting the green add icon, click within each field to select the surcharge, set the effective start date, specify the rate, and choose the rate type. Additionally, an optional pre-authorization process can be configured to ensure approval before sending the proposal to the customer if it includes surcharge rates that are different from the established rate in setup.
Additional Information
- Surcharge Setup Location: Surcharge availability is dependent upon the Service Code. To adjust what surcharges are displayed go to Setup > Services > Service Code.
Enable a Pre-Authorization Process (Optional)
To ensure contracts undergo the appropriate level of review, businesses can configure a pre-authorization process before sending contracts to customers. This flexible setup allows for a tailored approval process, requiring either a single pre-authorization from the user’s manager or a two-step process that includes oversight from a higher-level manager.
Approval Logic
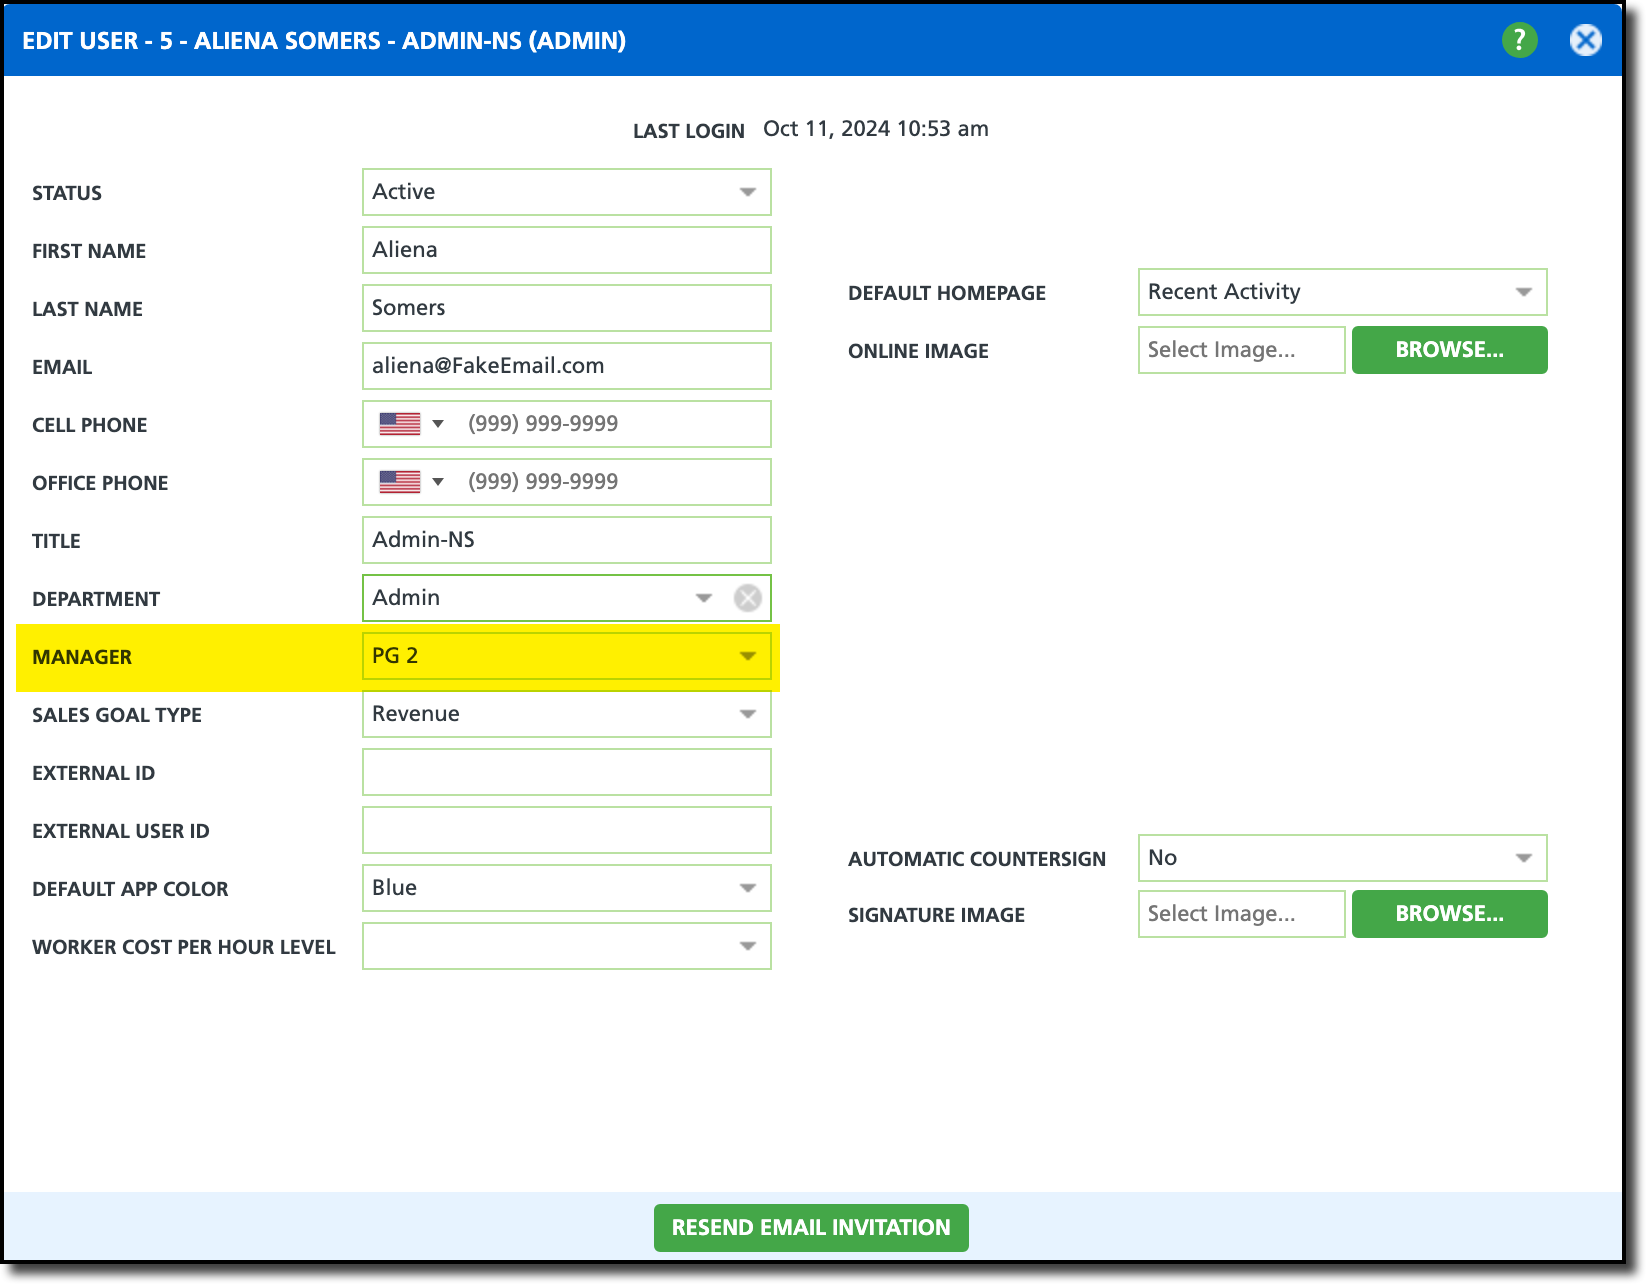
Pathway: Setup > System > User
Identification of Approver
The system identifies the approver based on the manager listed in the Manager field of the user profile for the individual who drafted the contract. If a second authorization is required, the system refers to the manager listed in the first approver’s user profile.
Setup to Require 1 Pre-Authorization
For the system to require a single pre-authorization before the contract can be sent to the customer, the following must be true:
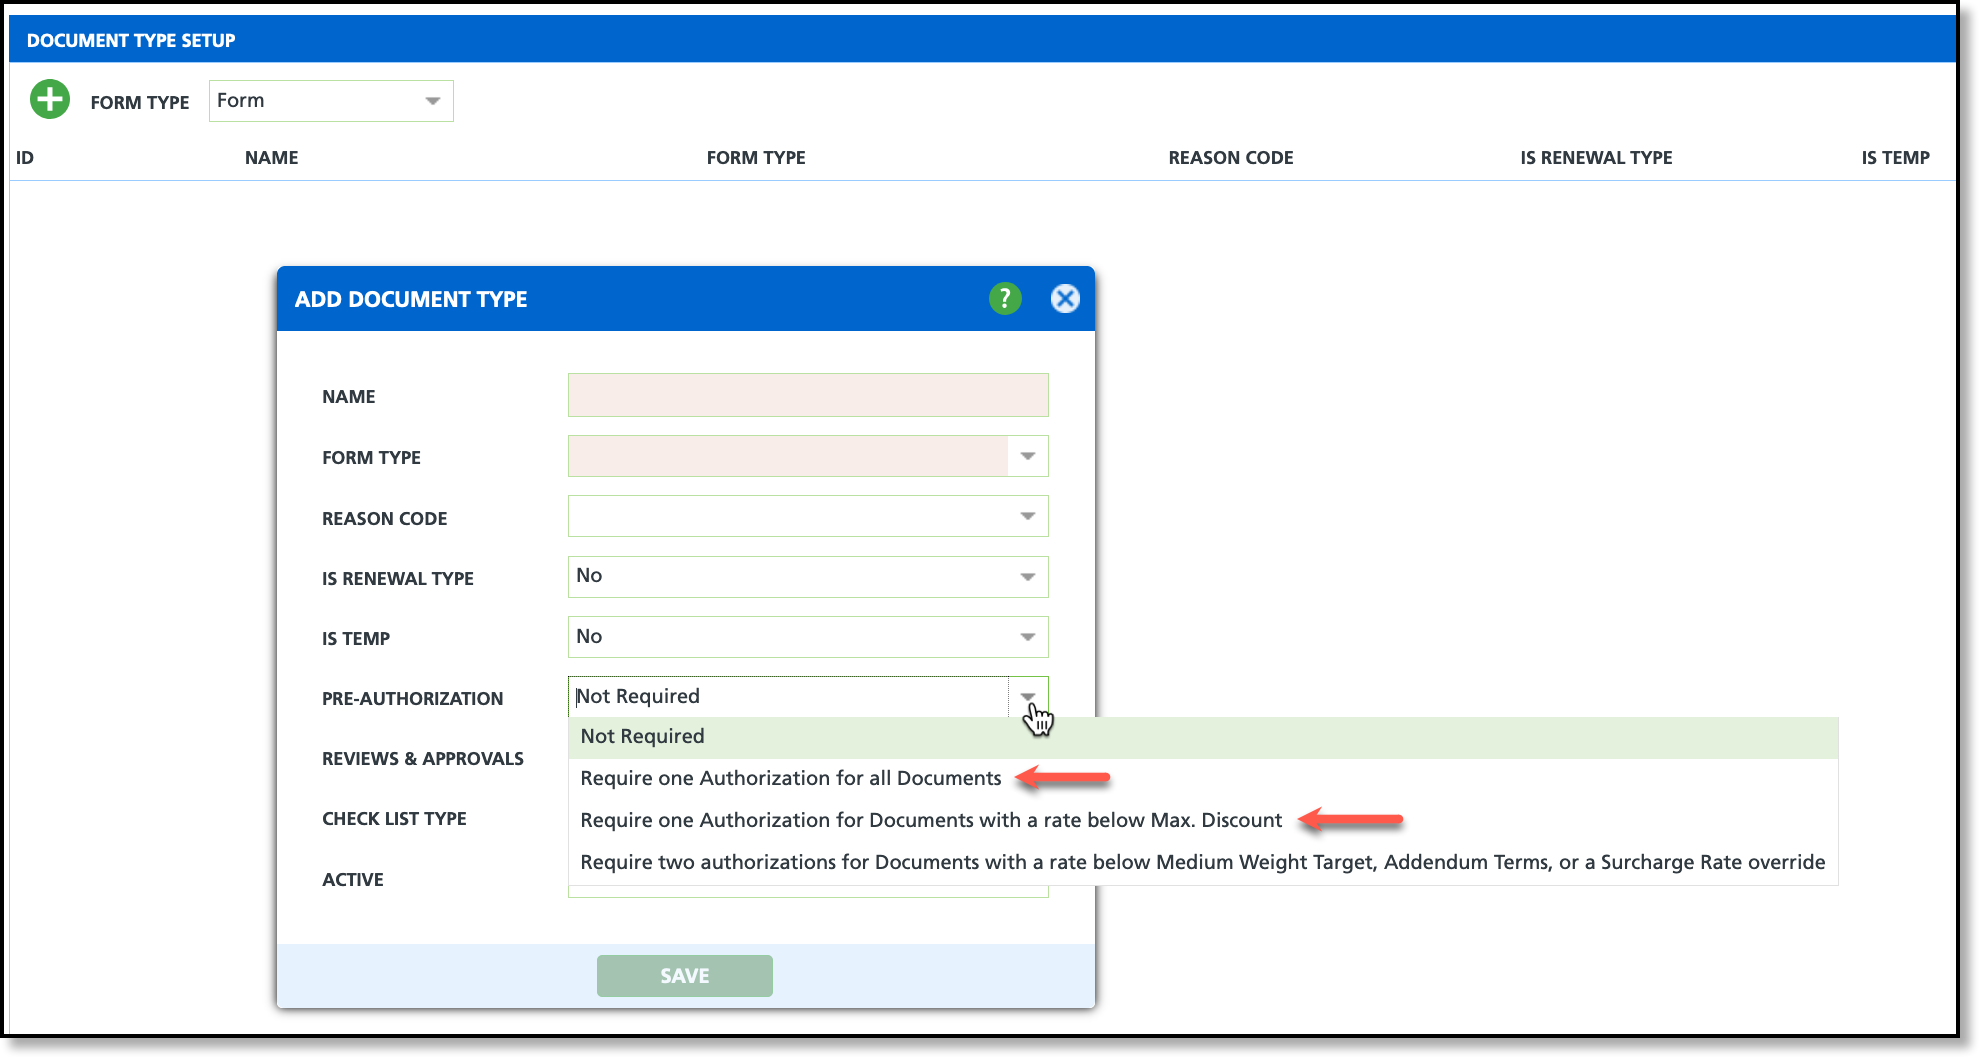
- In Setup > Document Formats > Type, the 'Pre-Authorization' field is set to either "Require one Authorization for all Documents" OR "Require one Authorization for Documents with a rate below Max. Discount."
Setup and Logic to Require 2 Pre-Authorizations
For the system to require two pre-authorizations before the contract can be sent to the customer, the following must be true:
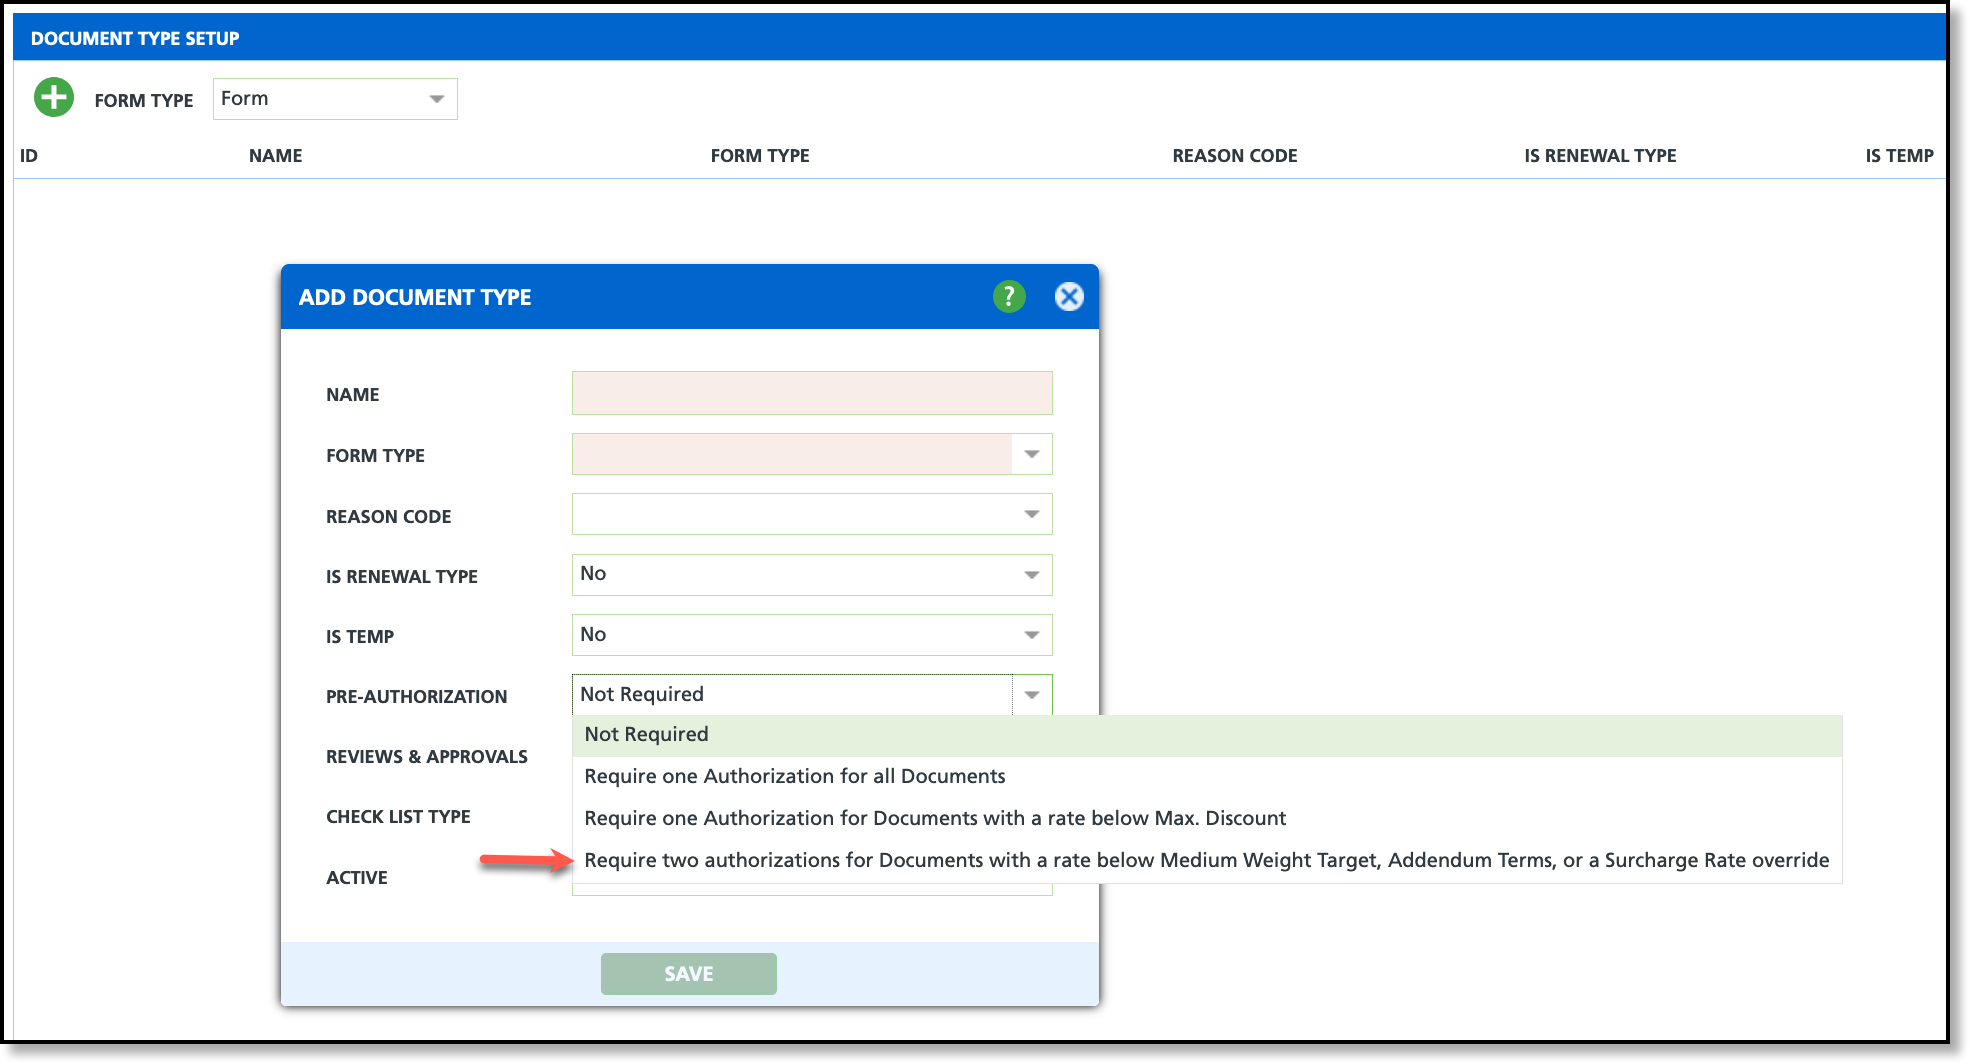
- In Setup > Document Formats > Type, the 'Pre-Authorization' field is set to "Require two authorizations for Documents with a rate below Medium Weight Target, Addendum Terms, or a Surcharge Rate Override"
And any two of these are true:
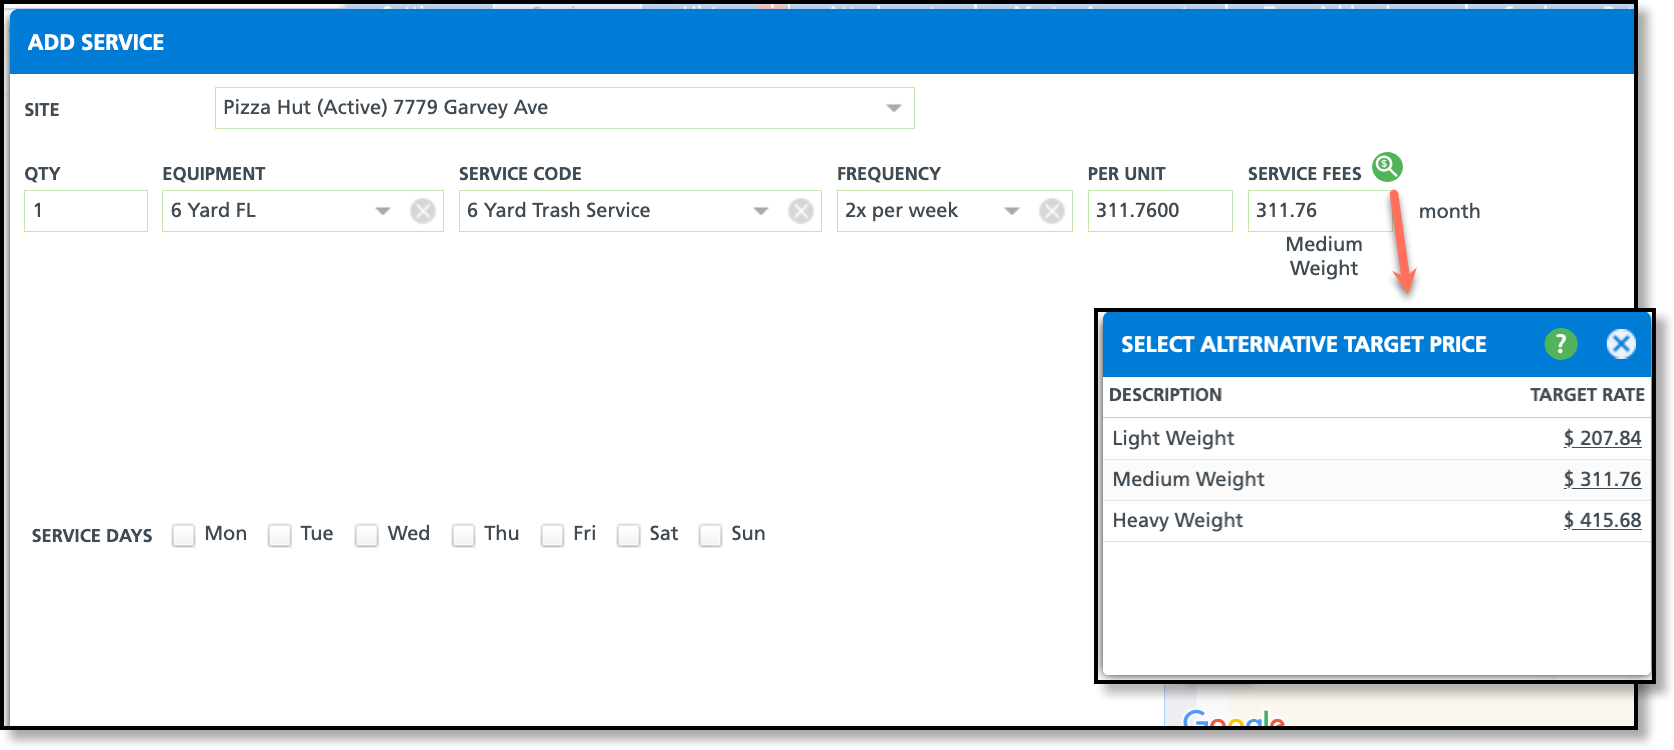
- The Service Fees rate entered by the user is less than the medium weight rate.
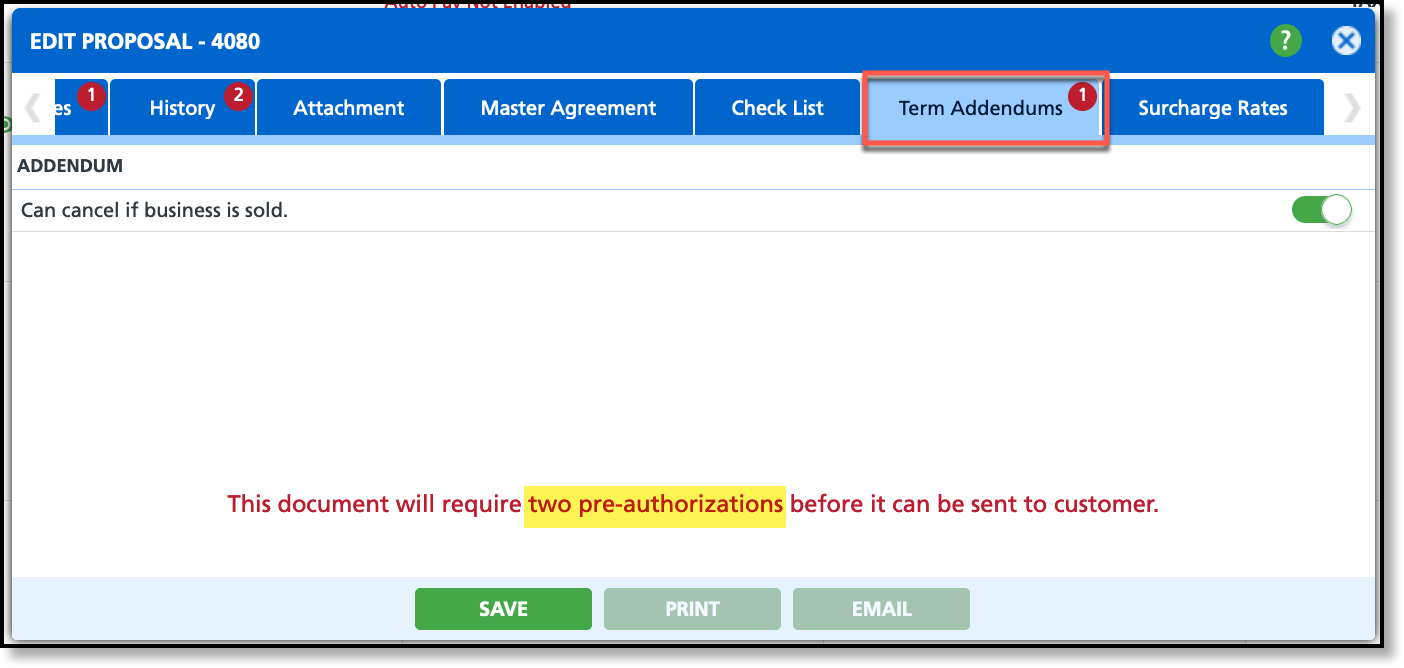
- The proposal includes a Terms Addendum.
- The proposal includes a surcharge rate override where the rate is lower than the default rate.
Rate Below Medium Weight Target |
|
|
The logic for triggering 'Rate below Medium Weight Target' includes the following setup: - Cost/Target Pricing must be established for the division.
- The service code must have 'Target Pricing (Weight Class)' selected as the Pricing Model.
- The material type for the service code must match the material type for the line of business.
Once this setup is complete, the Target Price icon will appear next to Service Fees after a Frequency for the service is selected.
|
|
 |
|
Term Addendums |
|
|
|
 |
|
The logic for triggering two pre-authorizations with Term Addendums requires enabling one addendum in the contract.
Term Addendums are managed in: - Setup > Document Formats > Format > Terms Addendums (tab)
|
| Surcharge Rate Override |
|
|
The logic for triggering two pre-authorizations with a surcharge rate override requires adding a surcharge and applying a rate that is different than the surcharge's default rate.
Surcharge rates are managed in:
- Setup > Services > Surcharge
|
|
 |
|
|
|
Send/Sign Contract
You can choose from three options to sign a contract: printing it out and providing a manual signature, signing it through email, or capturing a signature on a handheld device.
Email Contract for Signature
Upon selecting Email from the Edit Document screen, the Email Proposal screen will display. Follow the process outlined below to send the email and any attachment forms along with it.
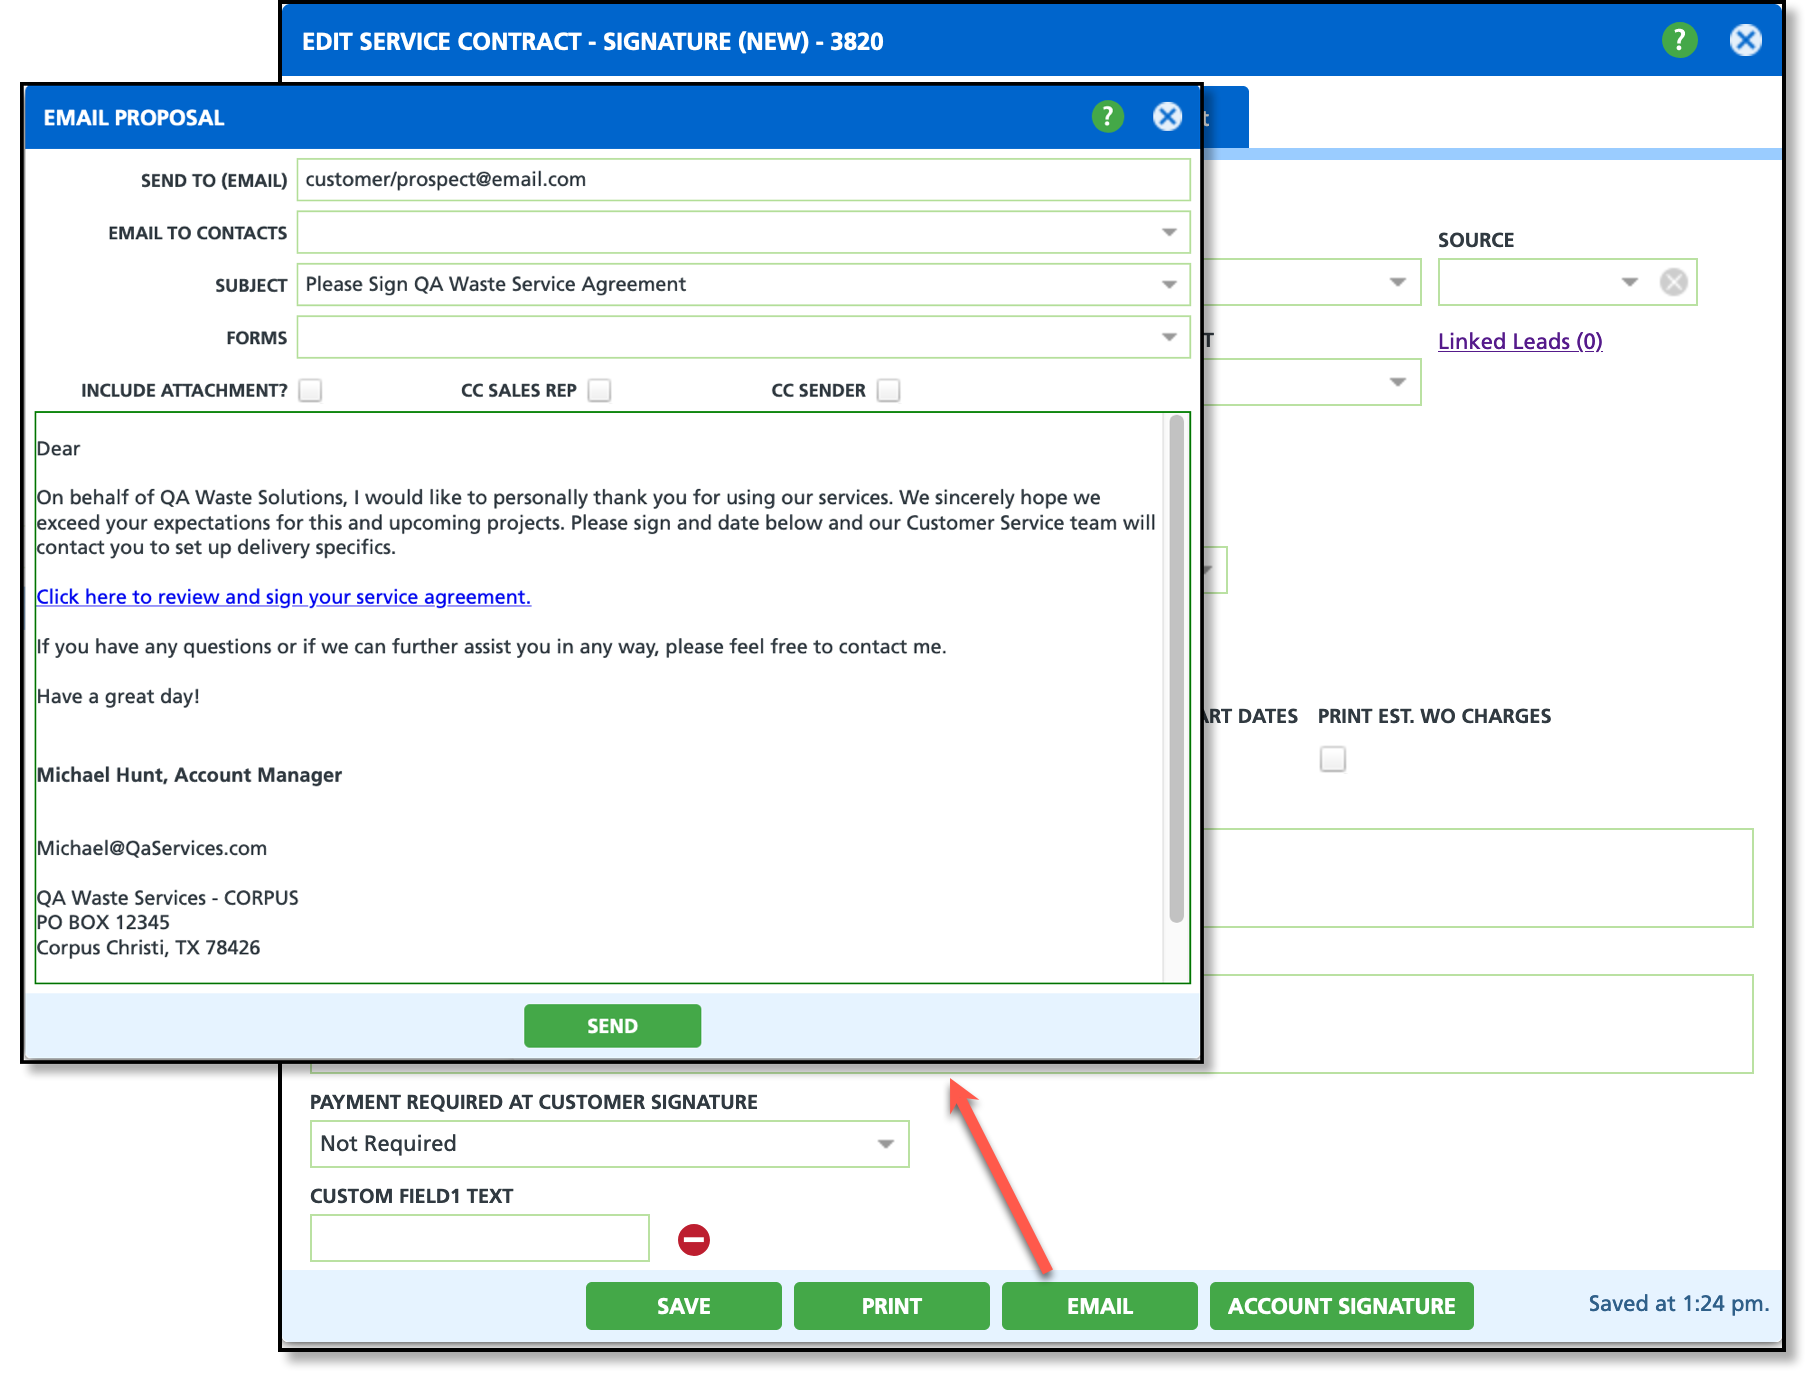
- Enter the email address of the person contracts are signed by in the Send to (Email) field if they are not listed as a contact in the "Email To Contacts" drop-down; otherwise, select a contact from the drop down.
- Select an email template from the Subject drop down. This will populate the message in the Body section of the email.
- Select to Forms drop down to add a form such as a Credit Card Authorization form or anything else you would like a customer to have along with the contract.
- Review the body of the email message and edit as needed. Click Send when the contract is ready to be sent.
Account Signature (In Person Option)
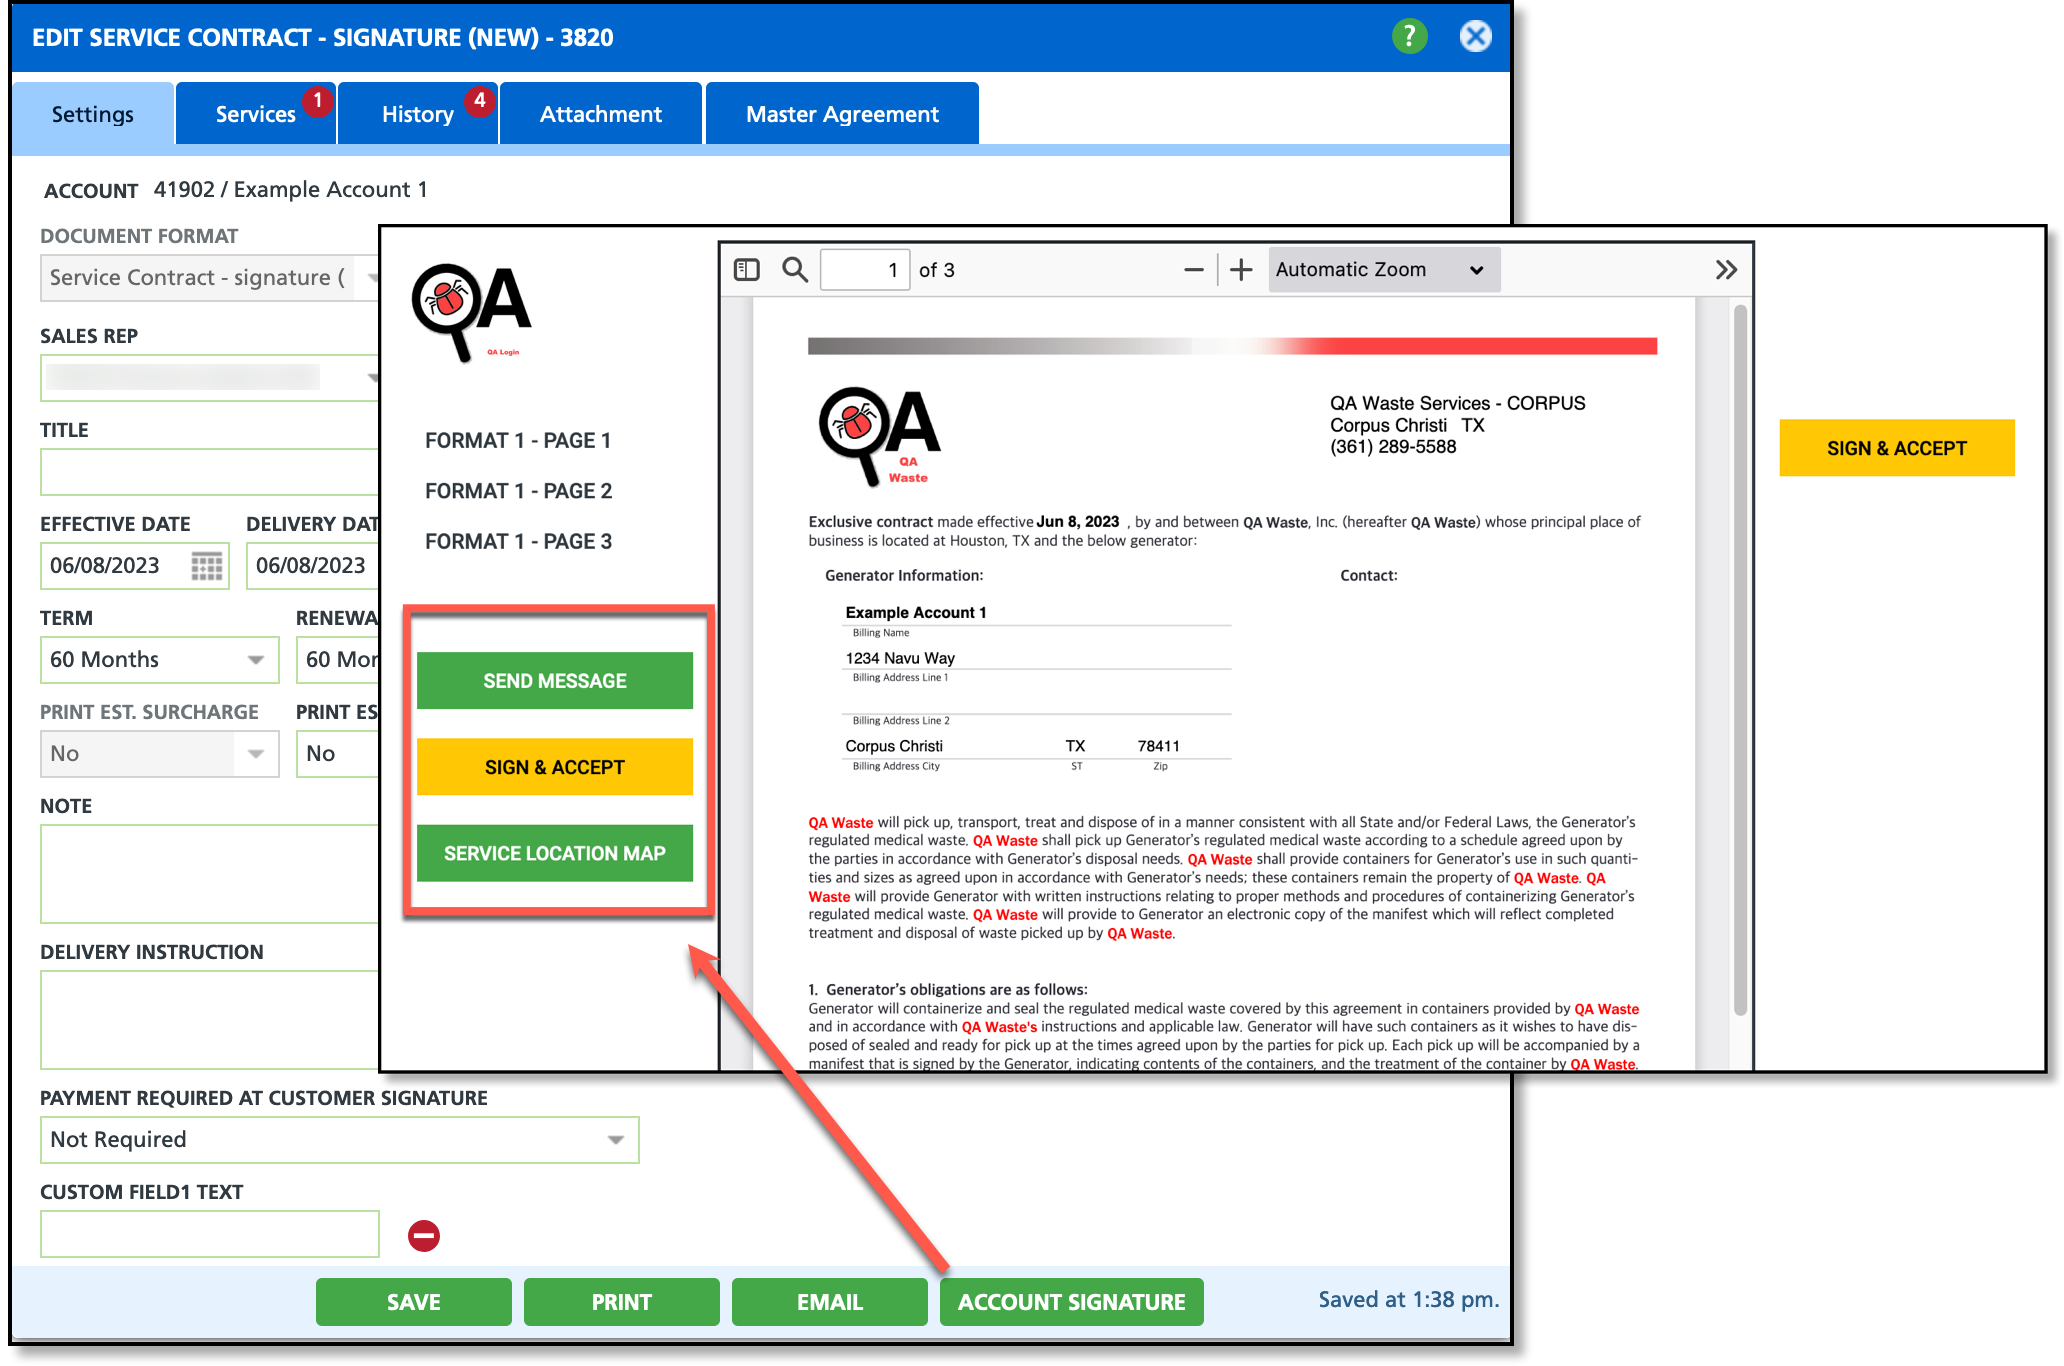
The Account Signature option is available if the signature is being captured in a face-to-face setting where the sales rep can capture the signature in the field. If payment is required, the contract cannot be submitted until bank or credit card information has been provided.
Contract Example - Customer Display
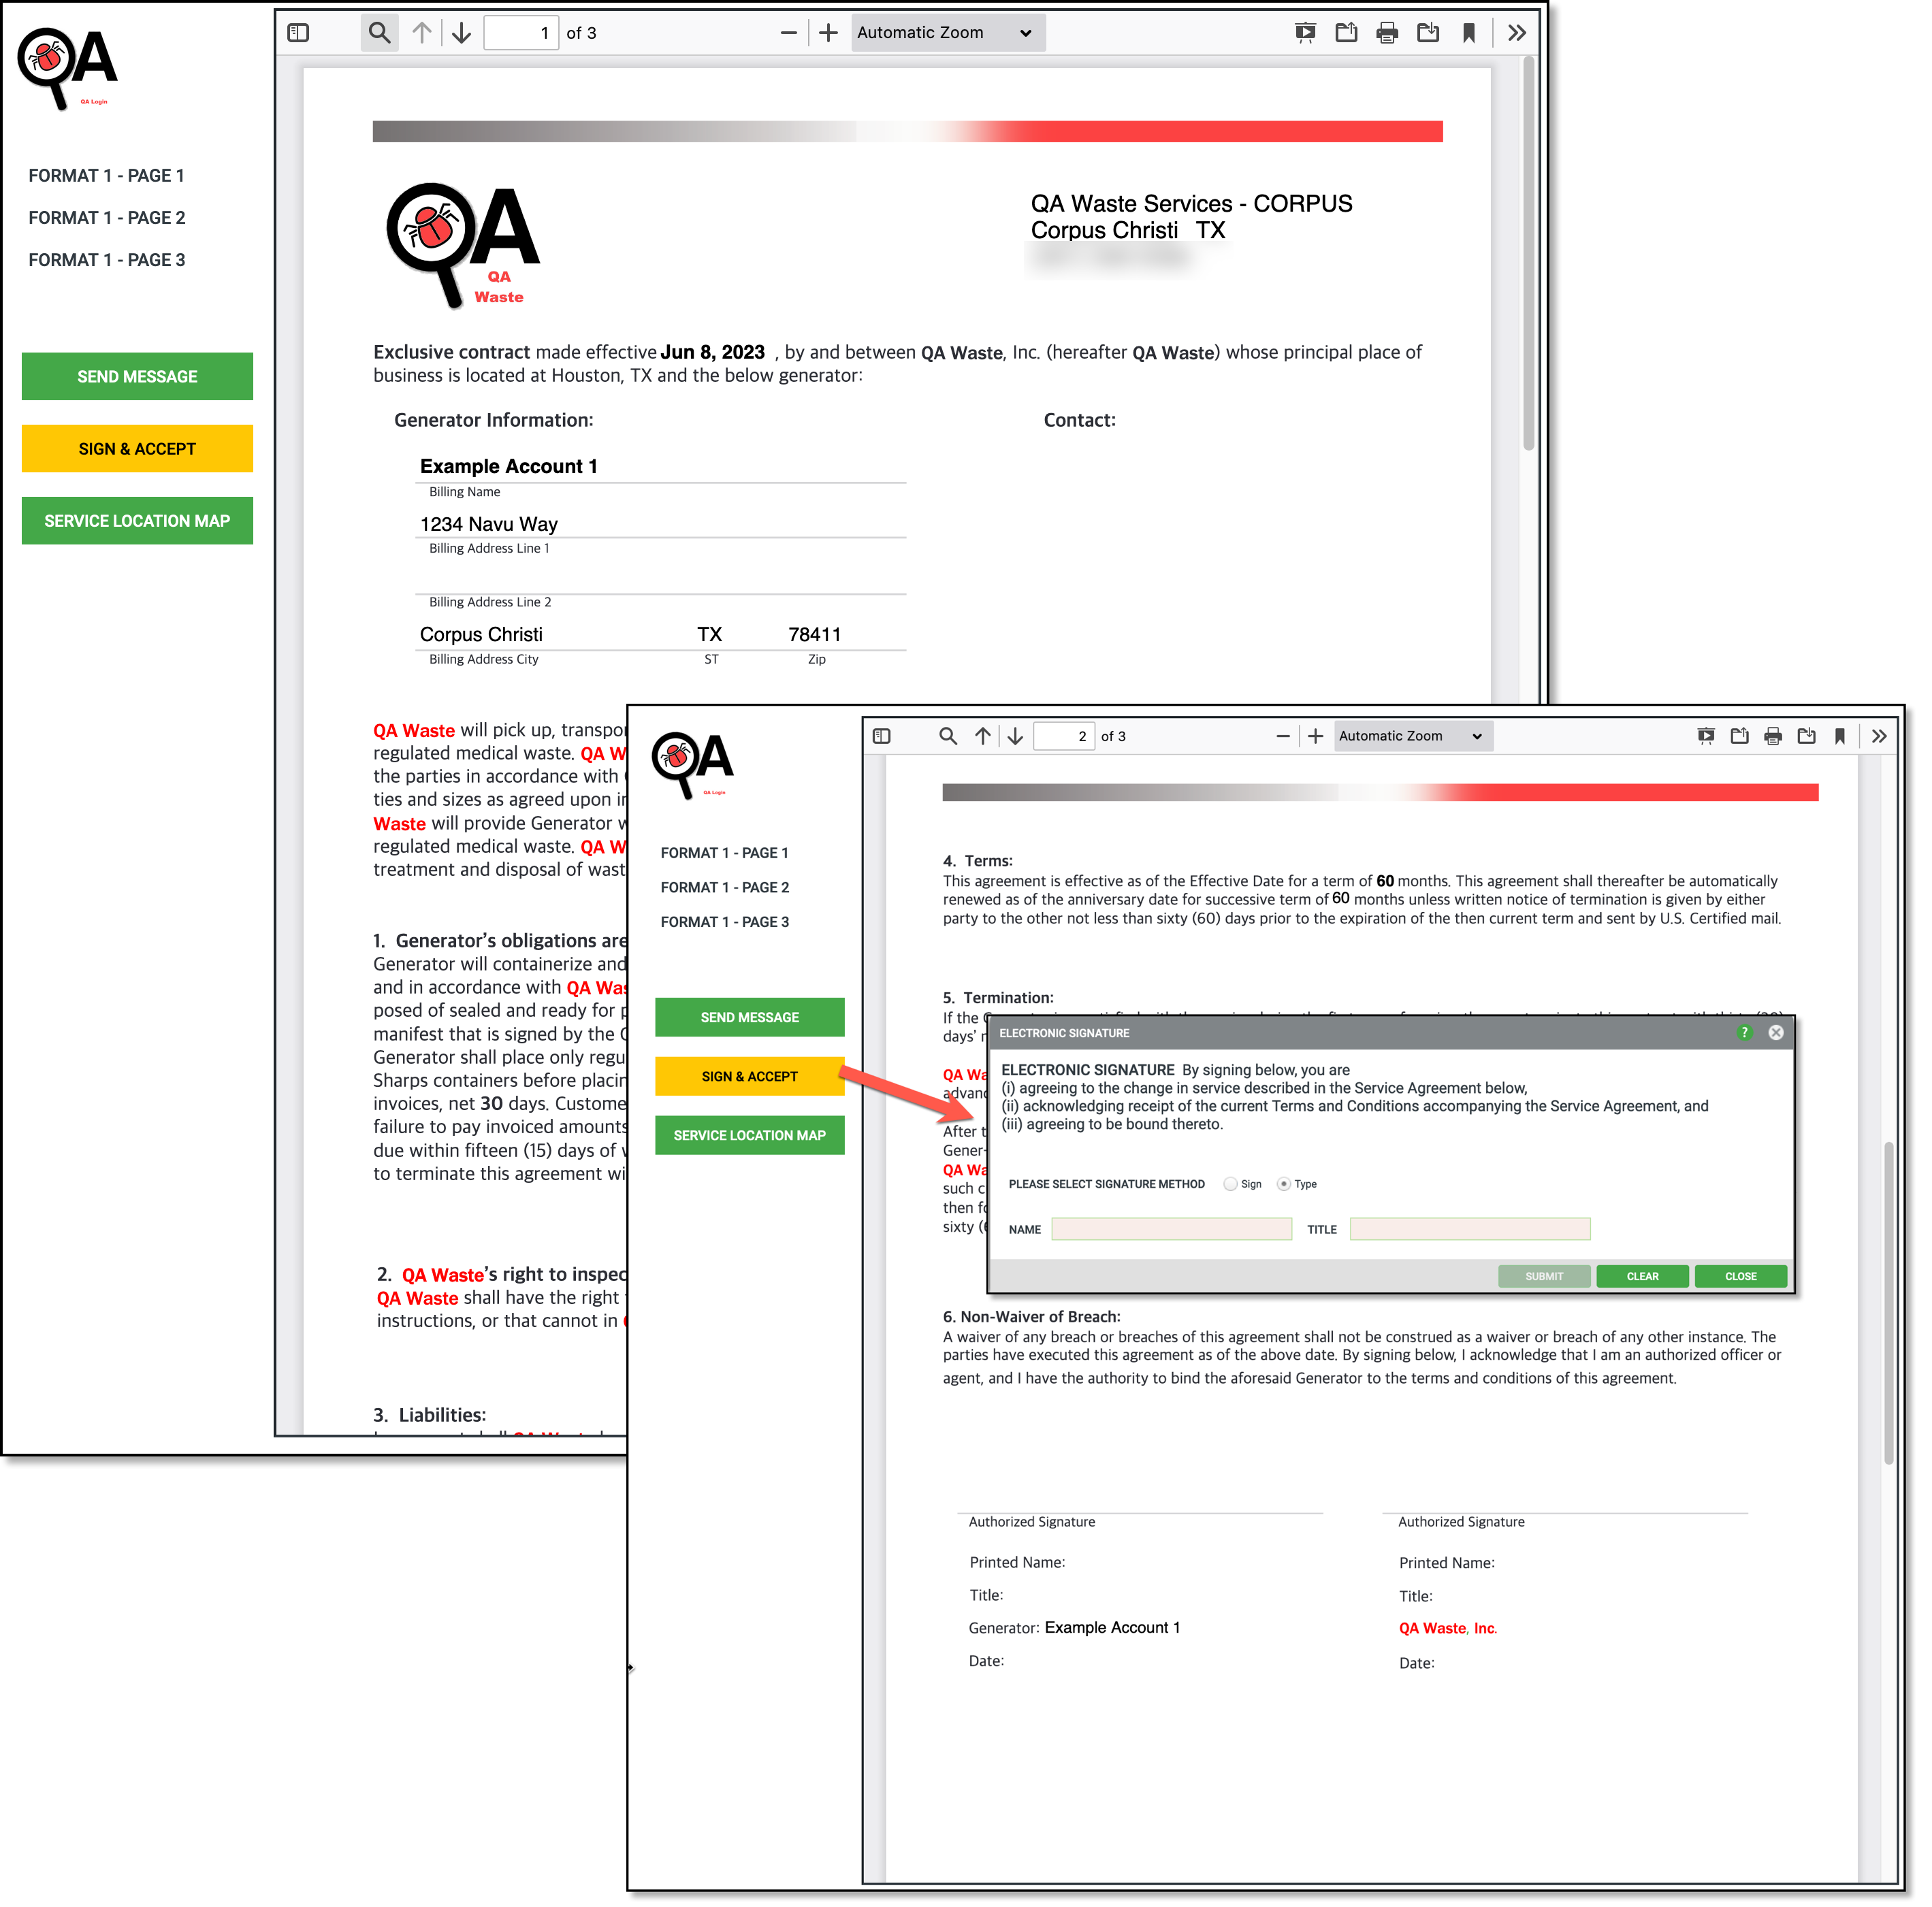
The following is an example of a printed or emailed contract. Contracts will vary dependent on your template setup. If payment is required, the contract cannot be submitted until bank or credit card information has been provided.
| PDF Window Button |
Description |
| Send Message |
Upon receiving an electronic version of the contract, customers can choose to send a message to the assigned sales representative with questions, comments or concerns. Once a message is sent, the sales rep will be notified with a blue notification containing the message. The message will also display in their Recent Activities and on the Customer Service screen. Sales reps are not able to message the customer back using the same process and must use an alternative means of communication.
|
| Sign & Accept |
Upon selection, an Electronic Signature popup will display. Customers have two options for signing: they can either use their mouse or mouse pad to sign ('Sign' radio button), or they can type their name and title as signature ('Type' radio button).
|
| Service Location Map |
The Service Map Location button only displays if the address for the site location is geo coded. By selecting the button, customers will see a map of the location the contract is intended for with service location markers. |
Related Articles
This article is related to the Sales CRM Workflow that includes the following process:


