AR Payment Batch
Last Modified on 06/24/2026 2:09 pm PDT
Pathway: Accounting > AR Payment Batch
The AR Payment Batch screen consolidates and manages payments received from accounts. When a payment is received, users can apply it to the account in an existing open AR batch, or create a new batch to record the payment in. Payments are reflected in an account's AR History after the batch has been posted.
Permissions
The following permissions are required to use the AR Payment Batch tool:
| Permission ID |
Permission Name |
| 117 |
AR Payment Batch |
| 269 |
Apply Deposit - affects the Deposit check box |
Logic
Division
- If a batch contains a payment from another division, that division will be listed below the batch's primary division on the AR Aging Management screen.
- If users are restricted to specific divisions, only the divisions they have access to will appear in the division dropdown filter. However, when viewing a batch for an accessible division that includes payments from a restricted division, the user can see payments for both divisions within that batch.
Filters and Field Descriptions
| Field |
Description |
| Filters |
| '+' Icon |
Creates a new payment batch.
|
| Period |
Filters on the calendar period payment batches are categorized. Period is established at the creation of a batch.
|
| Division |
Filters on the Division payment batches were created for and are limited to what the user has access to.
|
| Bank Account |
Filters on the bank account payments are deposited into.
|
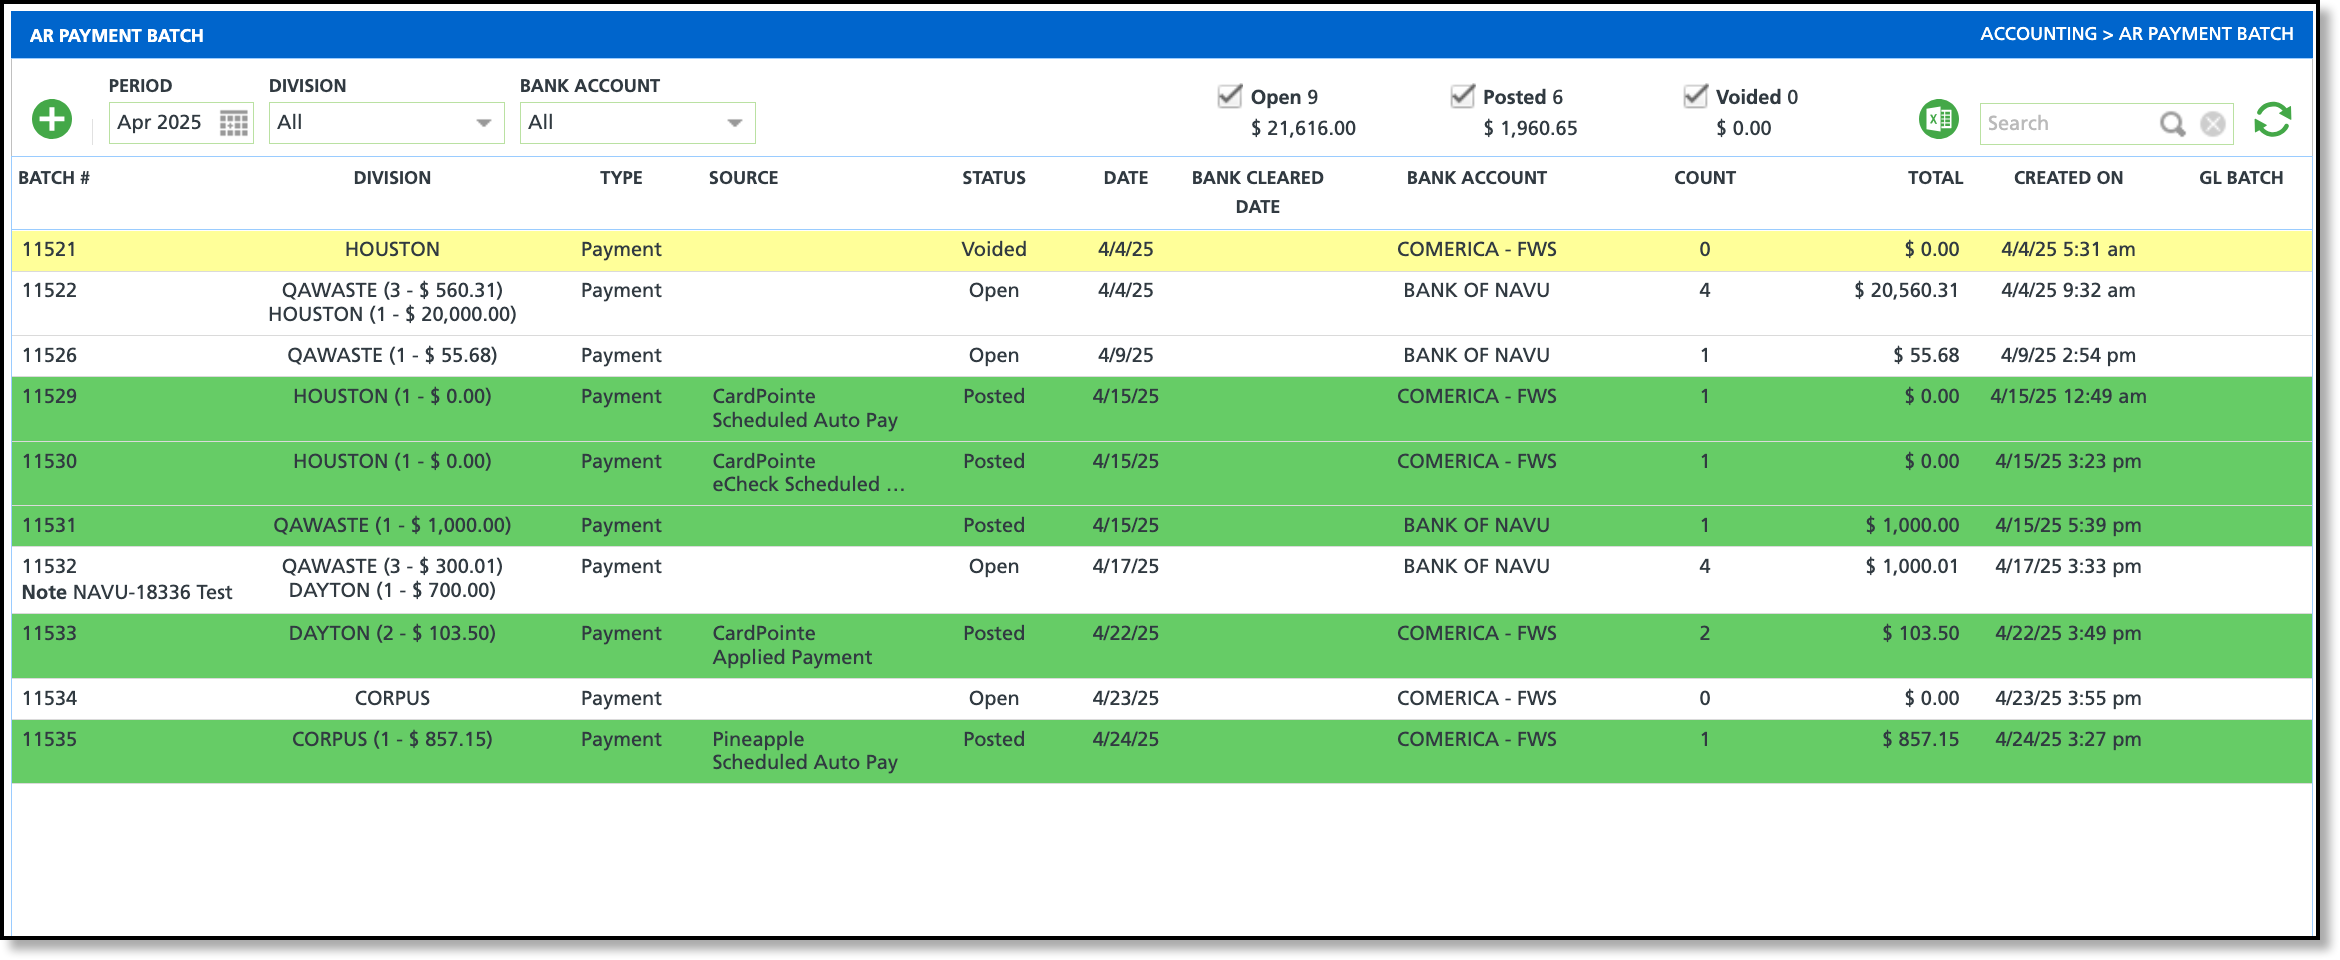
| Open |
Select to display only the Open payment batches. An Open payment batch is one that has not been posted or voided. The numerical value shown represents the total amount of payments that are still tied to an open batch.
|
| Voided |
Select to display only the voided payment batches. The numerical value shown represents the total amount of payments that are associated with a voided batch.
|
| Posted |
Select to display only posted payment batches. The numerical value shown represents the total amount of payments that have been applied/posted to accounts.
|
| Fields |
| Batch # |
Identifies the batch.
|
| Division |
Indicates the Division the batch is assigned. If a batch includes a payment for an account of another division, the division for that account will be listed below the batch's primary division.
|
| Type |
Indicates the transaction type, or the form the payment came in (cash, check, ACH, etc.).
|
| Is Merchant |
Displays the name of the third party processing system used for credit card processing.
|
| Deposit Date |
Displays the date the payment was deposited into the bank account.
|
| Bank Account |
Identifies the bank account payments are deposited into.
|
| Deposit Cleared Date |
Indicates the date the payment was successfully deposited into the selected bank account.
|
| Count |
Displays a total count of payments received for the batch.
|
| Total |
Displays the total amount of all payments included in the batch.
|
| Created On |
Records when the payment batch was created.
|
| GL Batch |
Displays the Batch ID for the General Ledger (Accounting > GL Batch Processing).
|
| Search |
Broad search across all fields in the AR Payment Batch screen.
|
| Excel |
Exports the AR Payment Batch screen to an excel file.
|
Create an AR Payment Batch
The following process must be followed to create a new AR Payment Batch to process payments.
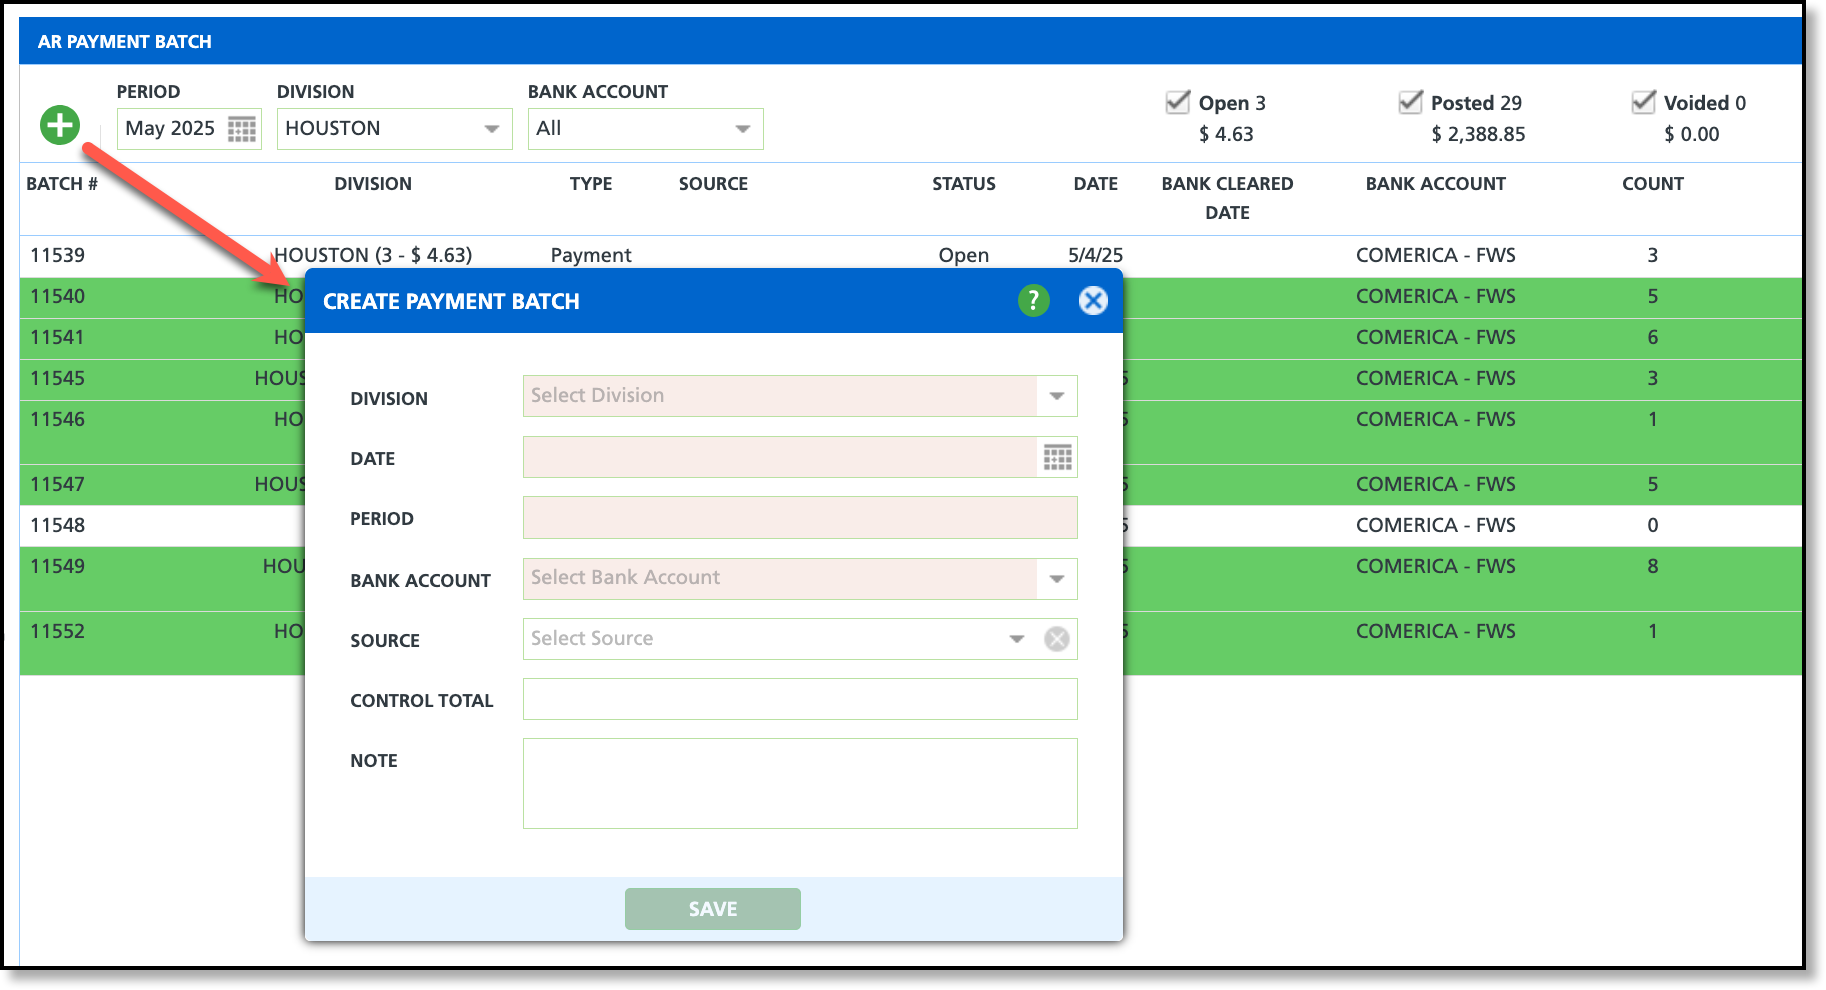
- From the AR Payment Batch screen, select the green ‘+' icon to display the 'Create Payment Batch’ pop-up editor.
- Complete all required fields highlighted in red.
- Select the Division the payment batch belongs. If the batch includes payments for accounts in another division, the division selected here is considered the primary division.
- Enter or select a Deposit Date payments recorded in the payment batch will be deposited.
- Select a calendar Period the payment batch falls into.
- Select the Bank Account payments will be deposited to.
- Select Save when finished and the new payment batch will display on the AR Payment Batch screen.
Add Control Total
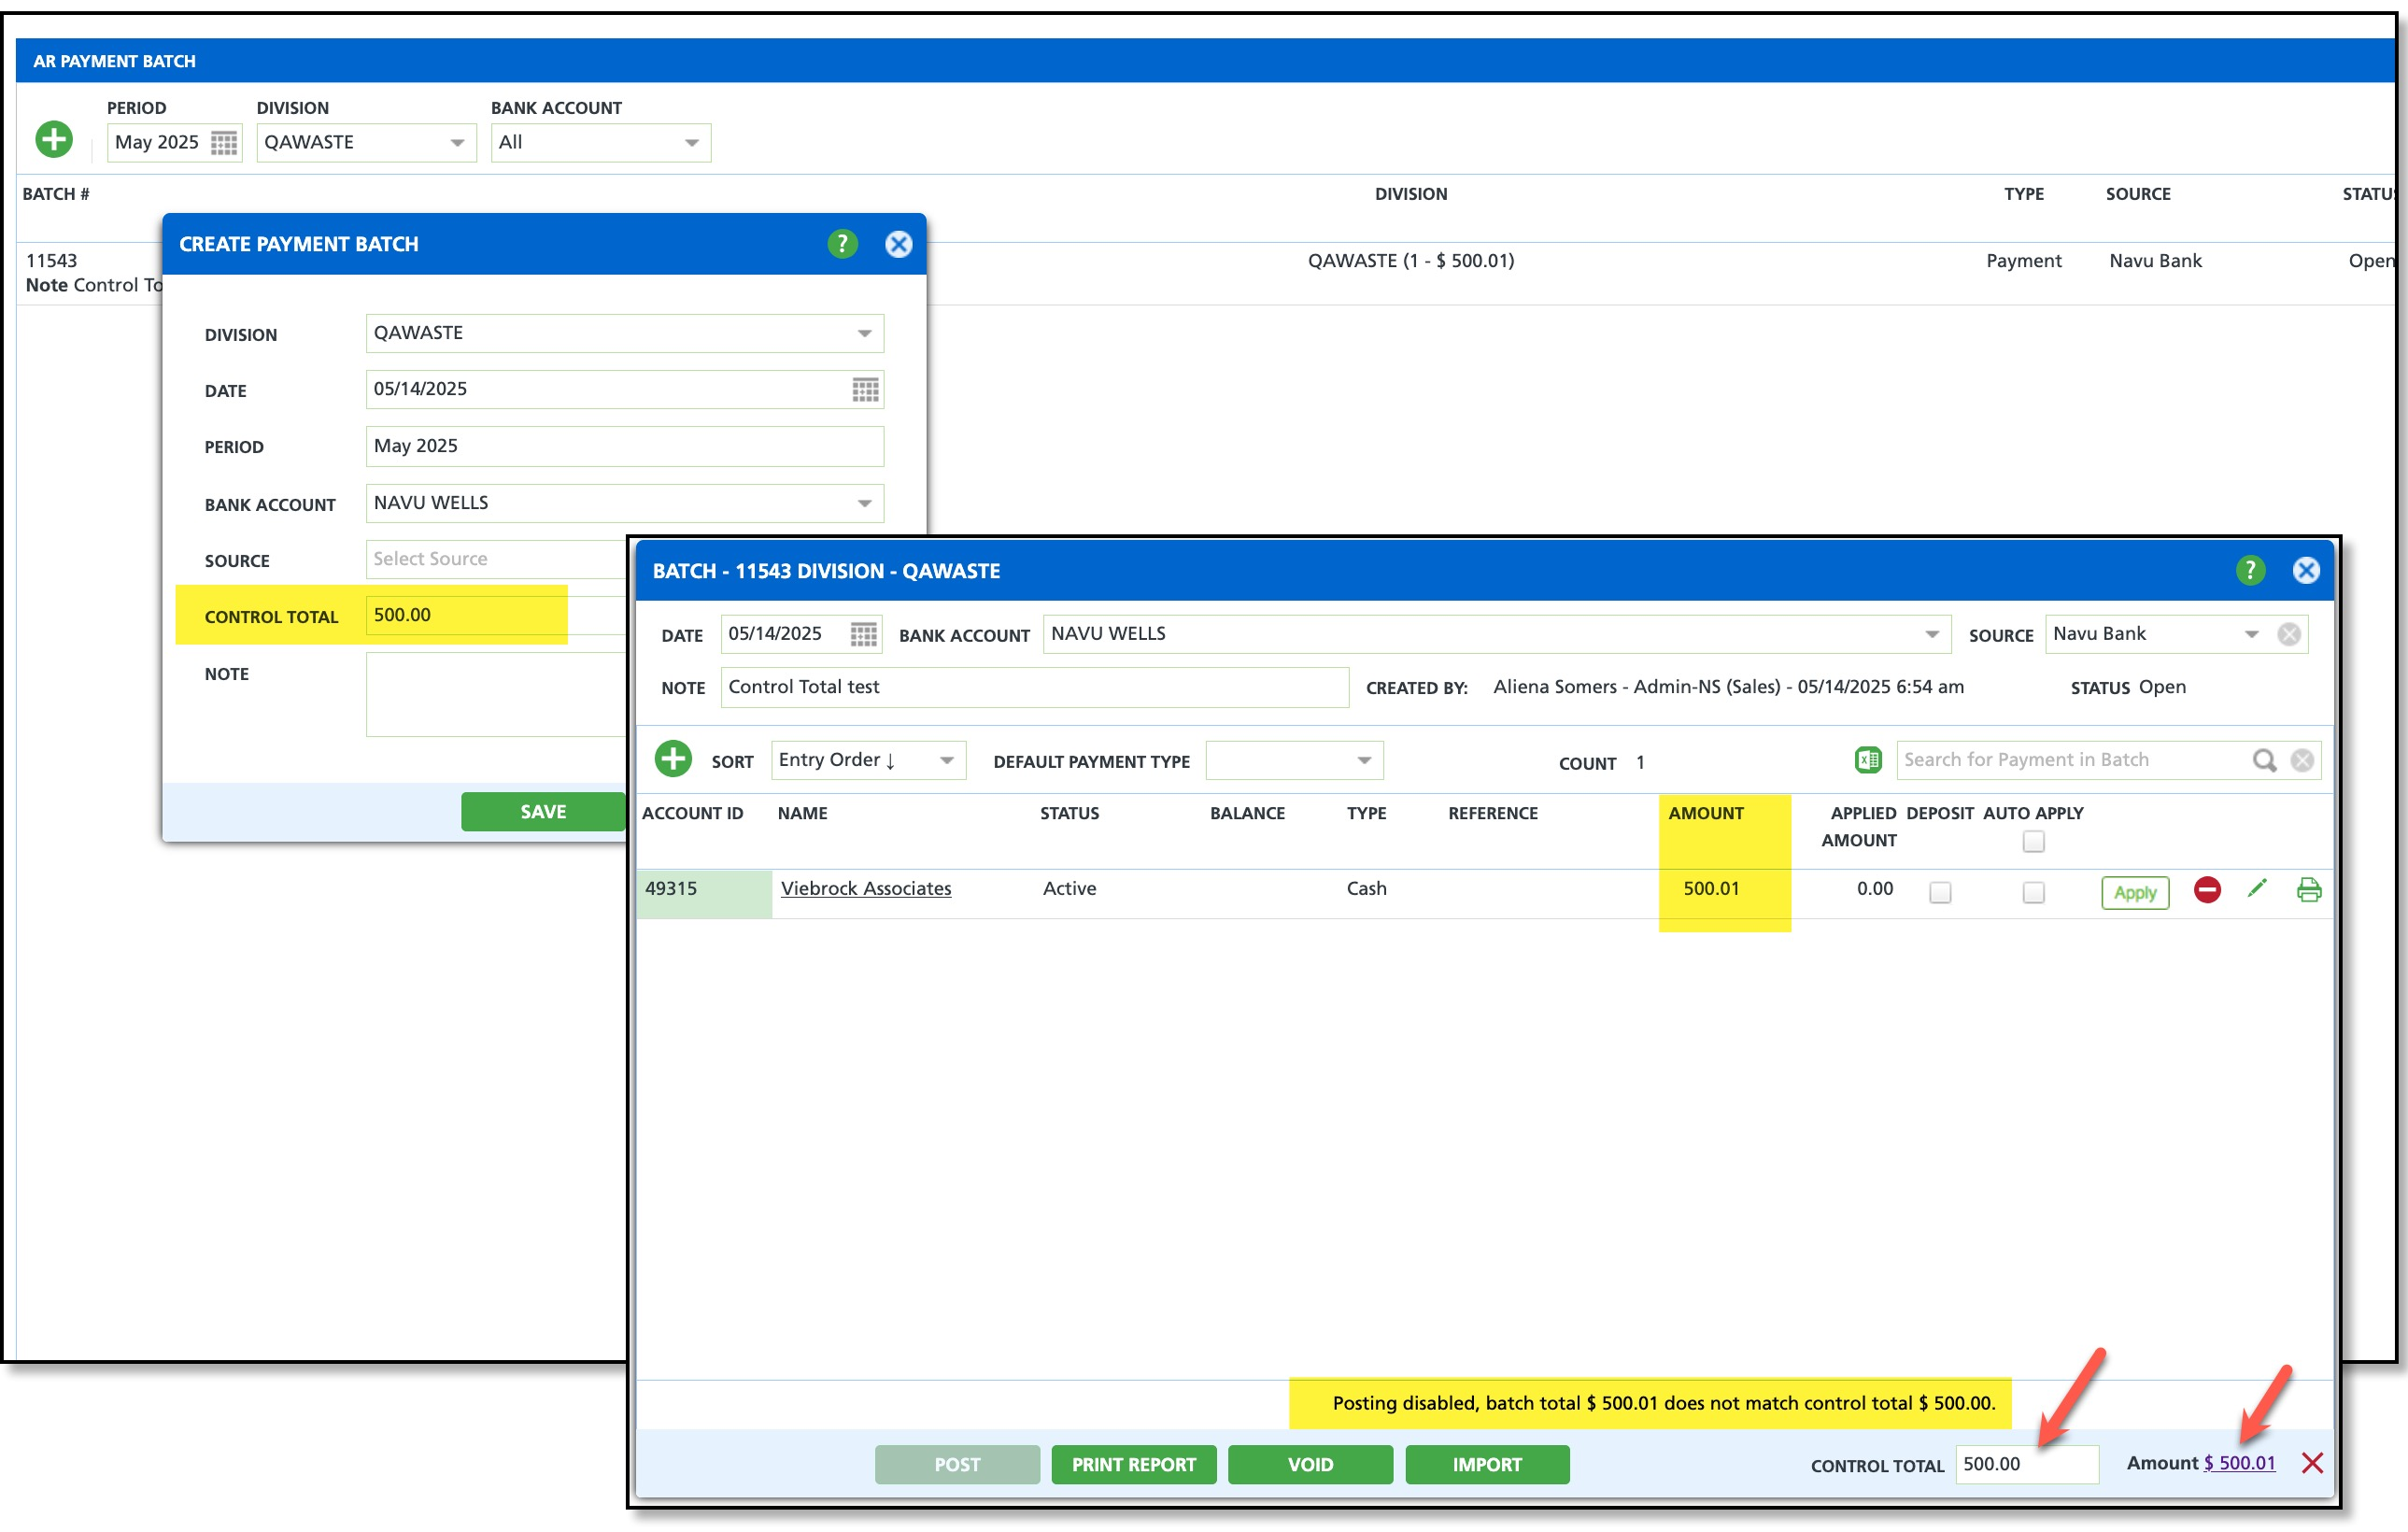
A control total can be used as a checks-and-balances measure to help prevent data entry errors and ensure batch accuracy before processing. This value can be entered when creating a batch using the Create Payment Batch popup, or it can be added or updated later in the Batch Details screen by entering a value in the Control Total field. Adding a control total affects the ability to post the batch and uses the following logic:
- If the Control Total field is null/blank for the batch, the Post button is enabled.
- If a value is entered in the Control Total field and the payment amount does not match exactly, the Post button is disabled and a message is displayed indicating the discrepancy.
Add Payment to an Open Batch
To access a batch and start applying payments, double-click on the row of an open batch in the AR Payment Batch screen. This will open the Batch Payment Editor. Follow the steps in the Batch Payment Editor section below to add payments to the batch.
Batch Payment Editor
Search and Add Accounts/Sites
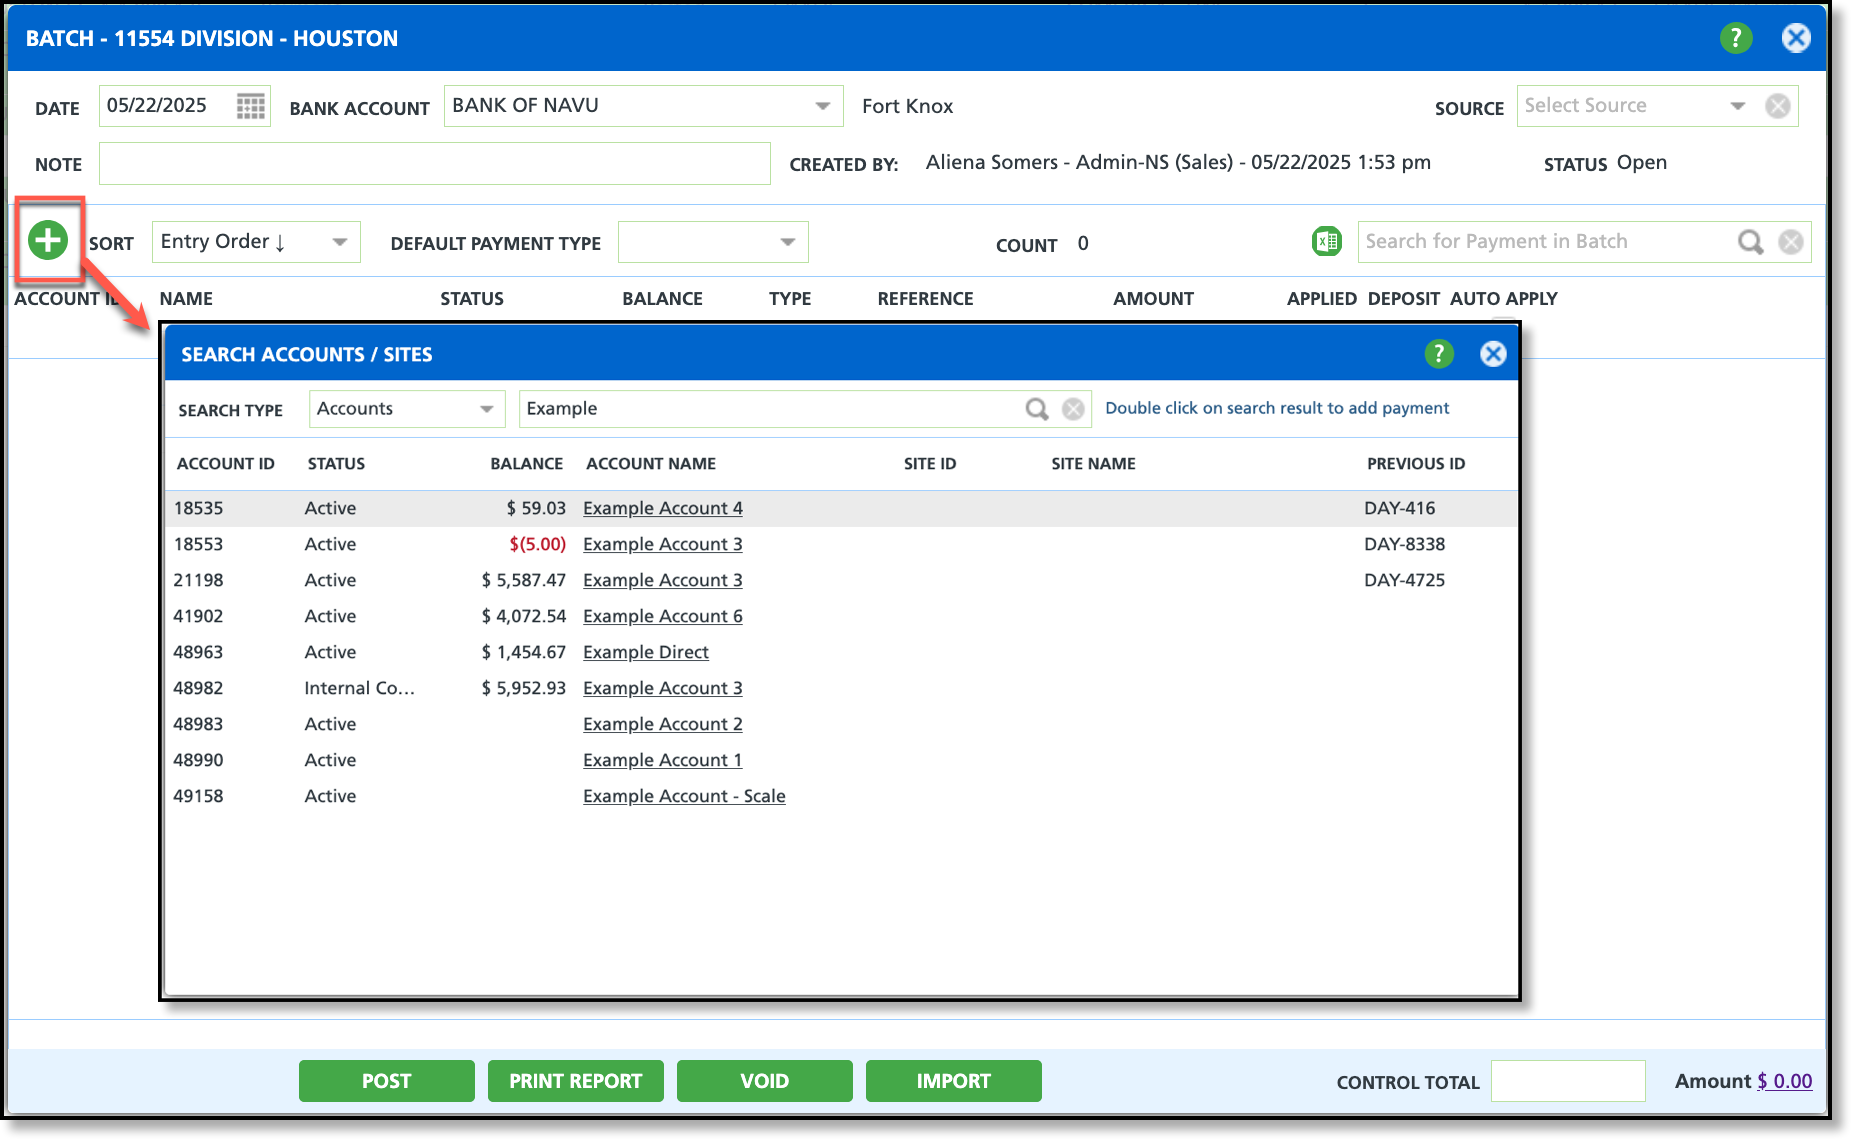
- Initiate the account/site search by clicking the green + icon, or pressing the F5 key on your keyboard.
- Search for accounts using the Search Type drop down and the 'Search Accounts/Sites' search bar.
- If only one result is returned, it will automatically populate in the Batch Details, and the search window will close. If multiple results are returned, double-click the appropriate row for the intended account—avoid clicking directly on the account name. Once selected, the account/site will appear in the payment section of the batch, and the search window will close.
Apply Payments to the Account/Site
After searching for and adding an account or site to the batch, a payment can be entered and applied. The system offers two payment application options: automatic or manual. If a payment is not applied to an invoice when the batch is posted (and un-post is not an option), it will remain unapplied until a user applies it through either AR History or the Unapplied Management tool in the Accounting module.
Tip: If all payment types are the same, simplify your process by setting a Default Payment Type to apply automatically to each new payment.
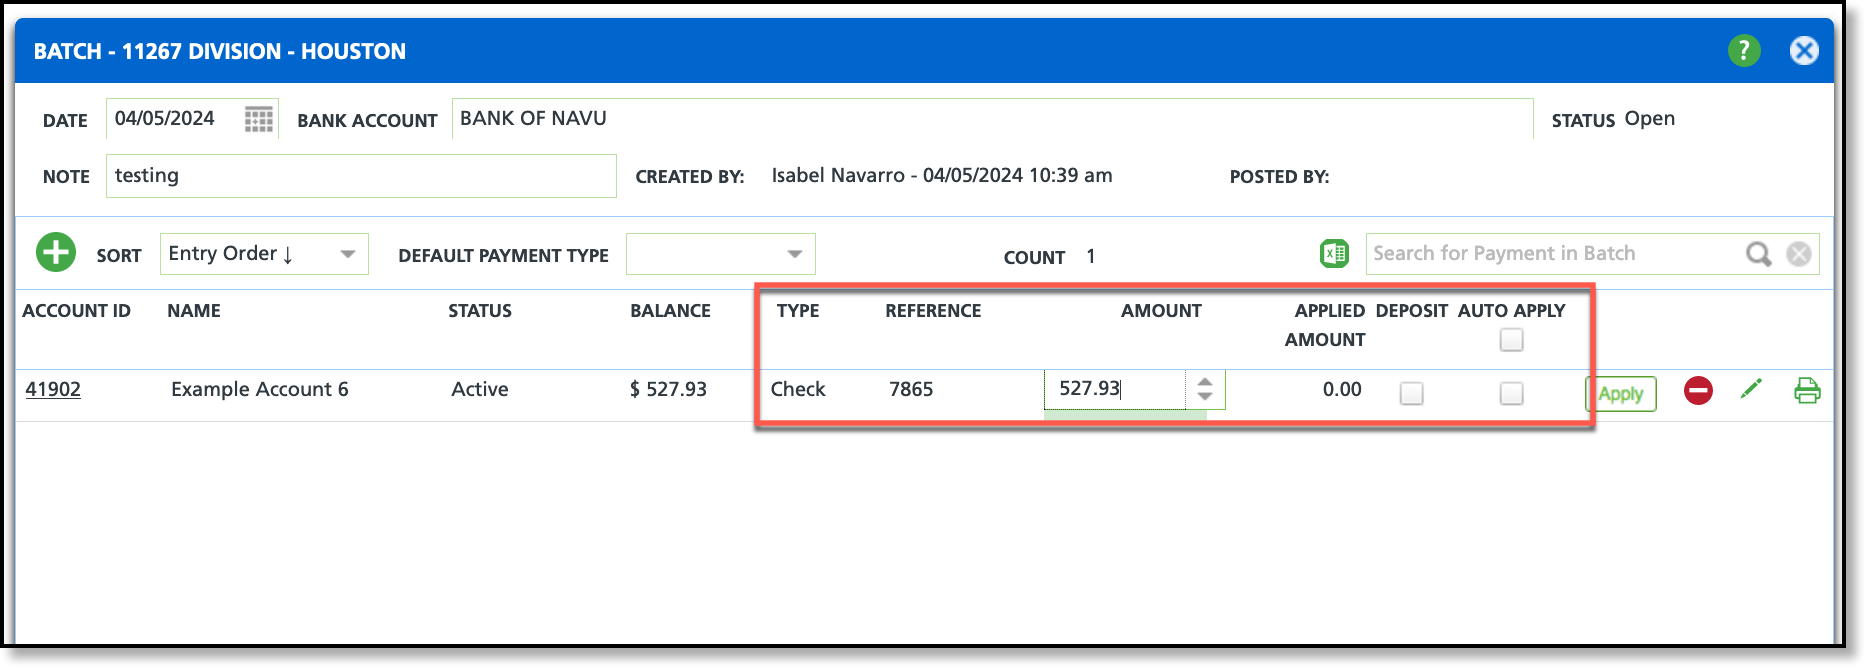
- Select the Type of payment received by clicking within the 'Type' column.
- Enter a Reference ID by clicking within the 'Reference' column. *This is not required. Refer to your company's policies on entries to this field.
- Enter a value for the Amount received by clicking within the 'Amount' column.
- Select the Deposit checkbox if the payment should be recorded as a deposit on the account and not towards an invoice.
- Select the Auto Apply check box and the system will automatically apply the amount entered to the oldest invoices first OR select the Apply button (displays after an amount is entered) to manually distribute the funds to open invoices. More information on the "Apply" option is captured below.
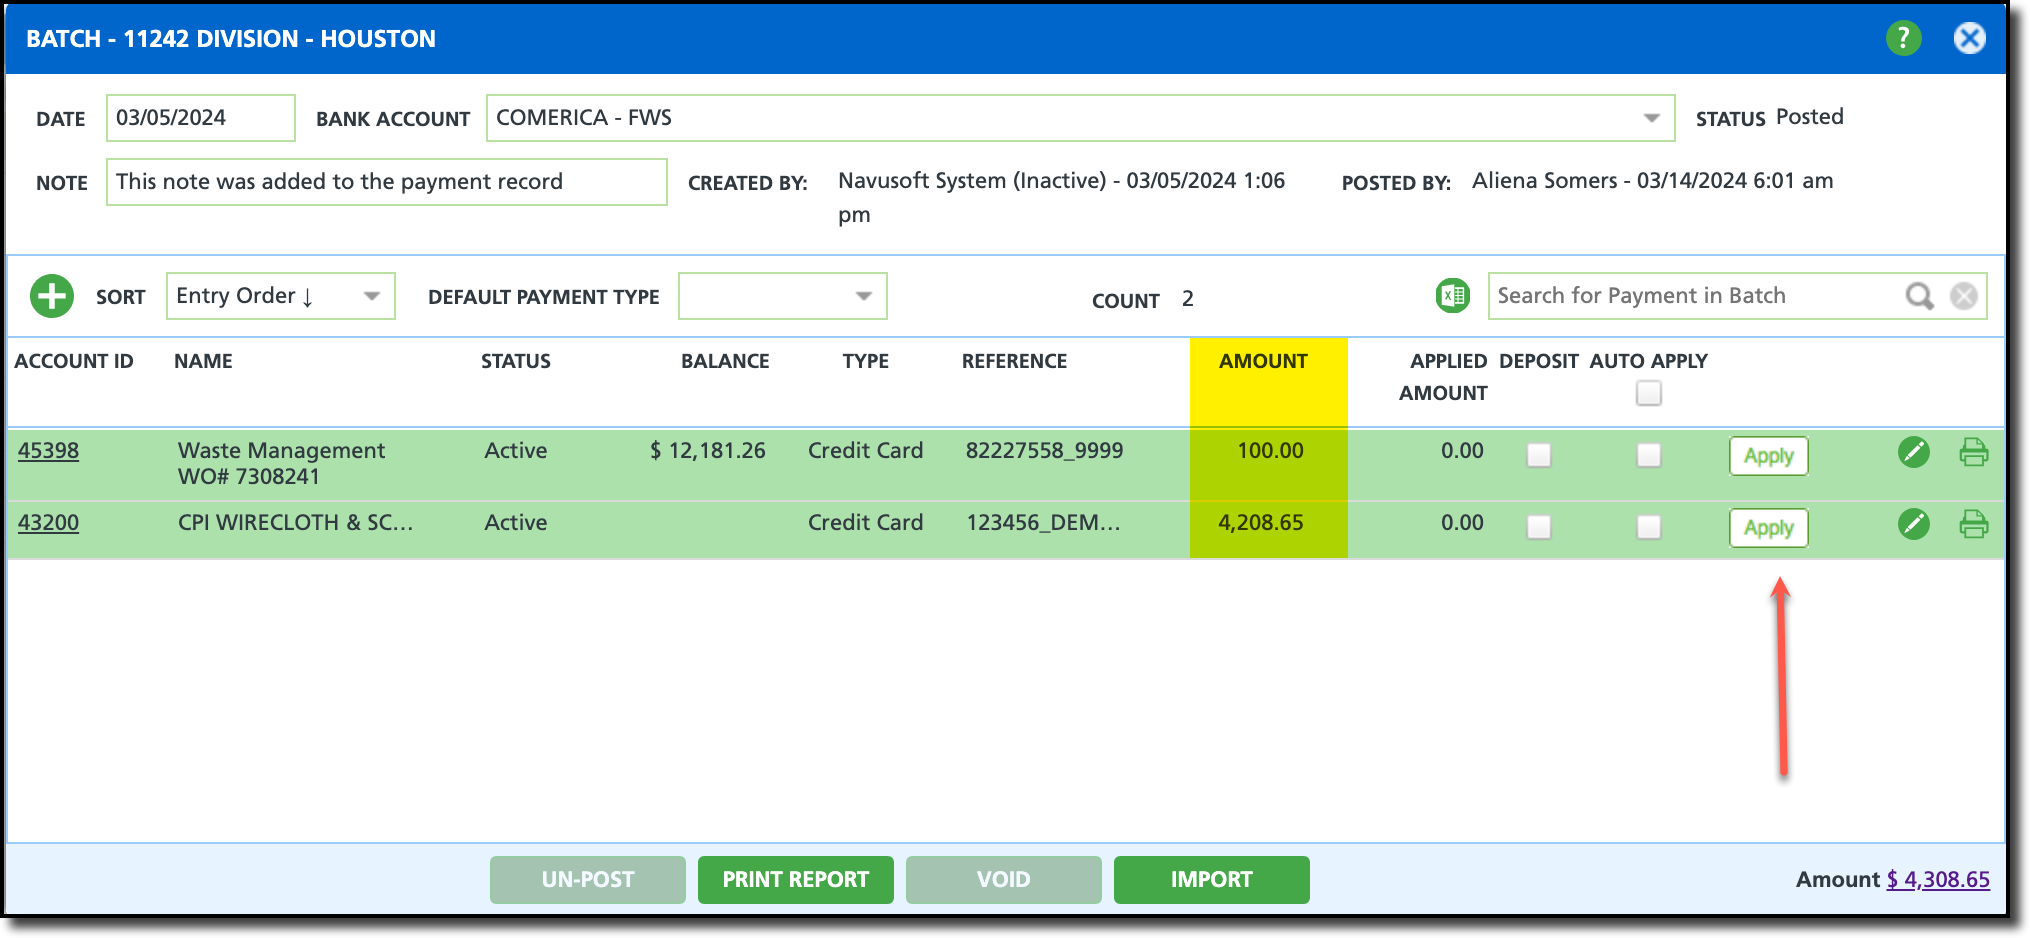
Using the Apply Button
To manually distribute payments to open invoice balances, enter the payment amount into the Amount field and click away. Upon clicking away, the Apply button will display.
Manually Select and Apply to Invoices
When the Apply button is selected, the Invoice Application screen opens, displaying all invoices with open balances for the account or site, sorted by oldest first. Follow the steps below to manually disperse and apply the payment to the invoices.
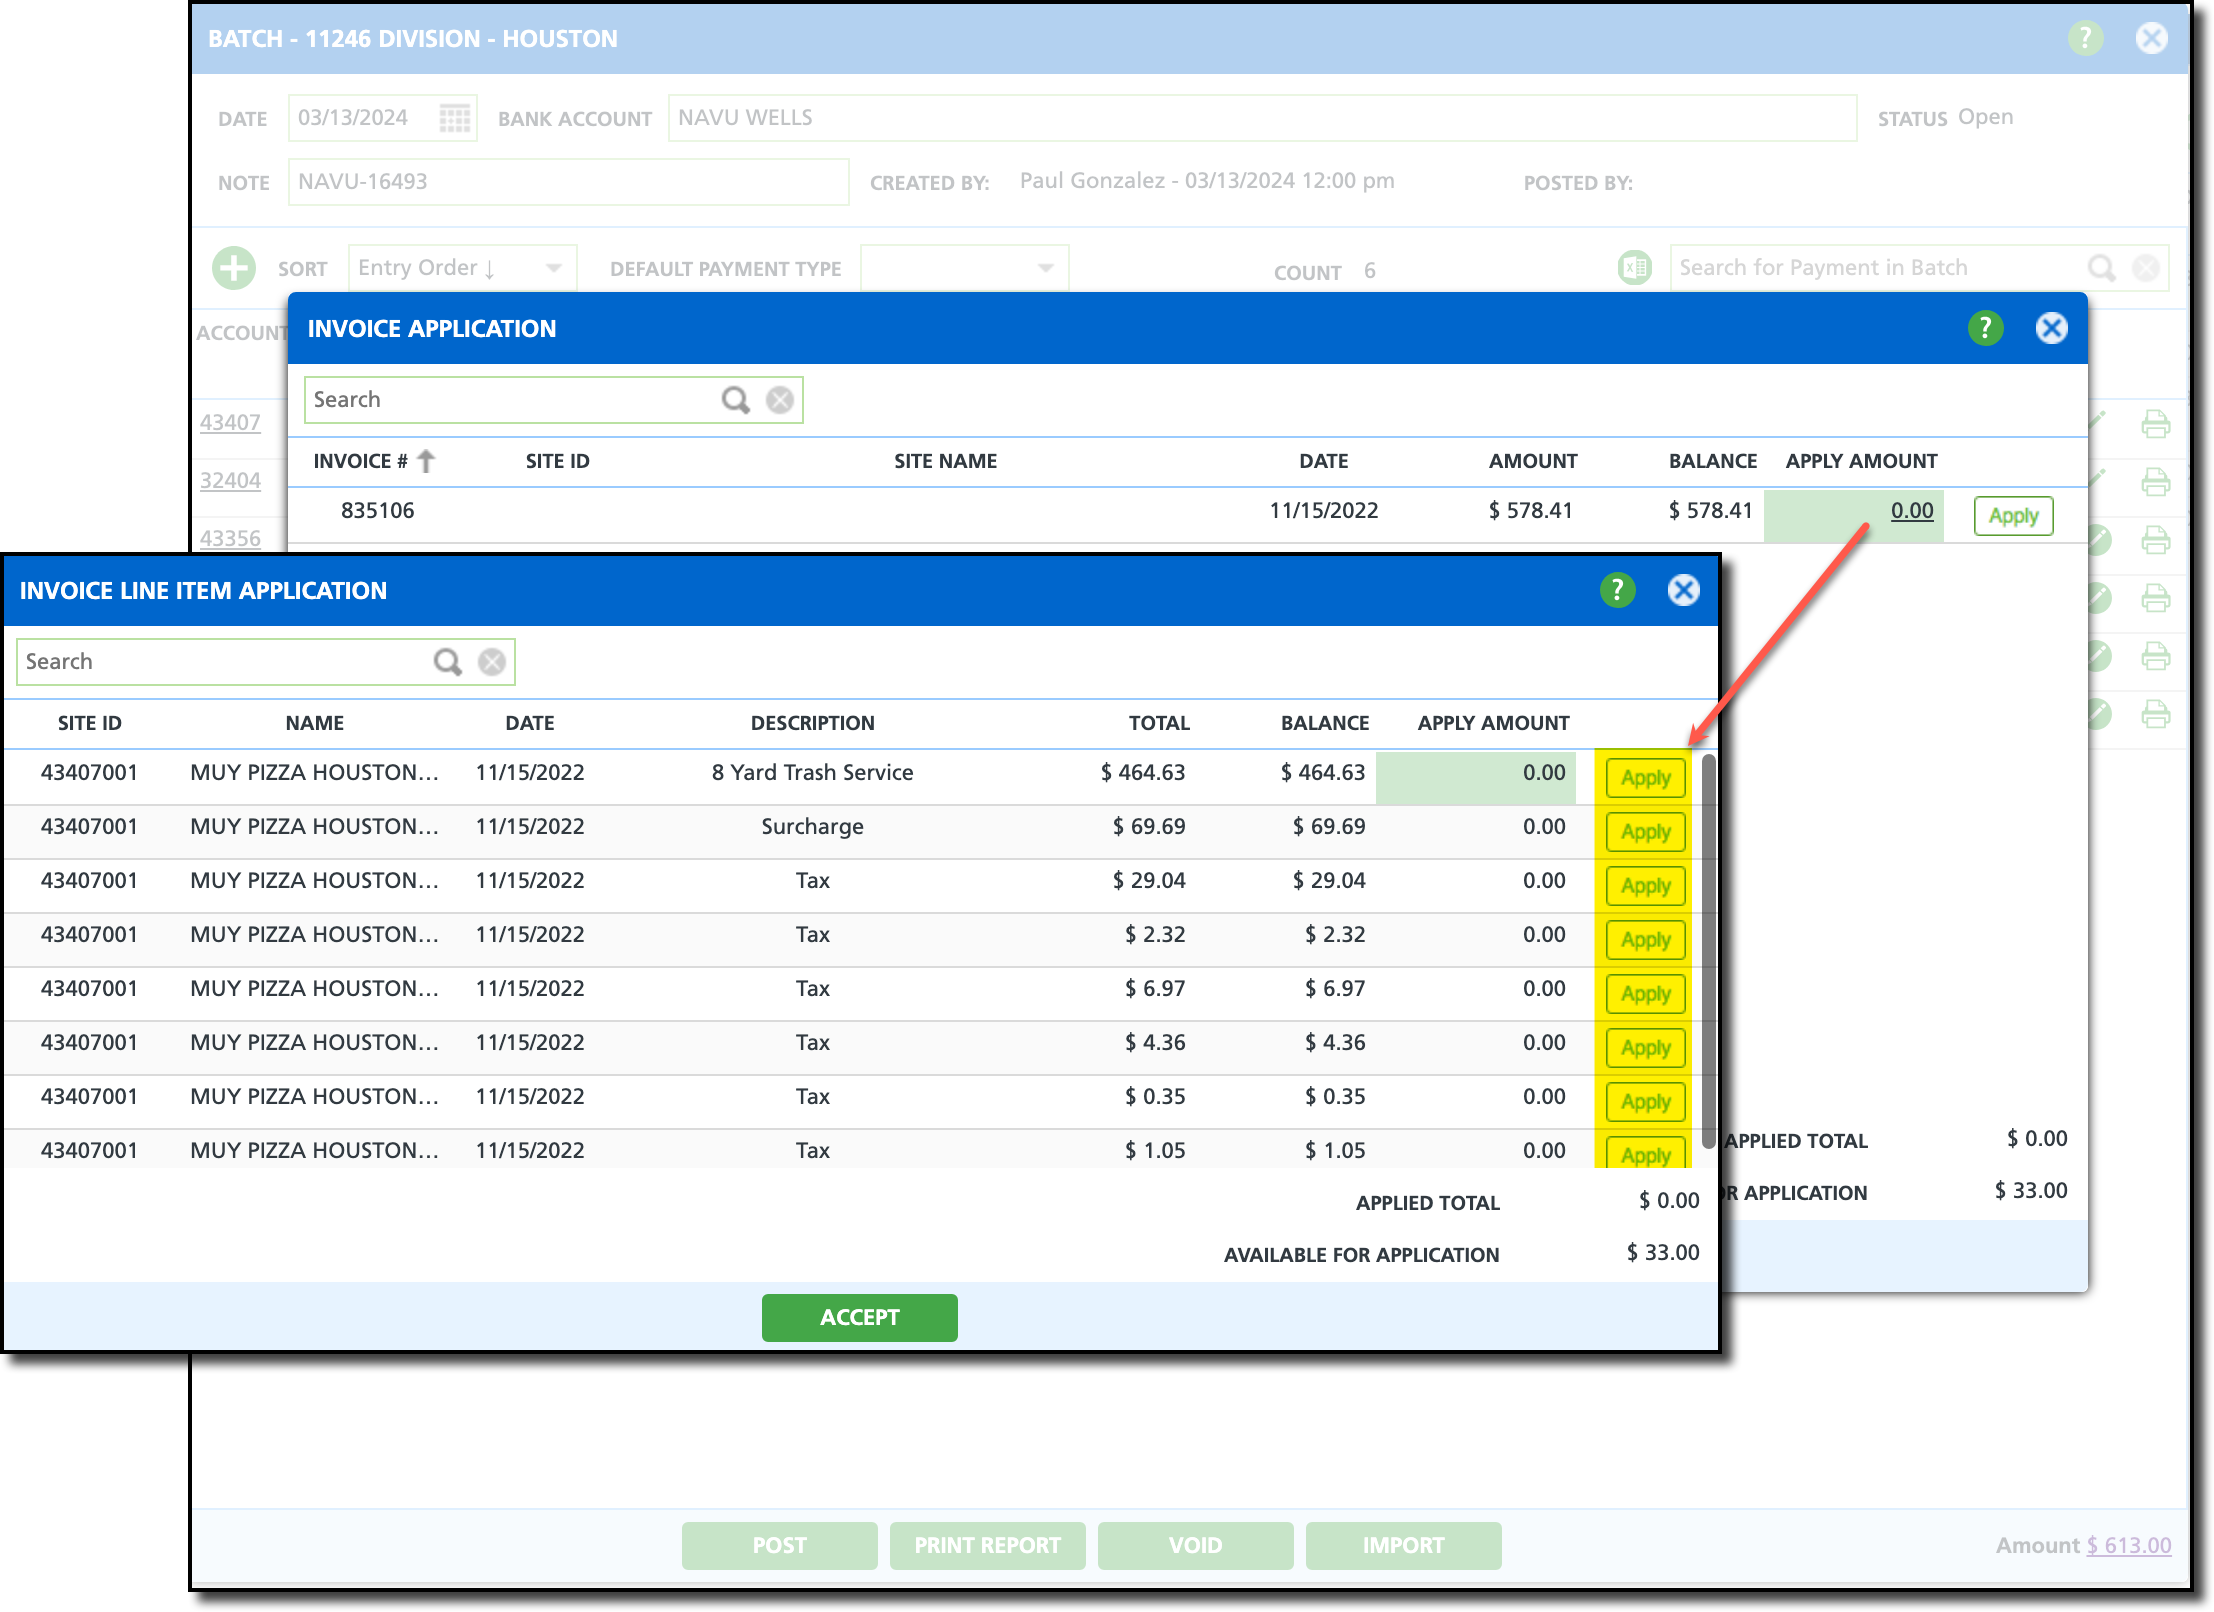
- From the Invoice Application screen, click on the value from the 'Apply Amount' column. This will open the Invoice Line Item Application screen.
- Select the Apply button for each invoice the payment should be applied to.
- As you select 'Apply,' the 'Applied Total' and 'Available for Application' values displayed at the bottom right corner of the popup will automatically update to reflect the applied amounts.
- Select Accept to save the payment amount to the invoices it was applied. This will also close the Invoice Line Item Application popup.
- With the Invoice Application screen still displayed, click Save and the payment will be recorded to the batch.
Post an AR Payment Batch
After all payments have been added and applied, the batch can be posted. Once 'Post' is clicked, payments will be reflected on the accounts for the invoices they were applied.
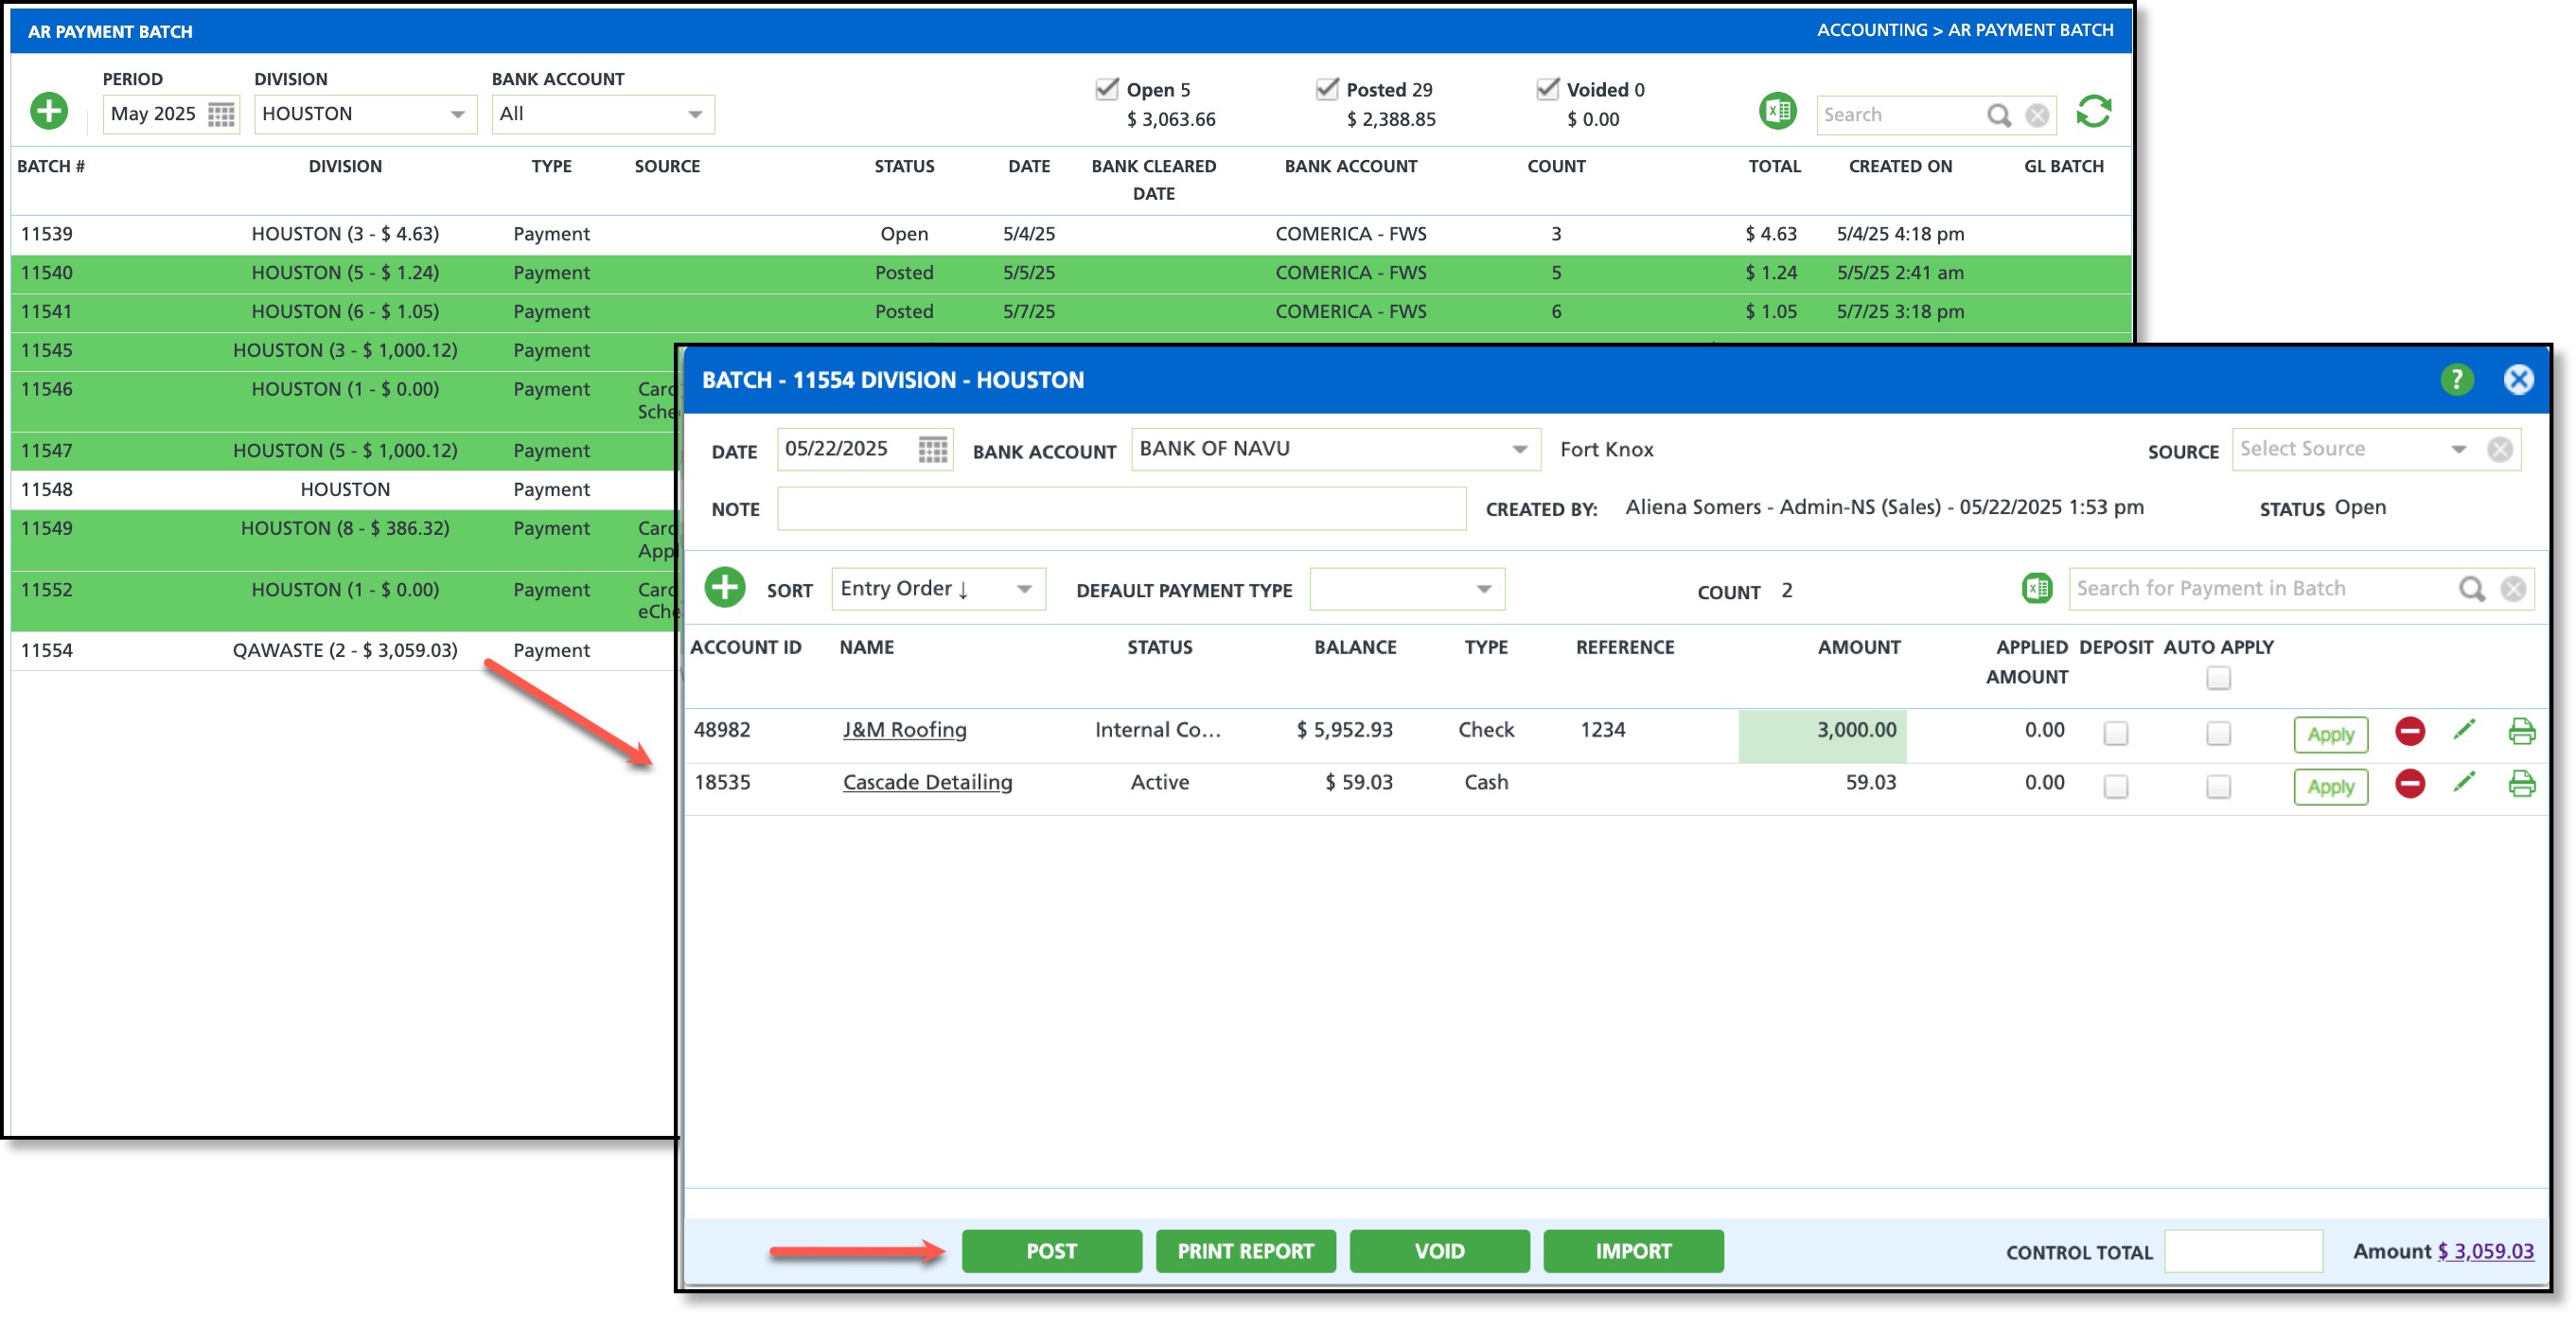
- Double-click within the row of the payment batch that is ready to be posted to display the batch pop-up editor.
- Review the Batch ID located at the top of the editor to confirm the correct batch will be posted.
- Select Post. A Confirmation popup displays, select 'Yes' to confirm.
- After posting, the Post button will change to 'Un-Post' should the batch need to be un-posted and returned to an 'Open' status.
- The Post button is disabled if a control total has been entered and it does not exactly match the total Amount collected in the batch.
- If the payment batch was successfully posted, a Success popup will display and the batch record will display in green on the AR Payment Batch screen.
Void an AR Payment Batch
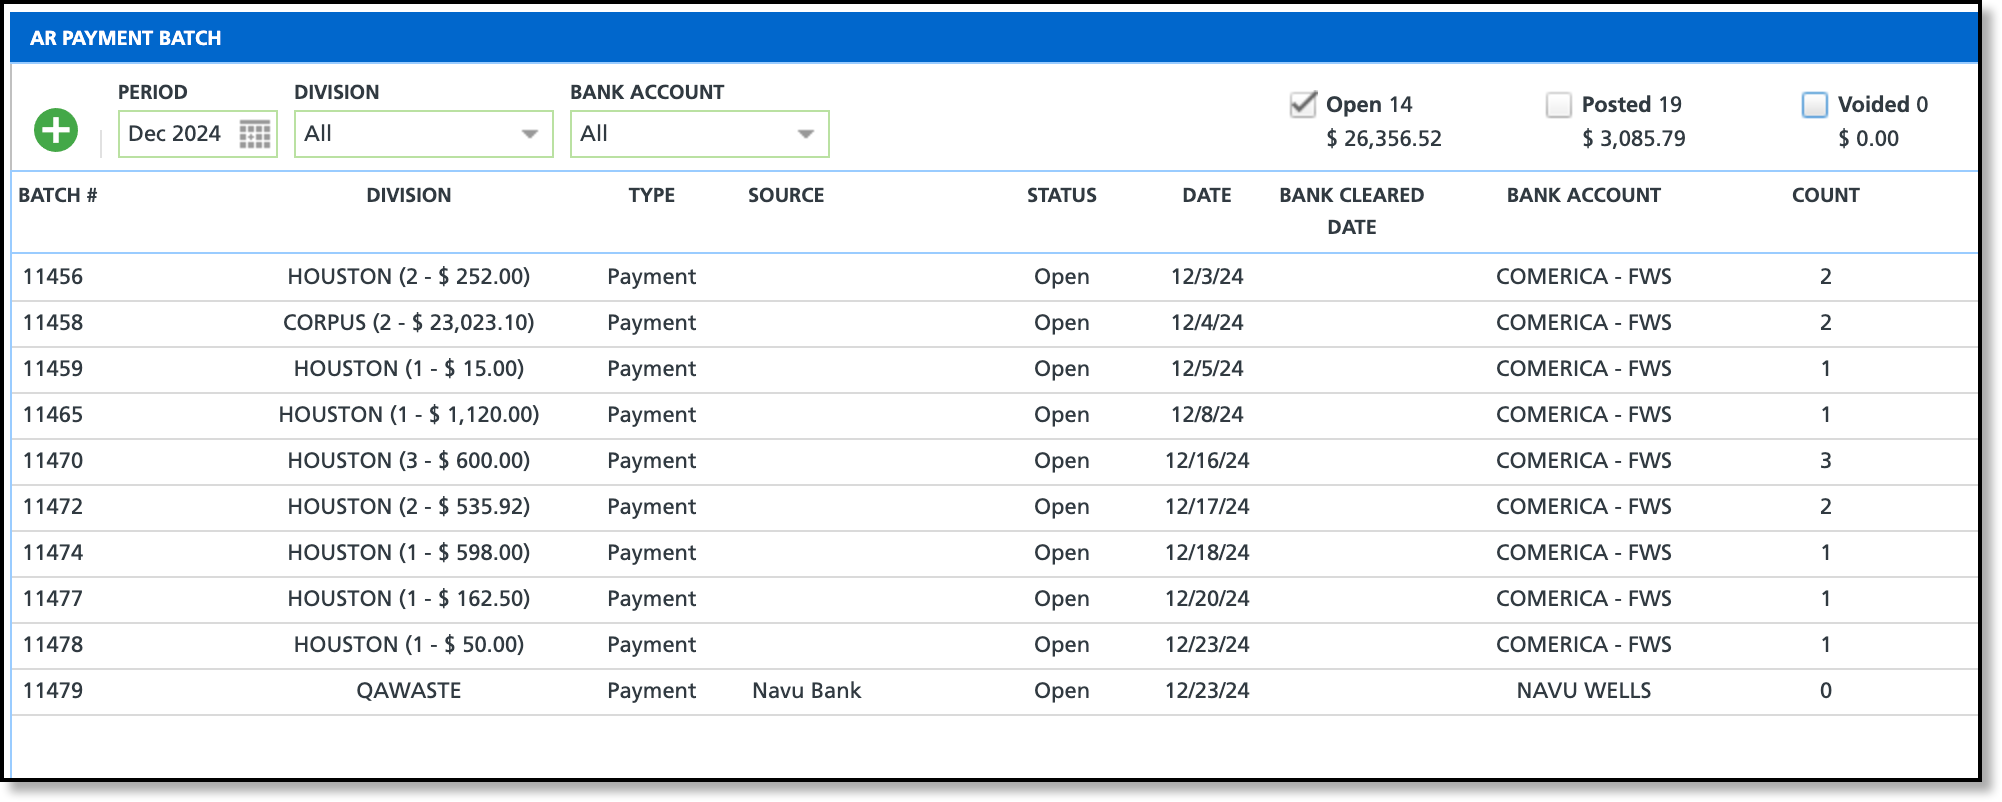
If a batch is in an 'Open' status, the option to void is available. Posted batches may also be voided if the 'Un-Post' option remains available and the user 'un-posts' the batch first. Voided batches will continue to display on the AR Payment Batch screen highlighted in yellow with a 'Voided' status.
Review Lockbox Payments and 'Change Account'
If a Lockbox-imported payment is applied to the wrong account, or routed to the default account because the account ID in the import file did not match any account in the system, you can transfer the payment to the correct account using the steps below.
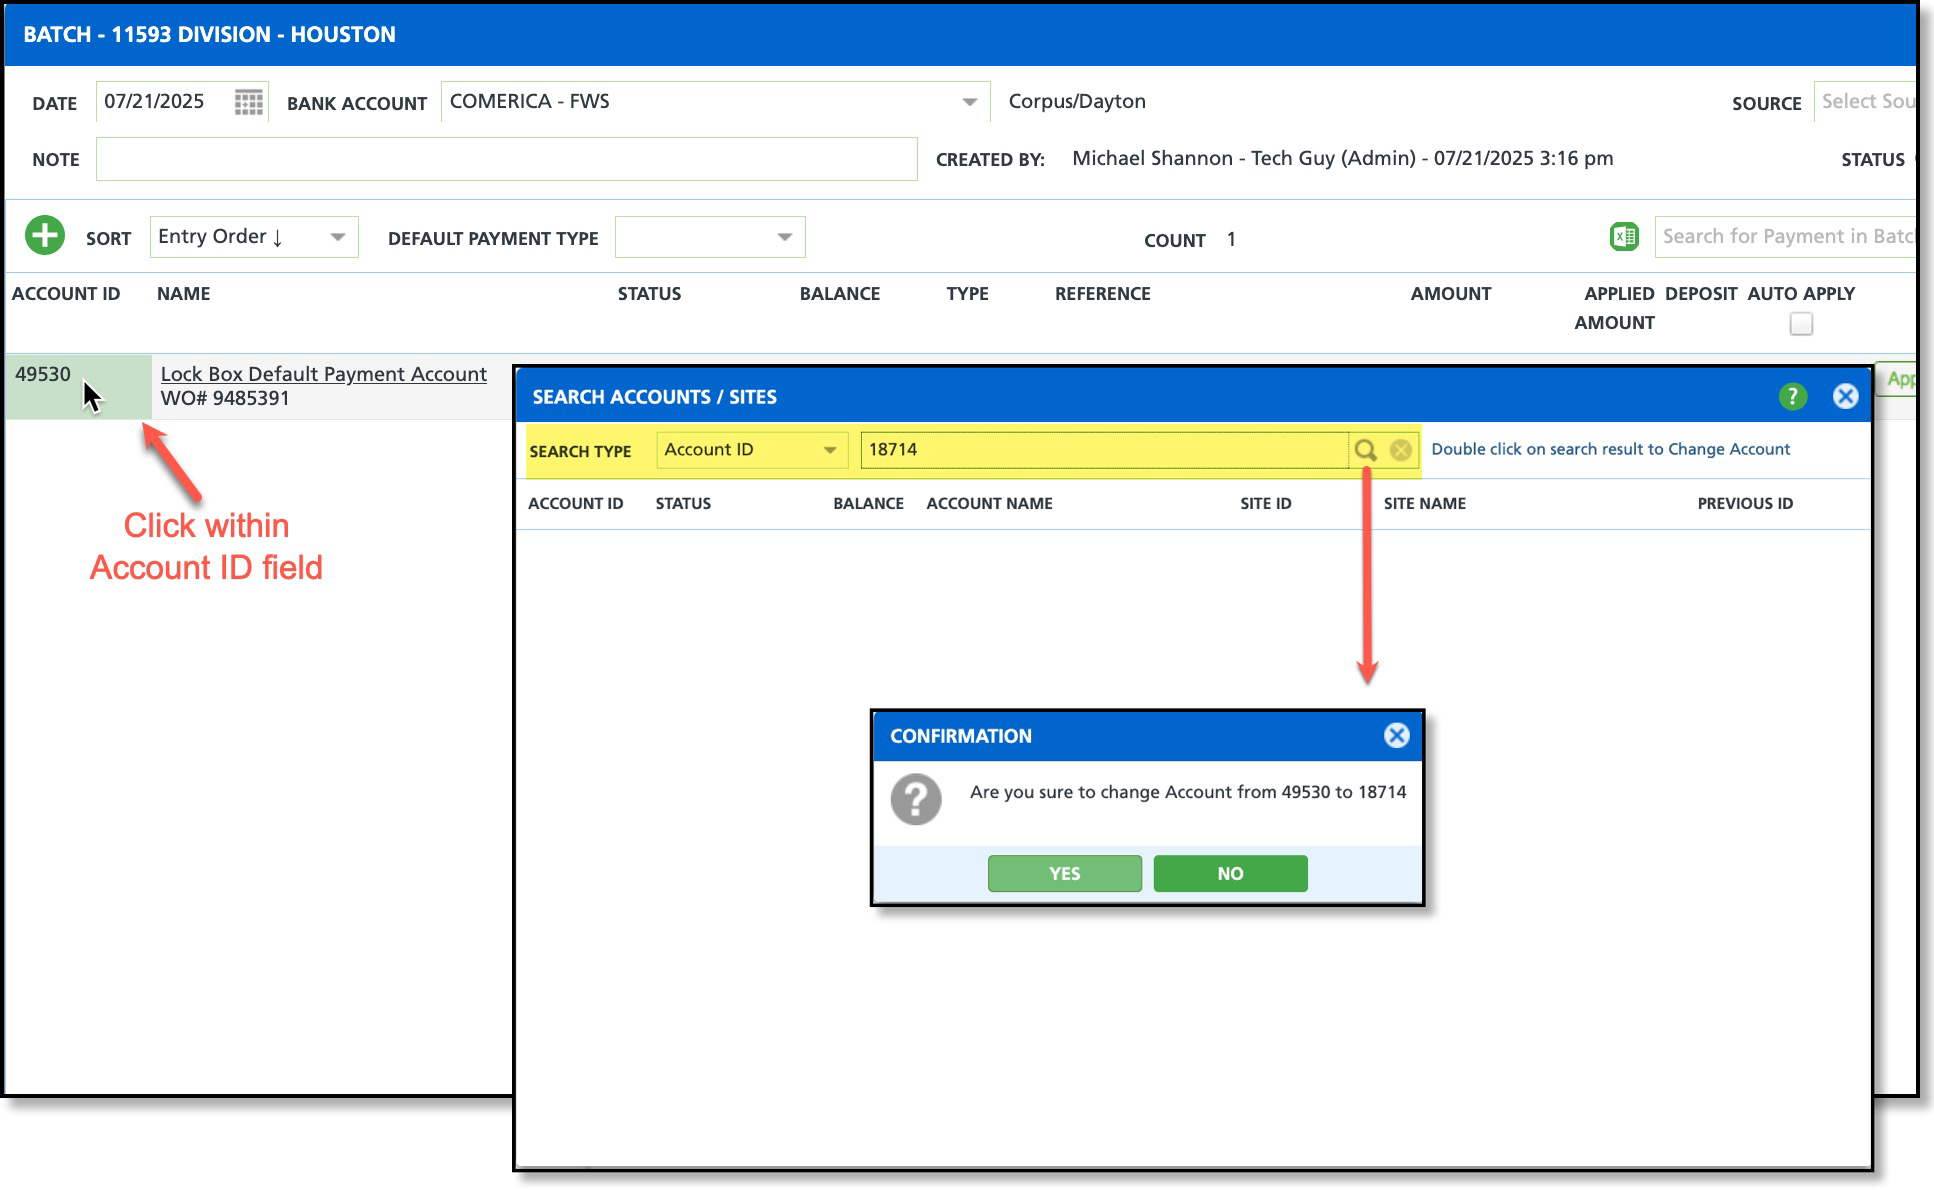
Step-By-Step Process
- From the AR Payment Batch screen, double-click the row of the open batch you want to review to open the Batch Details screen.
- Click inside the Account ID field to open the Search Accounts / Sites popup.
- Choose a Search Type (for example, Account ID or Account Name), enter the account you want the payment transferred to, and click the Search icon.
- When the confirmation popup appears, choose Yes to apply the change.
Related Articles
Unapplied Management- Quickly audit and apply payments that were posted in a batch, but were not applied to an invoice.
Daily Auto Apply
Lock Box Payment Import Format 3


