Inventory Management
Last Modified on 03/22/2024 6:37 am PDT
Pathway: Operations > Inventory Management
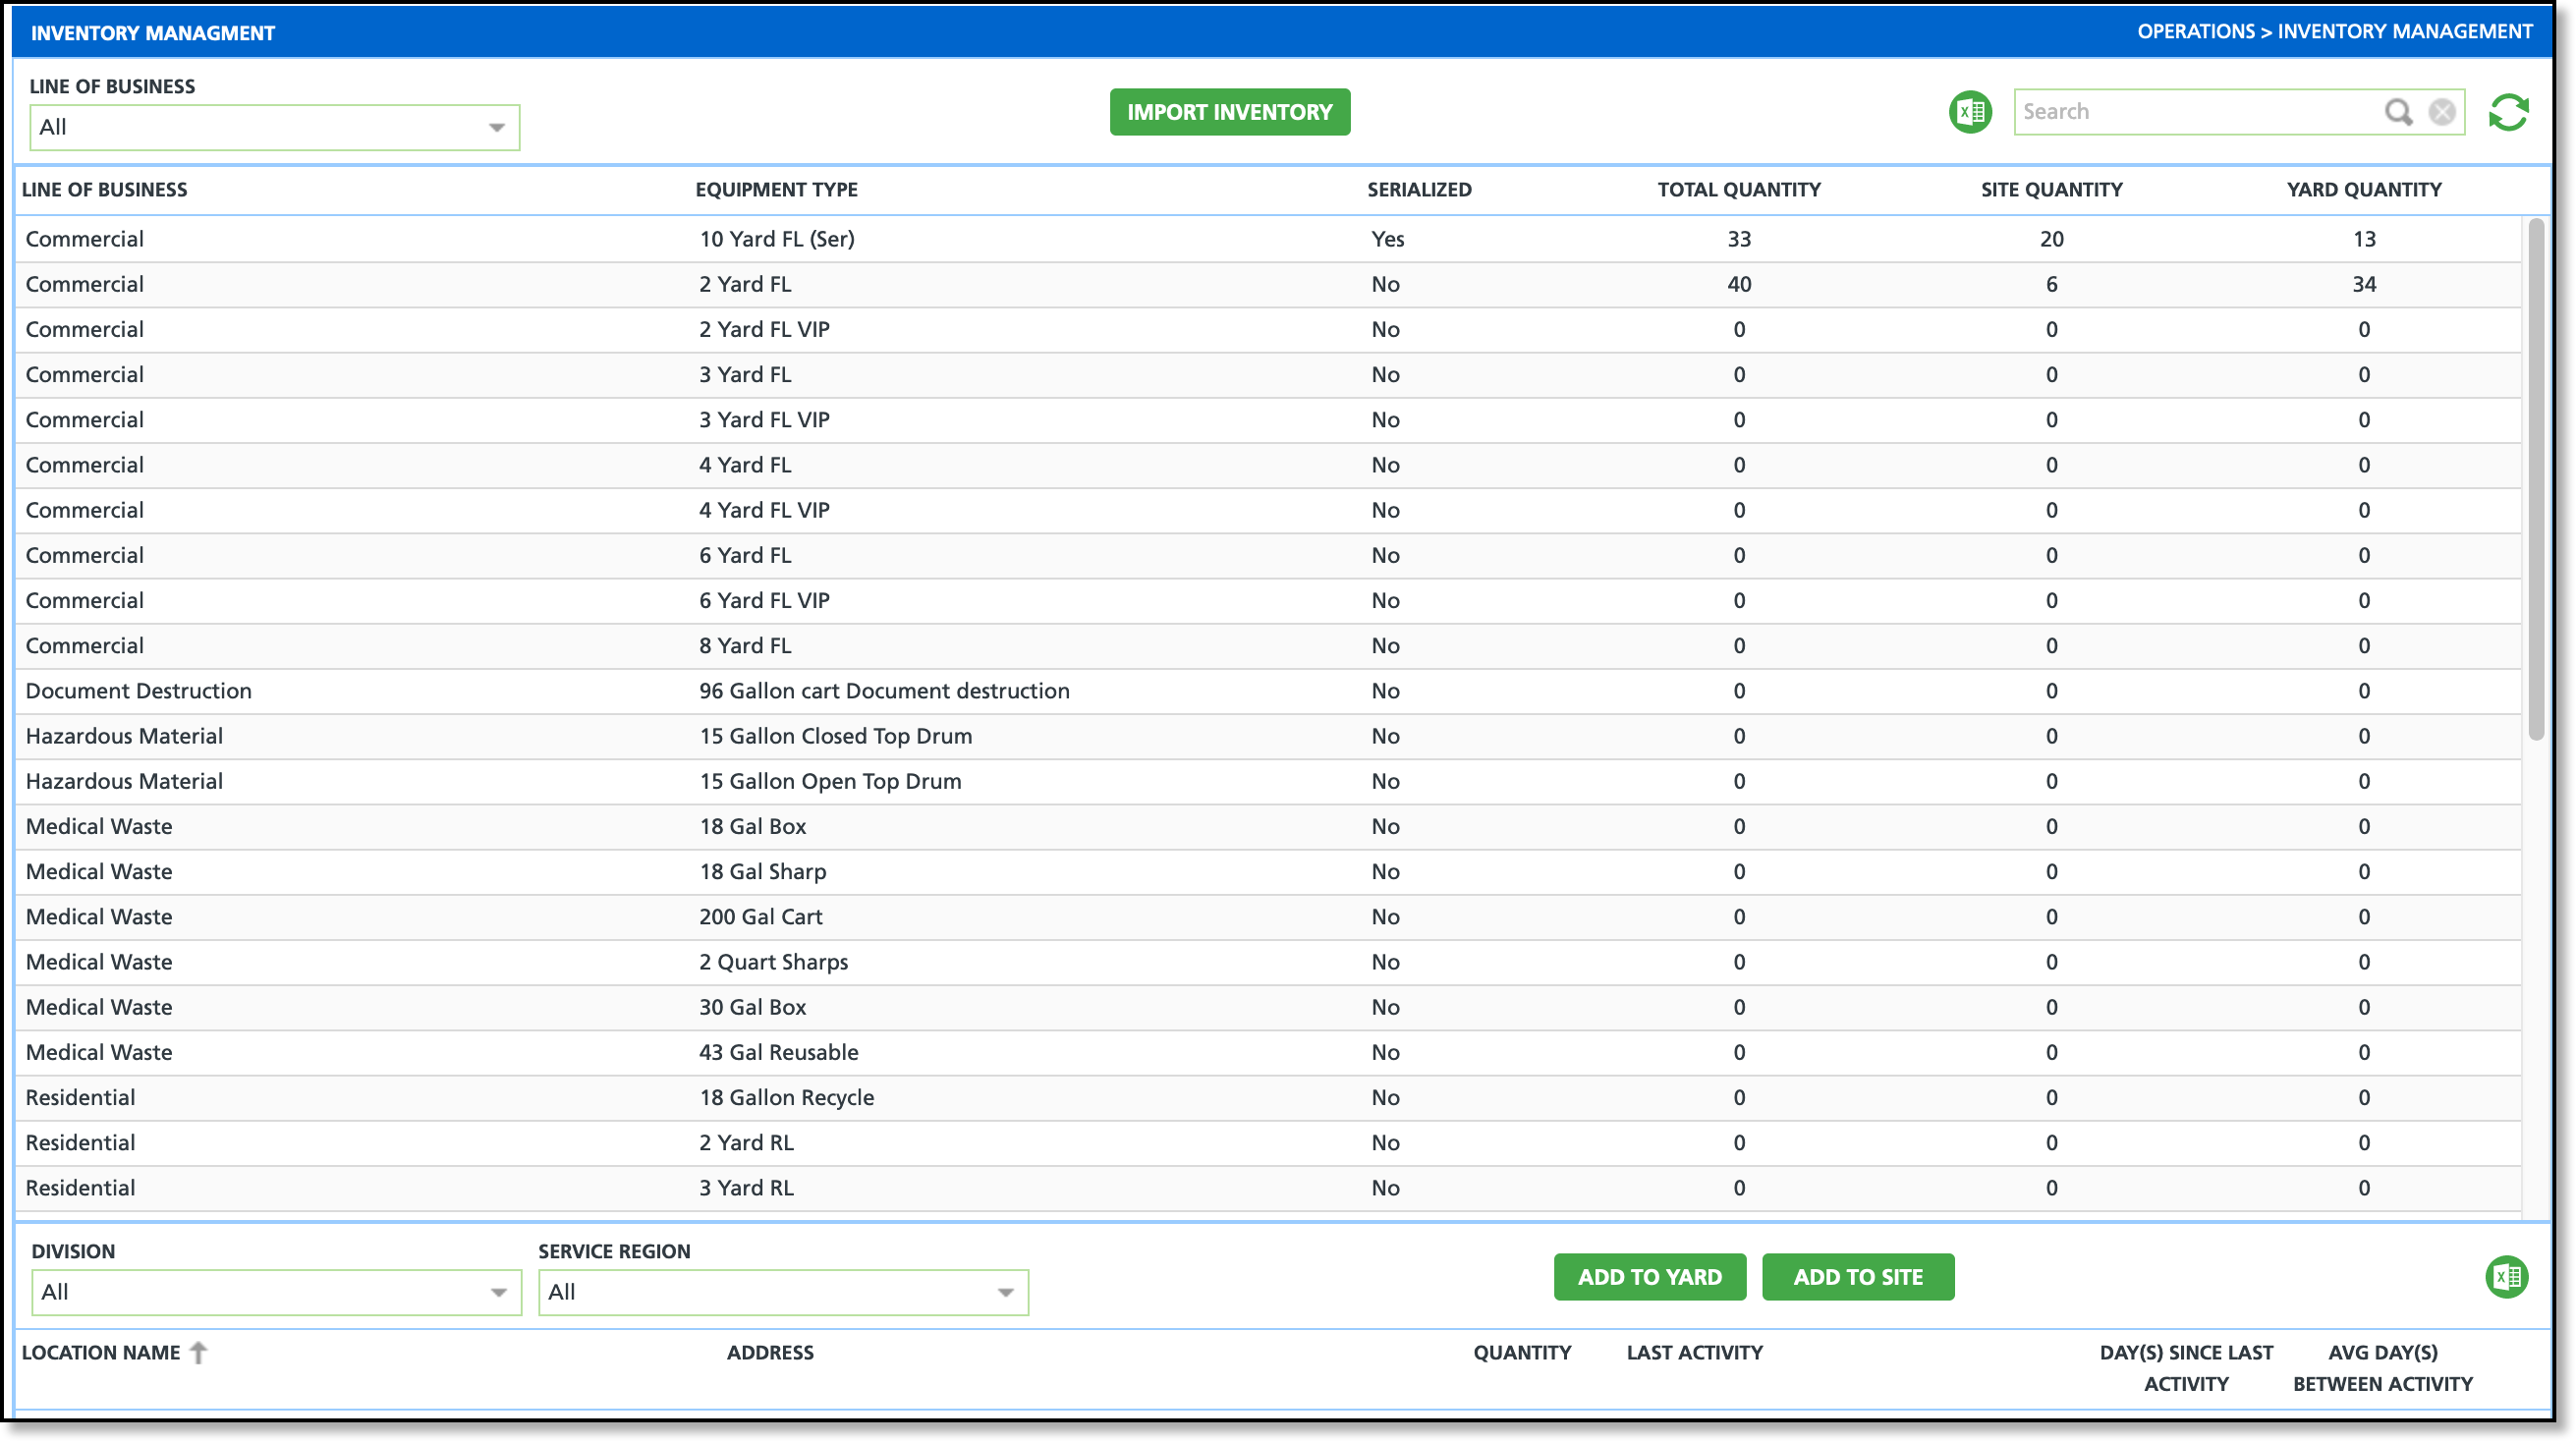
The Inventory Management screen effectively tracks and manages equipment inventory at yards and sites. This screen functions through two grids: an upper grid and a lower grid. The upper grid presents each equipment type categorized by the line of business. Upon selecting an equipment type, the lower grid opens to facilitate the addition, review, and adjustment of the equipment's quantity.
 Permissions
The Inventory Management screen requires the following permission from the Operations module:
| Permission ID | Permission Name |
449
| Inventory Management |
Field Descriptions
| Upper Grid |
| Line of Business | Displays the line of business the equipment belongs to. Use the Line of Business drop down to filter the screen to a specific line of business. |
| Equipment Type | Displays the name of the equipment inventory is tracked for. |
| Serialized | Displays "Yes" if in Setup > Services > Equipment Type the equipment type is marked "Yes" for the 'Is Serialized' field. Serialized equipment requires the entry of a serial number when equipment is added to a site or yard. |
| Total Quantity | The combined amount of Site Quantity and Yard Quantity. |
| Site Quantity | The total amount of the specific equipment type currently sitting at a site. |
| Yard Quantity | The total amount of a specific equipment type currently sitting at a yard. |
| Lower Grid |
Filter Options | |
| Division | Filters the screen to only display inventory of the selected division. |
| Service Region | Filters the screen to only display inventory of the selected service region. |
| Fields | |
| Location Name | Displays the name of the yard or site inventory is located at. |
| Address | The address of the yard or site location. |
| Quantity | Displays the total count of equipment added to the the yard or a site. |
| Serial Number | Displays the serial number for the equipment if the equipment is serialized. This column does not display if equipment is not serialized. |
| Last Activity | Displays a timestamp hyperlink of the date and time equipment was last moved or adjusted. Select the link to open and review the activity history. |
| Day(s) Since Last Activity | Displays the tracked number of days since there has been any movement or adjustments to equipment at the yard or the site. |
| AVG Day(s) Between Activity | Displays the system averaged days between movement or adjustments to equipment at the yard or the site. |
+ / - Icon
| Option to increase or decrease the equipment quantity at a site or a yard. This is visible in both the Inventory Management screen as well as in Site Inventory (Equipment tab). |
Add Inventory
Inventory Management classifies equipment tracking into two categories: serialized and non-serialized. Equipment becomes serialized when the "Is Serialized" field is enabled under Setup > Services > Equipment Type. Serialized equipment requires the input of a serial number whereas non-serialized equipment uses a Quantity field.
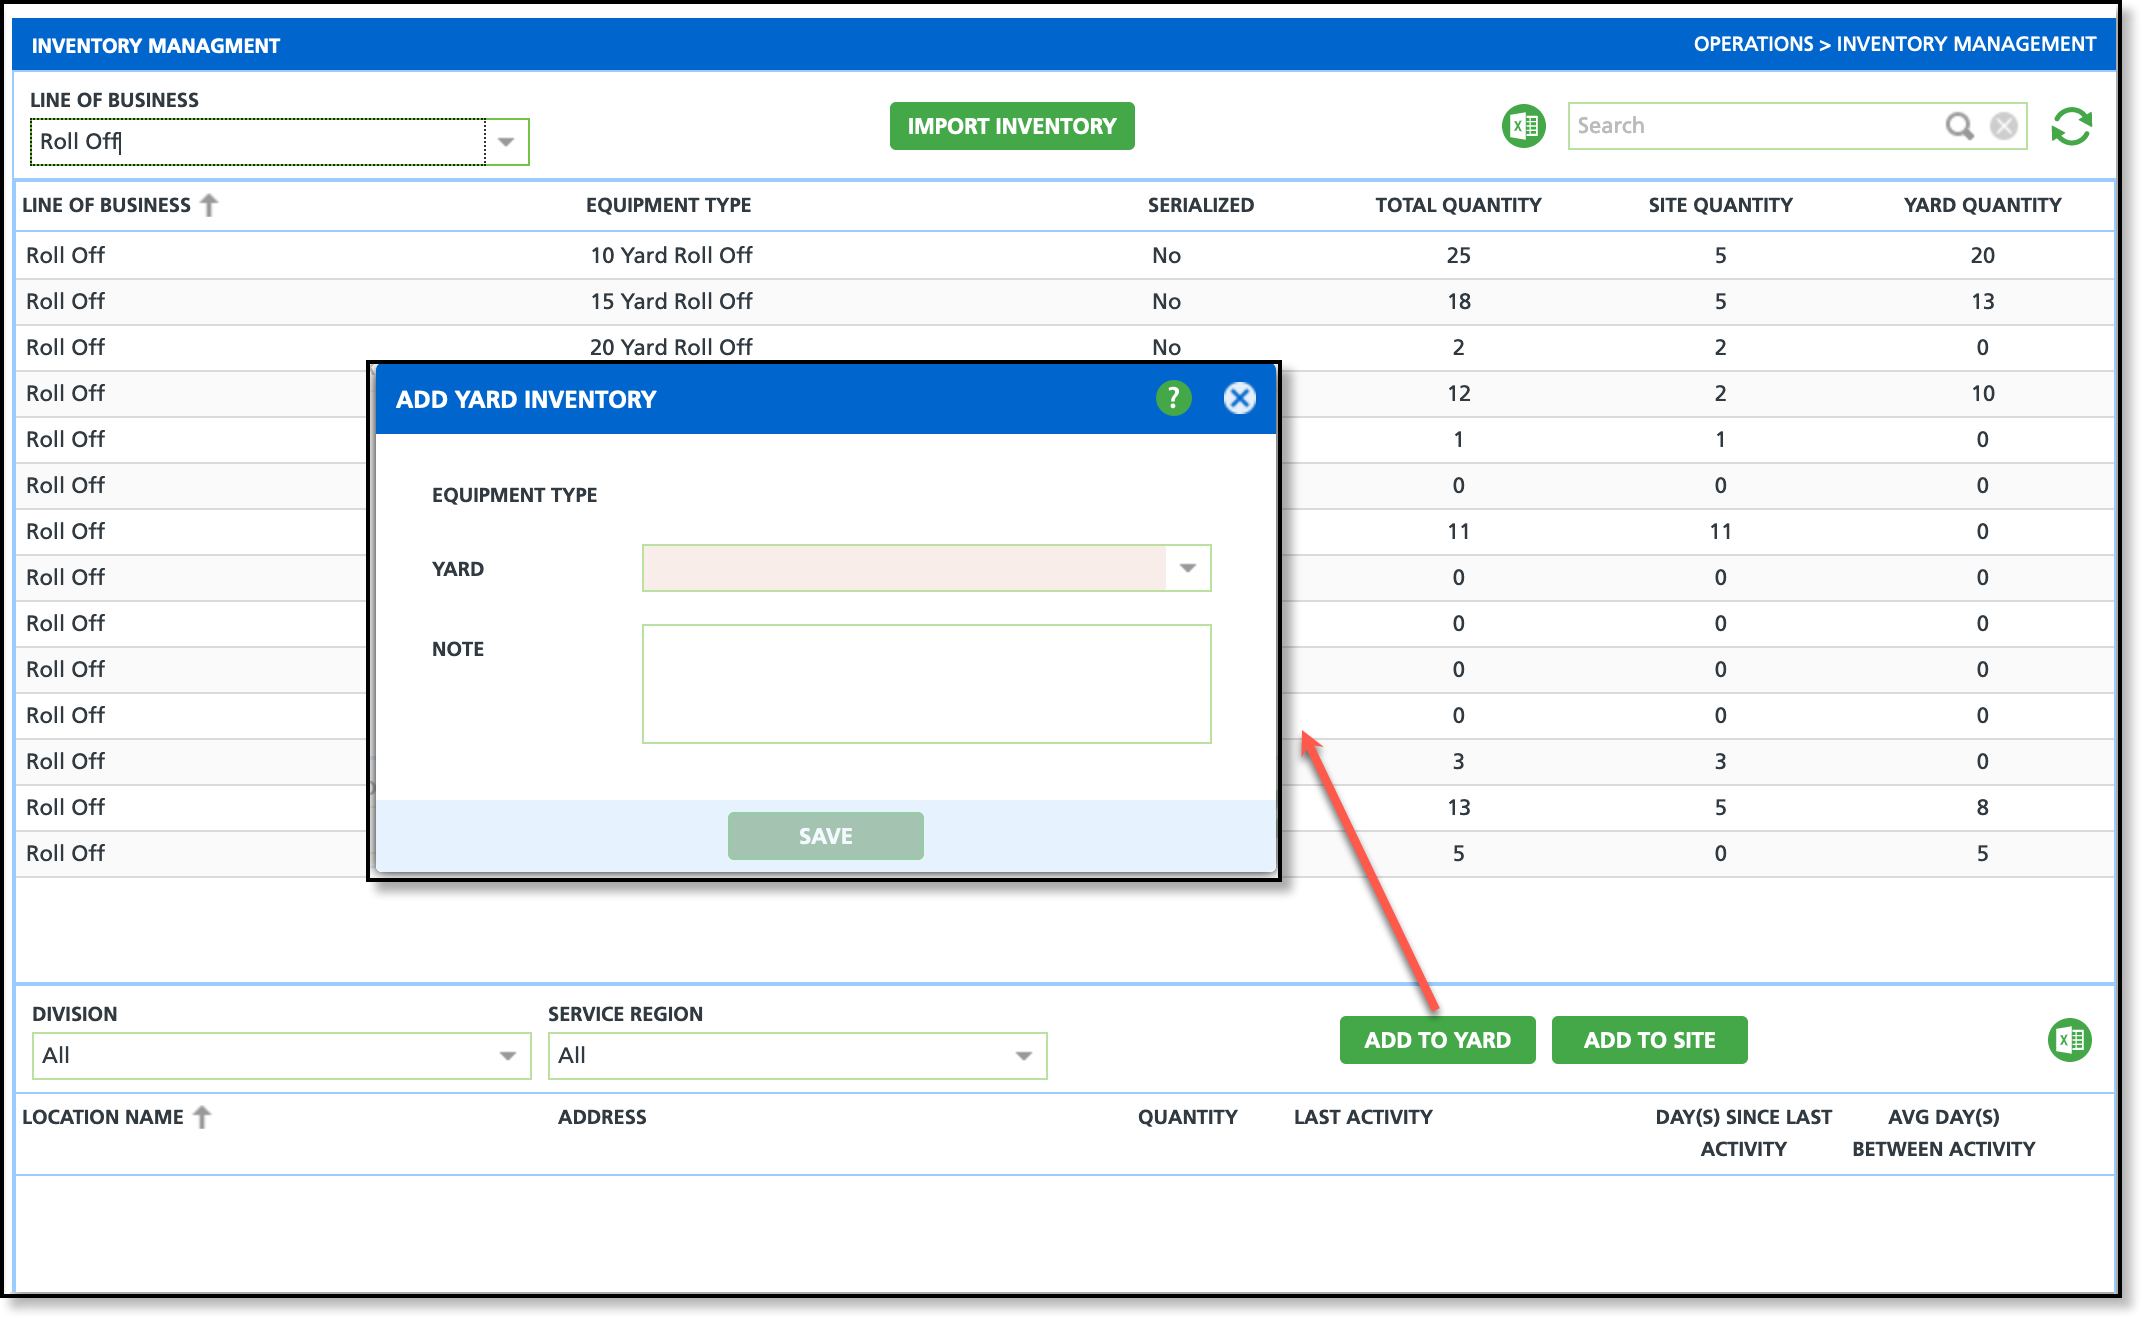
Add: Non-Serialized Inventory
If an equipment type is not serialized, the option to add serial numbers is not available when adding inventory to a site or yard and is replaced with a 'Quantity' field.

Add Inventory:
- Click on the Equipment Type from the upper grid you would like to add inventory to.
- Select "Add to Yard" or "Add to Site" to create an inventory record.
- If "Add to Yard" is selected, select the Yard the inventory will be added to.
- If "Add to Site" is selected, search for the site by selecting the site search icon.
- Enter the quantity of the equipment in the Quantity field.
- Optional - Add any notes regarding the equipment or inventory.
- Click Save when finished.
Add: Serialized Inventory
If an equipment type is serialized, the Serial Number field is required when inventory is added. If more than one serial number exists, separate each serial number with a space, comma, semi-colon, or as a new line. Upon save, a confirmation window displays with a serial number count confirming each will be added as a unique inventory record count.
Equipment is considered serialized if in Setup > Services > Equipment Type, the "Is Serialized" field for the specific equipment type is set to "Yes."
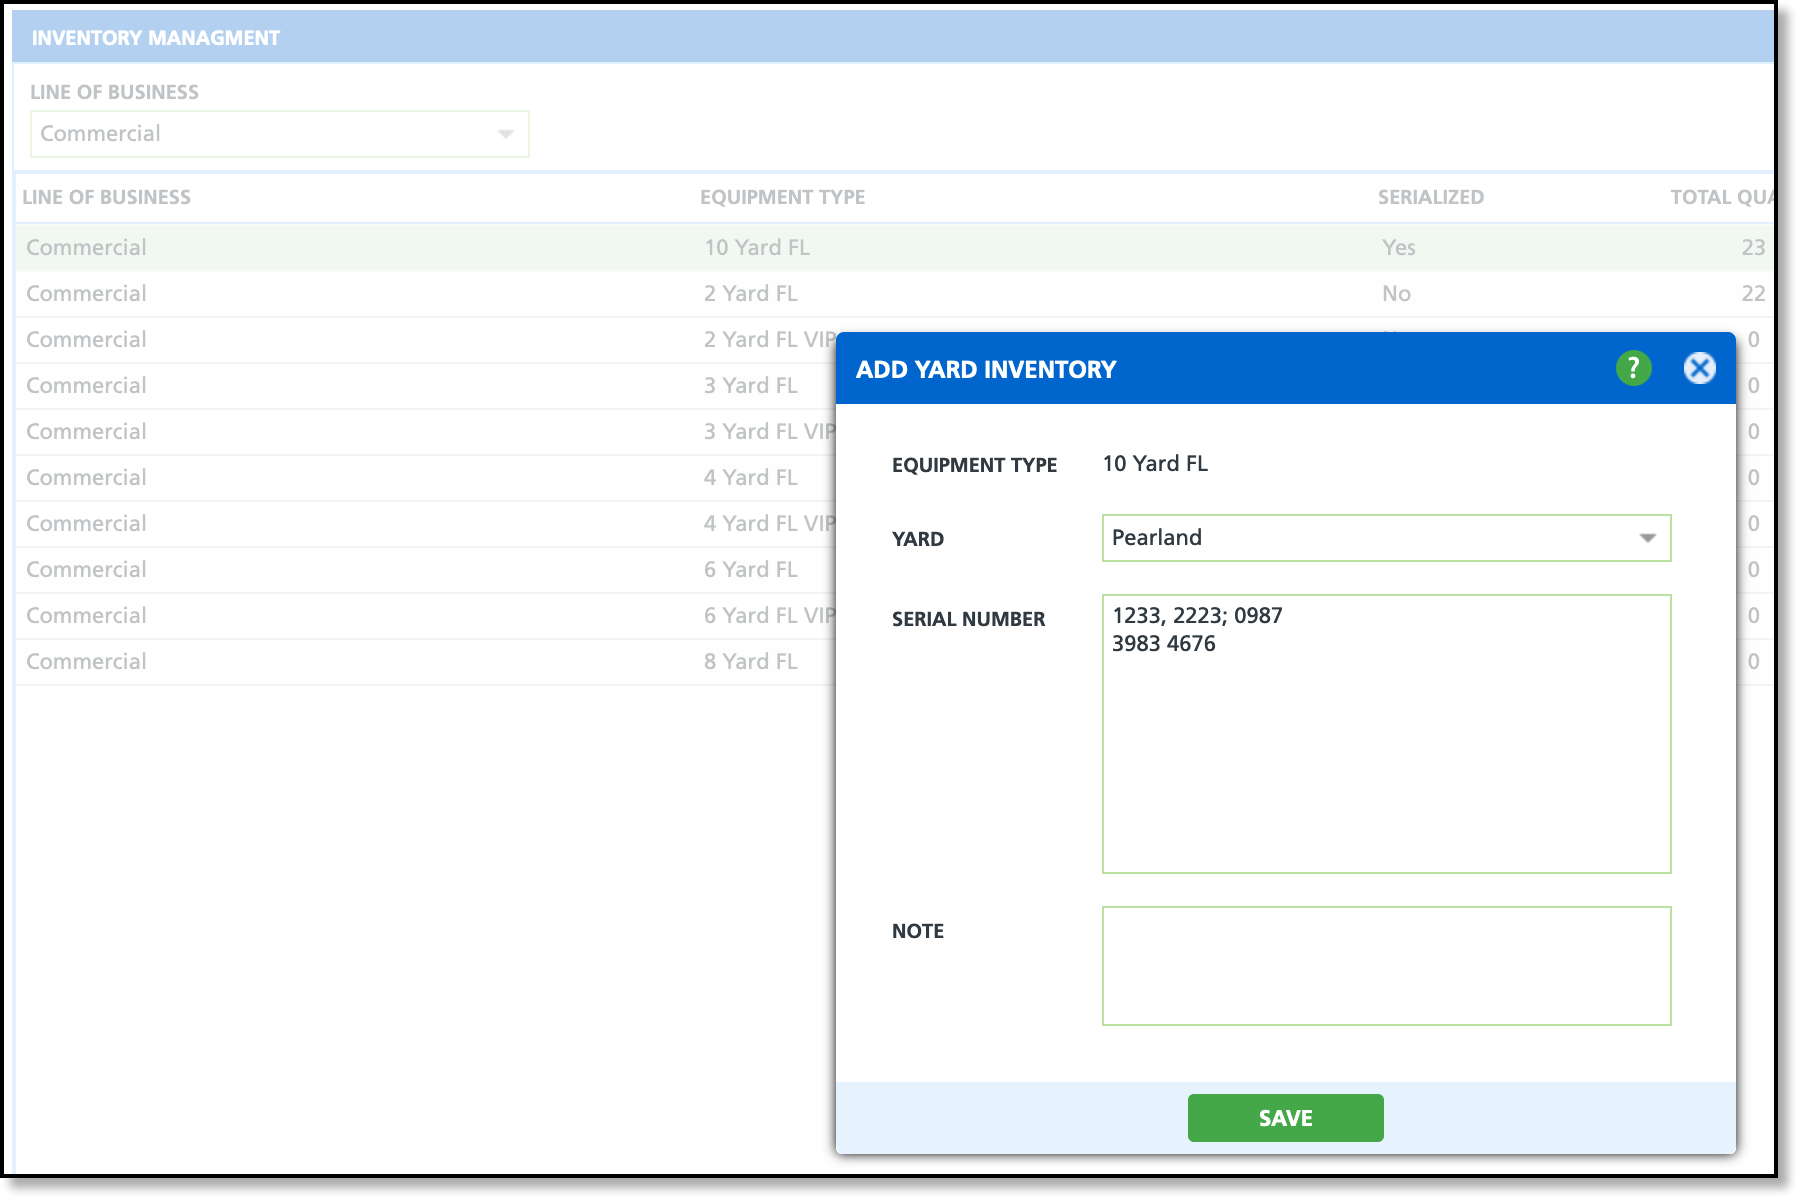
Add Inventory:
- Click on the Equipment Type from the upper grid you would like to add inventory to.
- Select "Add to Yard" or "Add to Site" to create an inventory record.
- If "Add to Yard" is selected, select the Yard the inventory will be added to.
- If "Add to Site" is selected, search for the site by selecting the site search icon.
- Enter the serial number for every piece of equipment. Each serial number entered creates a unique inventory record.
- For multiple serial numbers separate with a comma, semi-colon, space or new line.
- Optional - Add any notes regarding the equipment or inventory.
- Click Save when finished.
Add: Inventory at the Site Level
Related Article Link: Site Inventory
When adding equipment inventory to a site, you have two choices: you can either utilize the Inventory Management tool, or directly add it to the site through the Site Inventory screen. Once the inventory is added to a site, the tally for the particular equipment type will be automatically updated on the Inventory Management screen.
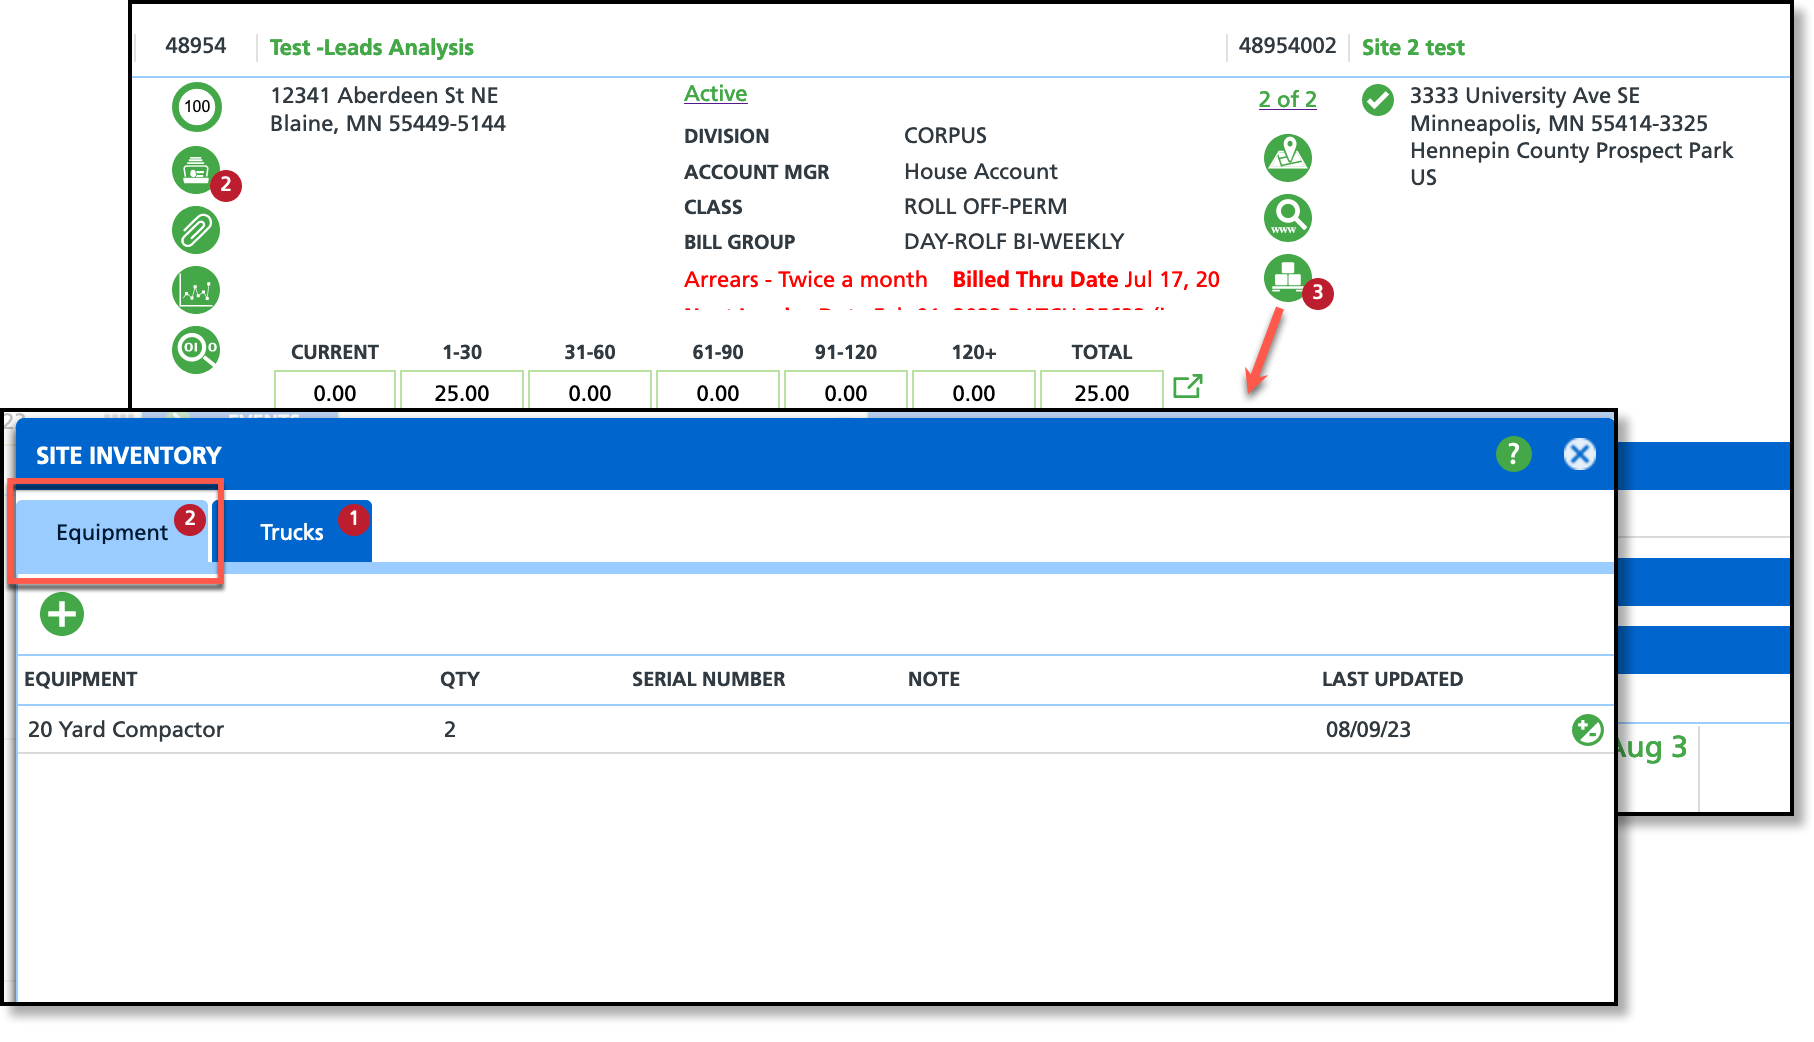
Add Equipment:
- Search and open the site.
- Select the Display Inventory icon in the Site section of the Customer Service screen. This will open the Site Inventory popup.
- Select the Equipment tab.
- Click on the green "+" icon to display the 'Add Site Inventory' popup.
- Select the Equipment Type from the drop down.
- Enter a Quantity. The Quantity field only displays for equipment types that are not serialized.
- If the equipment type is serialized, enter the serial number(s) in the Serial Number field.
- For multiple serial numbers separate with a comma, semi-colon, space or new line.
- Click Save when finished.
Move Inventory
The option to move site inventory is available for serialized equipment.
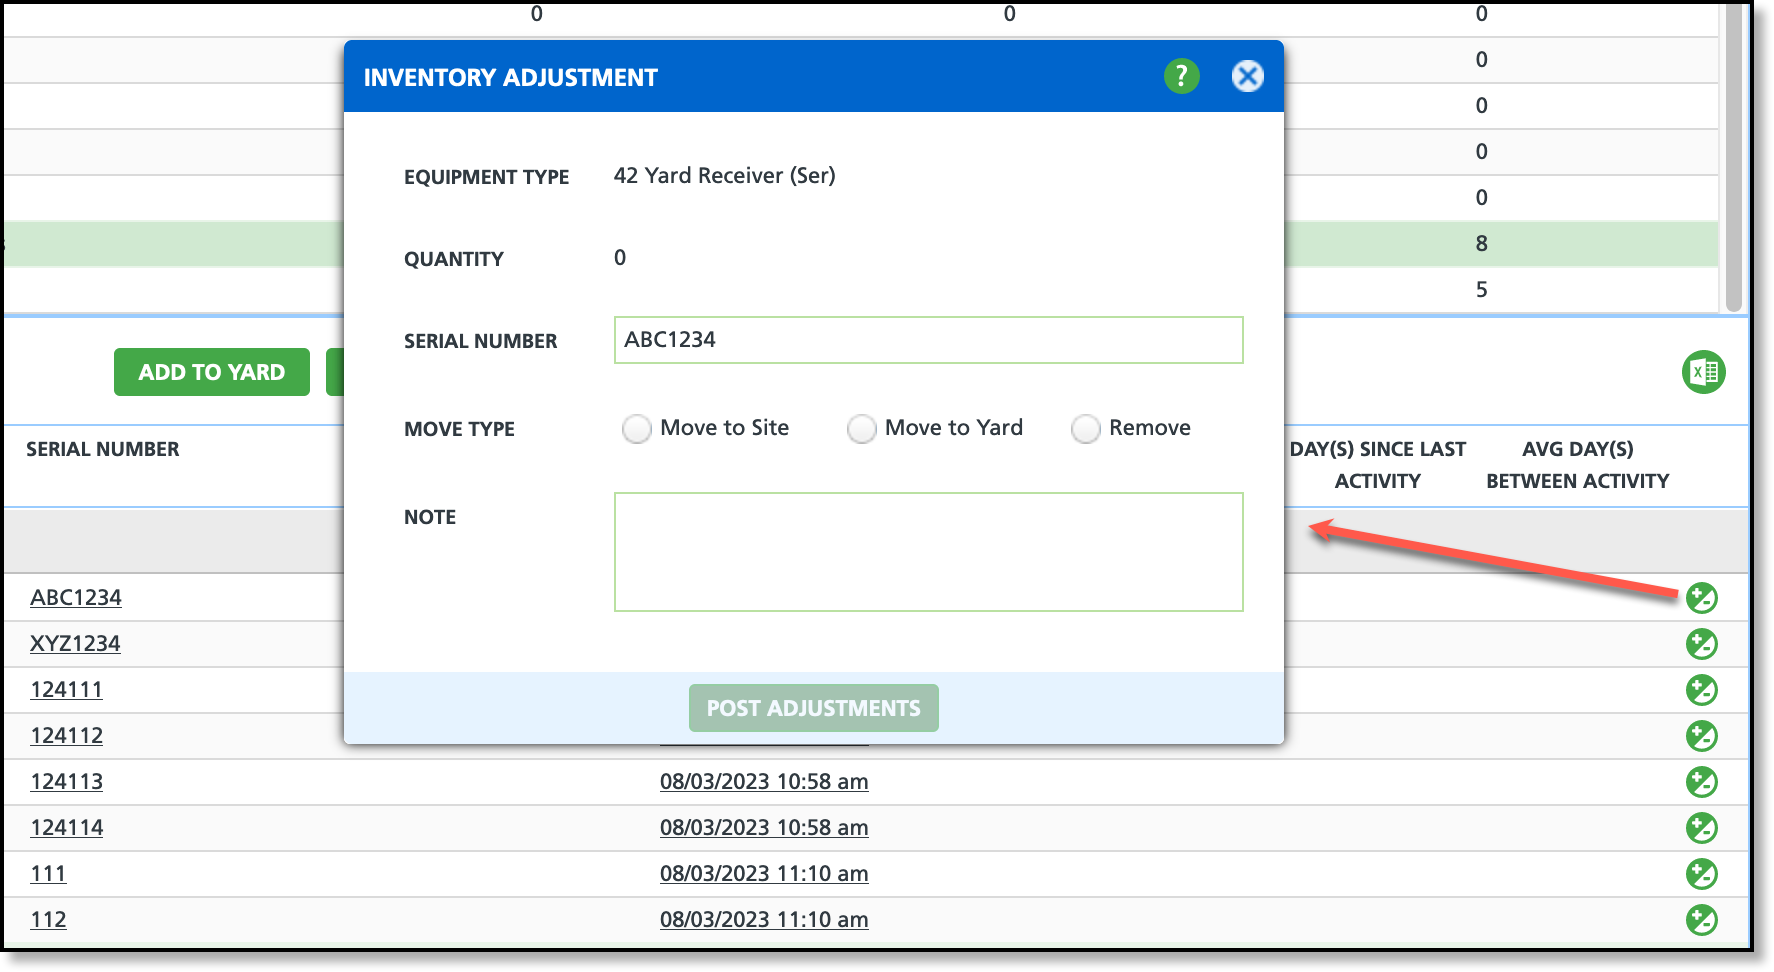
Move to Site
- Select the "+/-" icon of a serialized equipment type.
- Select the "Move to Site" radio button and the Site search field will display.
- Enter the site number in the search field, or select the green search icon to open a search window.
- Optional: add an internal Note that will display with the equipment in the inventory tools.
- Select "Post Adjustments" when finished.
Move to Yard
- Select the "+/-" icon of a serialized equipment type.
- Select the "Move to Yard" radio button and the Yard drop down will display.
- Select the Yard the inventory is being moved to.
- Optional: add an internal Note that will display with the equipment in the inventory tools.
- Select "Post Adjustments" when finished.
Remove
√ Removing serialized equipment from a site or yard only removes the record from the location you're working with, it does not delete the record from the system.
- Select the "+/-" icon of a serialized equipment type.
- Select the "Remove" radio button.
- Optional: add an internal Note that will display with the equipment in the inventory tools.
- Select "Post Adjustments" when finished.
Audit and Adjust Inventory Counts
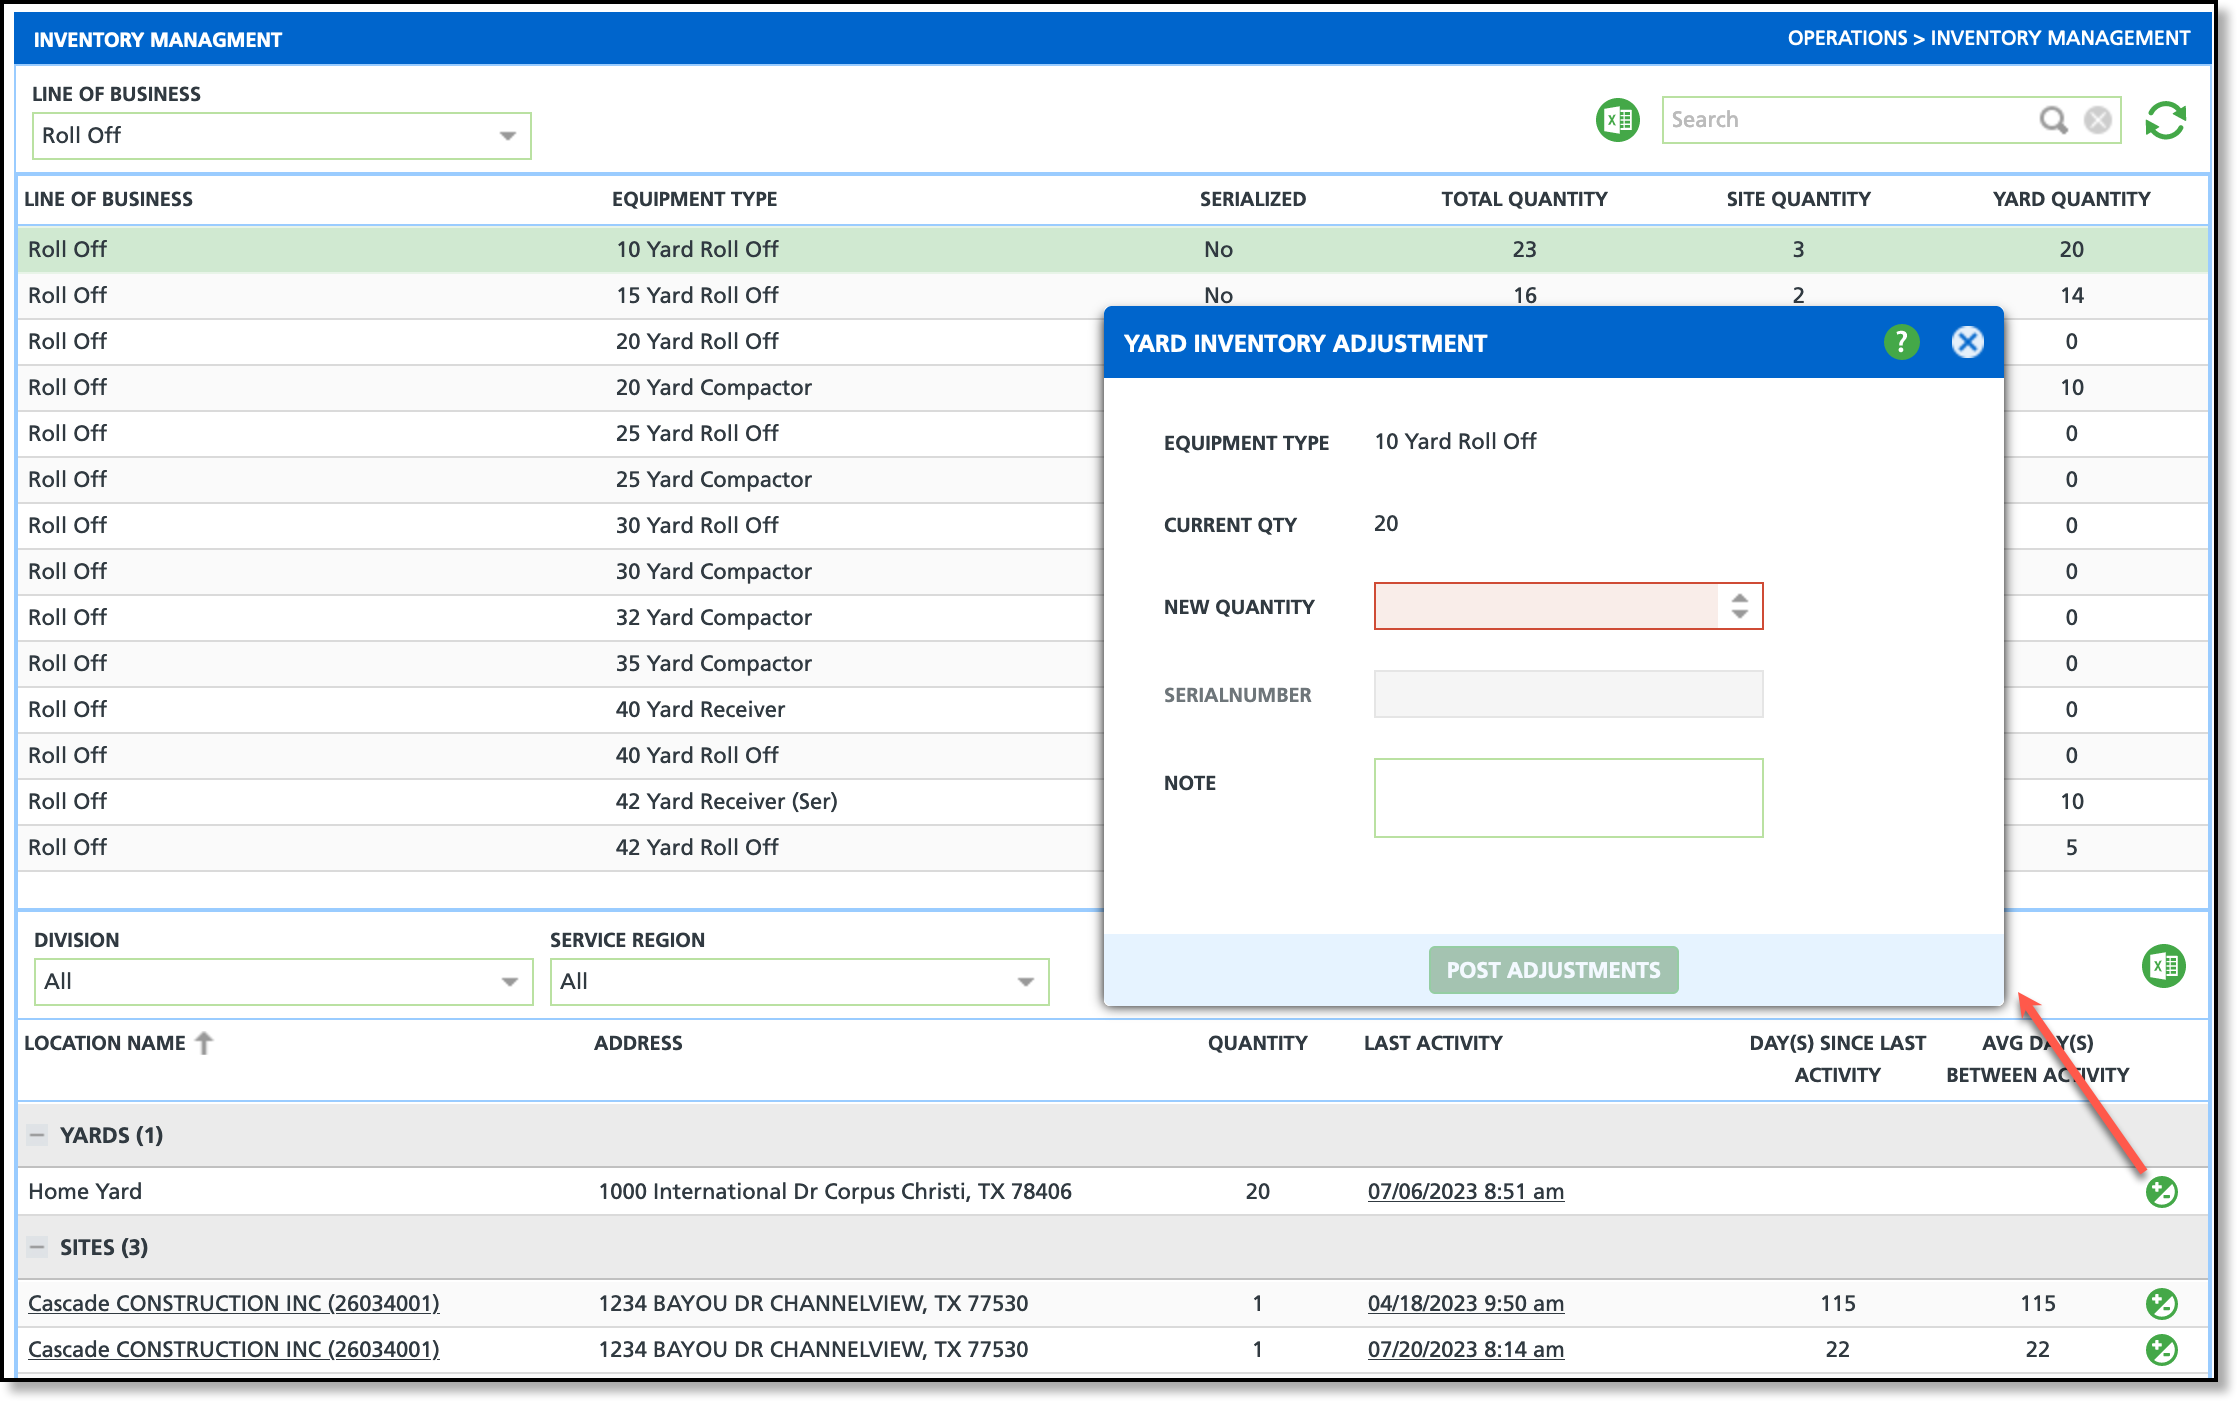
Adjustments to the equipment quantity display in the lower grid of the Inventory Management screen. To adjust the inventory amount at a site or a yard, select the specific equipment type from the upper grid and its inventory record will display in the lower grid.
Consider auditing and adjusting inventory counts for both the site and the yard when equipment is moved without a work order.
Add Inventory to a Work Order
When equipment is delivered to a site, the inventory tracking process involves updating the equipment's movement through the Inventory tab within the Service Record. When equipment is added, and a yard identified, it will be reflected in Site and Yard counts in Inventory Management for the equipment type.

Add Inventory
- Open the work order.
- Select the Inventory tab.
- Select the green "+" icon from the Deliveries section.
- Enter the quantity.
- Click within the Yard column and select the yard the equipment is being taken from.
- Enter a serial number if the equipment is serialized.
- Select Save when finished.
Import Inventory
Related Article: Import Inventory
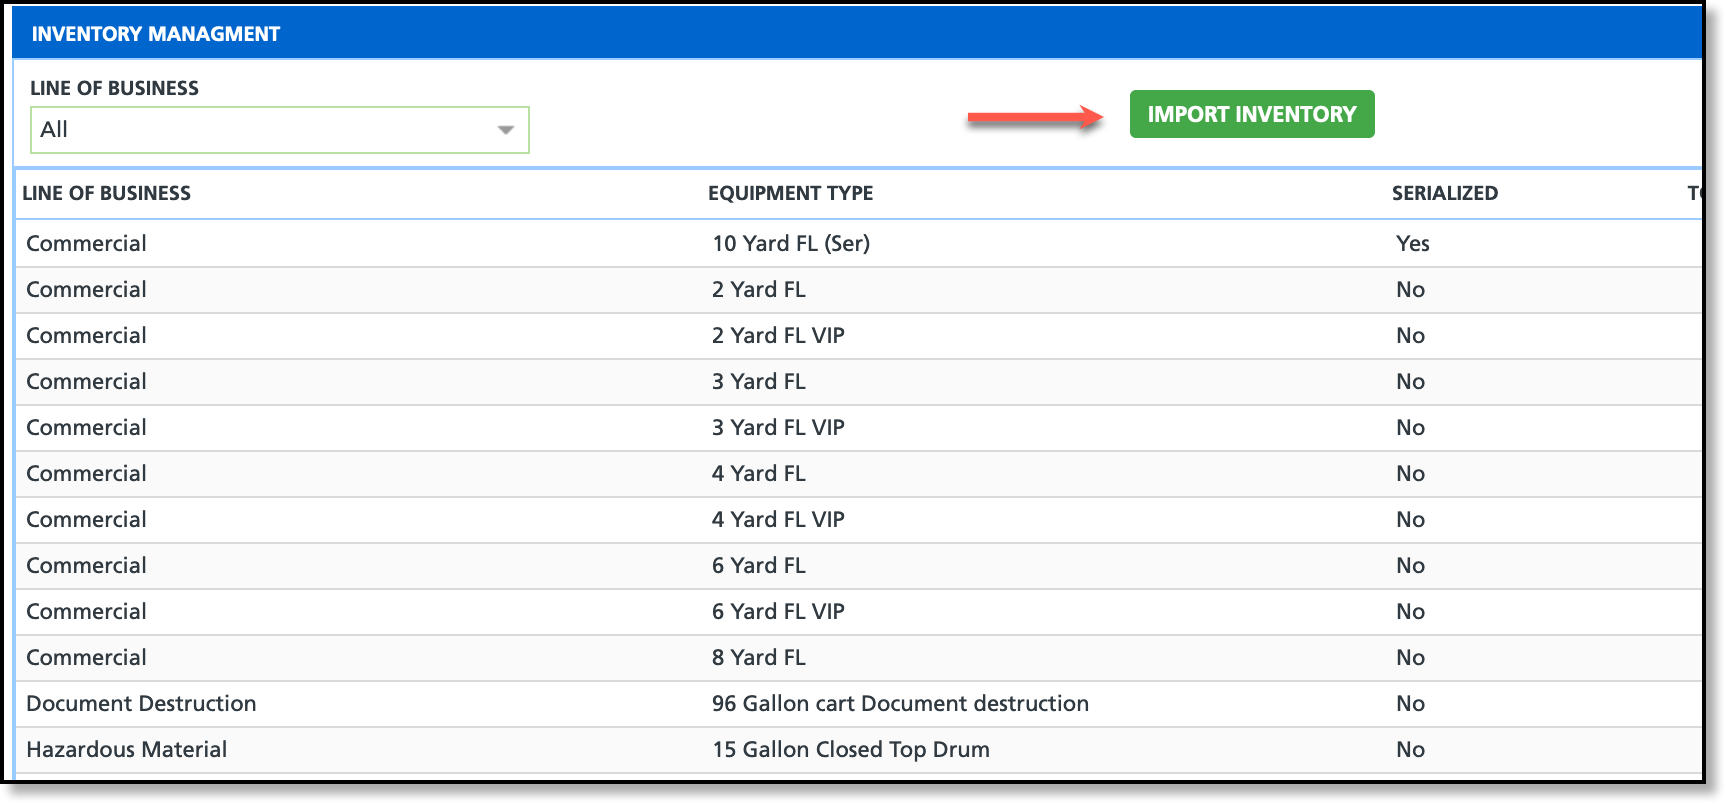
The Import Inventory tool is used to mass import equipment inventory from an external CSV file into Navusoft. Review the Import Inventory article linked above for more information including file requirements.
 Permissions


 Permissions


