Pathway: Setup > Account > Account Class
Account Class defines the billing and payment processing criteria for an account or group of accounts. It is assigned upon account creation and also serves as a filter for various reports and tools within the application.
Select the green plus icon to add a new account class, or double click on an existing to edit a current setup.

Permission
The following permissions are required to view and edit Account Class Setup:
| Permission ID | Permission Name |
23 | Setup \ Account |
Add Account Class: Details
The following section reviews the fields in the Details tab.
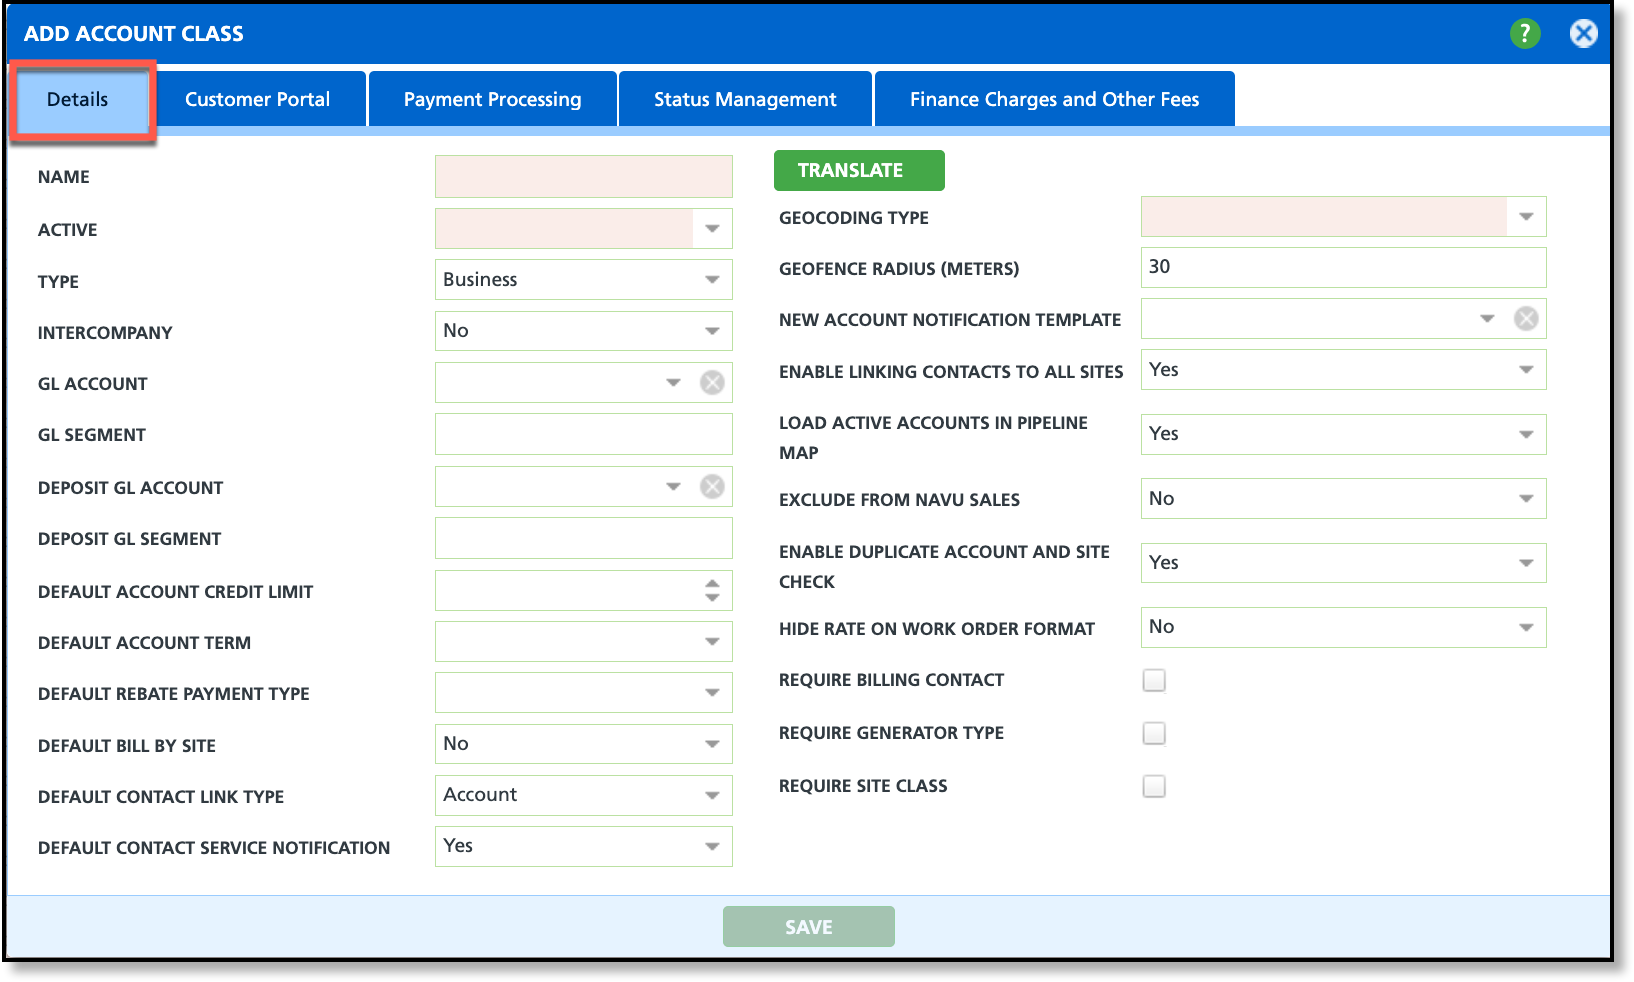
Field Descriptions: Details
The credit limit sets the threshold at which the hauler contacts the customer for payment or suspends service until the balance falls below the limit. The billing screen provides alerts when a customer exceeds their credit limit during the billing process.Fields Descriptions The Name of the Account Class. Controls if the account class is available for use. Indicates the business Type the account class falls under. Identifies the GL Account for accounts assigned to the account class. The GL Segmentation for the GL Account. Identifies the Deposit GL Account used for accounts belonging to the account class. Identifies the GL Segment used for accounts belonging to the account class. Identifies the default Term accounts assigned to the account class will follow for billing.
Term: The length of time a payor (customer) has after the invoice date to pay the amount due. Identifies the default payment type used by the account class for rebate payments. Default setting for the 'Bill Per Site' field in the Add or Edit Account editor for accounts assigned to the account class. Defaults the contact to either account level or site level when a contact is added. Default Contact Service Notification
If set to Yes, when a new contact is added to an account or site, the Receive Service Notifications field in the Add Contact screen will default to Yes for that contact. Determines placement of the pin when site locations are displayed on a map. Options include Roof Top or Street Side. Creates a virtual perimeter around the location's address to indicate proximity of the truck to the service location. This can be overridden at the Site Class level.
NOTE: Setting the radius too low (e.g., 1 meter) can interfere with Residential Mode in NavuNav, potentially preventing the app from recognizing when the driver has moved on from one bin to the next. Lowest recommended setting is 20 meters. Template that is used for new accounts. Notifications are sent based on the account contact's notification preferences. Enables linking contacts to all sites belonging to an account. Option to display active accounts on the Pipeline Map (Sales > Pipelines > Pipeline Summary). If enabled, prevents sync to the iPad. If enabled, the system will check for a duplicate accounts/sites when a new account/site is created. The default setting for this field is 'Yes'. If selected, rates will be hidden from view on scale tickets or work orders that support printing rates. This setting also exists at the account level where it can be applied specifically to an account instead of all accounts belonging to the account class. If checked, a billing contact is required when creating an account, and the Contact Name, Contact Email, and Contact Phone fields become required. If checked, setting requires accounts to identify the Generator Type.
*Applies to account classes dealing with Hazardous or Medical Waste.If checked, a site class must be selected when creating a new account or a site.
Details Setup
Add Account Class: Customer Portal
This section outlines the fields in the Customer Portal tab that are essential for the Customer Portal setup. For additional setup details, review the documentation here: Customer Portal Setup
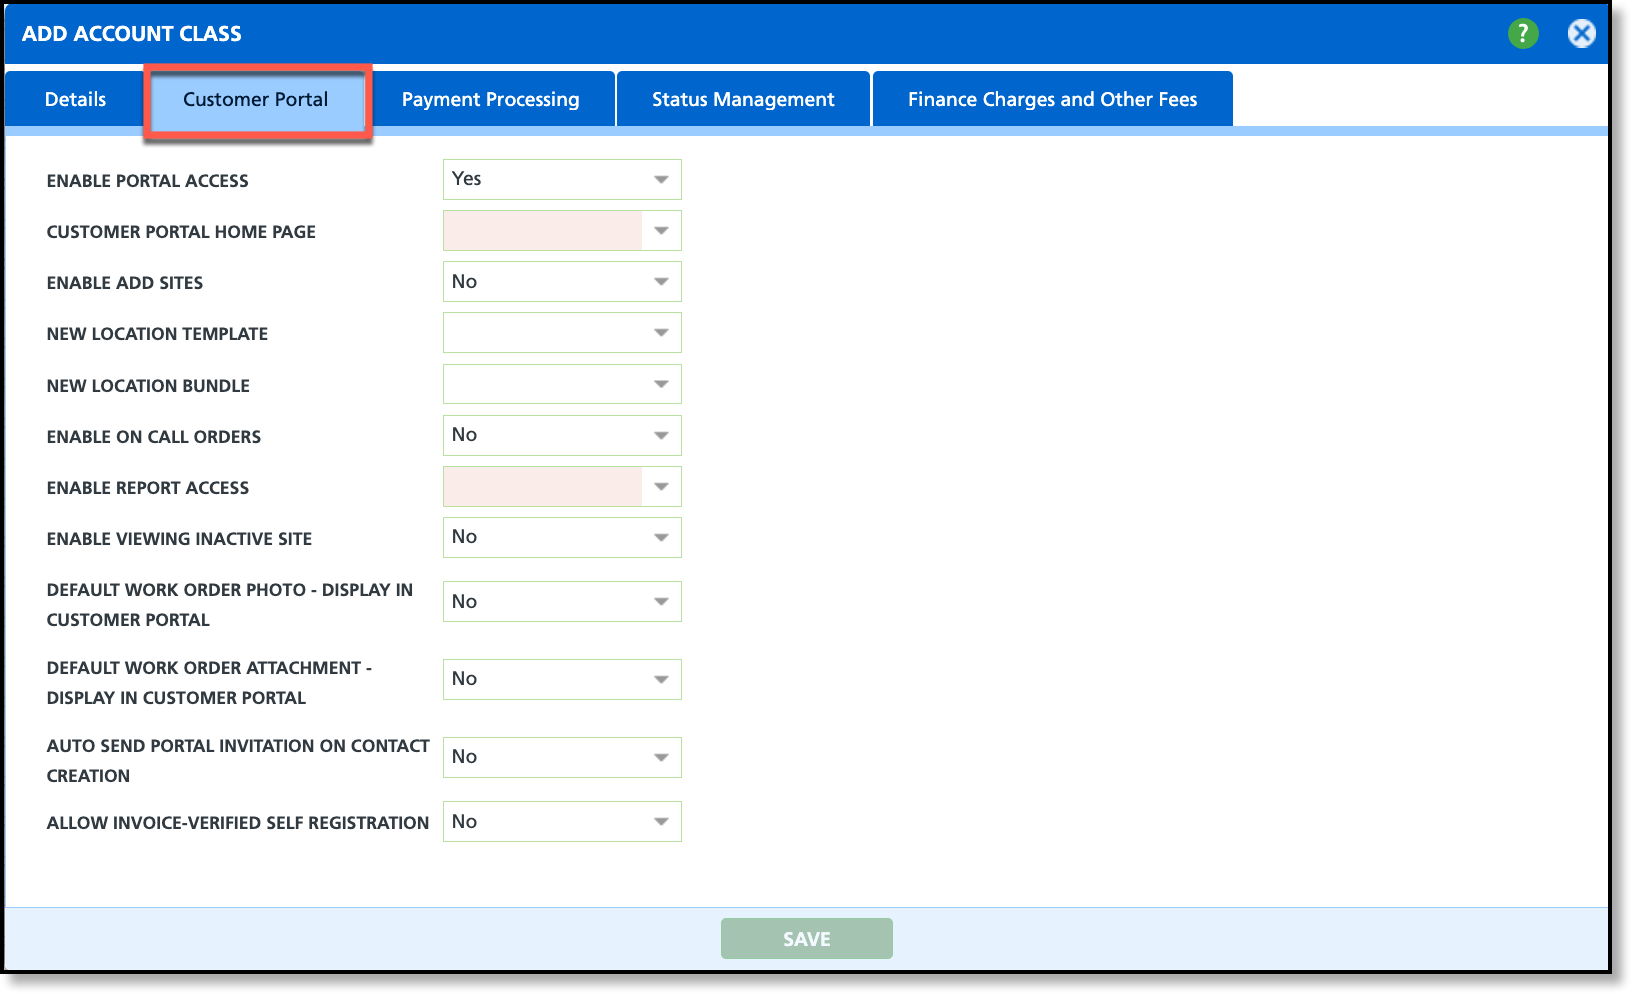
Field Descriptions: Account Portal
| Fields | Descriptions |
Enable Portal Access | Enables Customer Portal access to users of accounts assigned the account class. |
Customer Portal Home Page Required | The Home Page users see upon logging in to their Customer Portal account. |
Enable Add Sites | Enables the ability for users to add new service locations from their portal account. |
New Location Template | If 'Add Sites' is enabled, select the template the Customer Portal will follow when a new site is added. |
New Location Bundle | Default setting for self service ordering. More details to come. |
Enable On Call Orders | Enables the option to create On Call Orders from the Customer Portal.
Review the Online Order Default Status field in Setup > Services > Line of Business > Mobile/Optimization/Online Order (tab) to indicate how online orders are processed once received.
|
Enable Report Access Required | Option to control if Customer Portal users can run reports. |
Enable Viewing Inactive Site | Grants users of an inactive site access to view service history information, associated photos, manifests, and report attachments. Other options, such as the ability to create a request or view AR information, are hidden if the site is inactive. |
Default Work Order Photo - Display In Customer Portal | Controls if a photo should display in the Customer Portal. |
Default Work Order Attachment - Display In Customer Portal | Controls if an attachment should display in the Customer Portal. |
| Auto Send Portal Invitation on Contact Creation | When enabled, and a new account is created with a contact that has an email address, a Customer Portal invitation is sent automatically. |
| Allow Invoice-Verified Self Registration | When enabled, customers can request a portal login invitation using a recent invoice, which must include the invoice number and either a quick pay code or an account number. |
Customer Portal Setup
If setting up Customer Portal, review the full setup documentation here: Customer Portal Setup
Add Account Class: Payment Processing
The following section details the fields in the Payment Processing tab.
Enables saving credit card payment methods for future use in the Payments tab of a work order. Default setting: No – A Save for Reuse checkbox appears in the Add Payment popup when adding a credit card payment to a work order. If set to Yes – The Save for Reuse checkbox is hidden when adding a credit card payment, and the Add icon in Accounts > AR History > Wallet is also hidden. Enables convenience fees and specifies the fee type to apply—Percentage or Flat Amount. To disable convenience fees, leave this set to None. If convenience fee is enabled, an Apply Convenience Fee checkbox is displayed and automatically checked on the Post a Payment screen in AR History. Further information about convenience fees can be found here: Apply Convenience Fee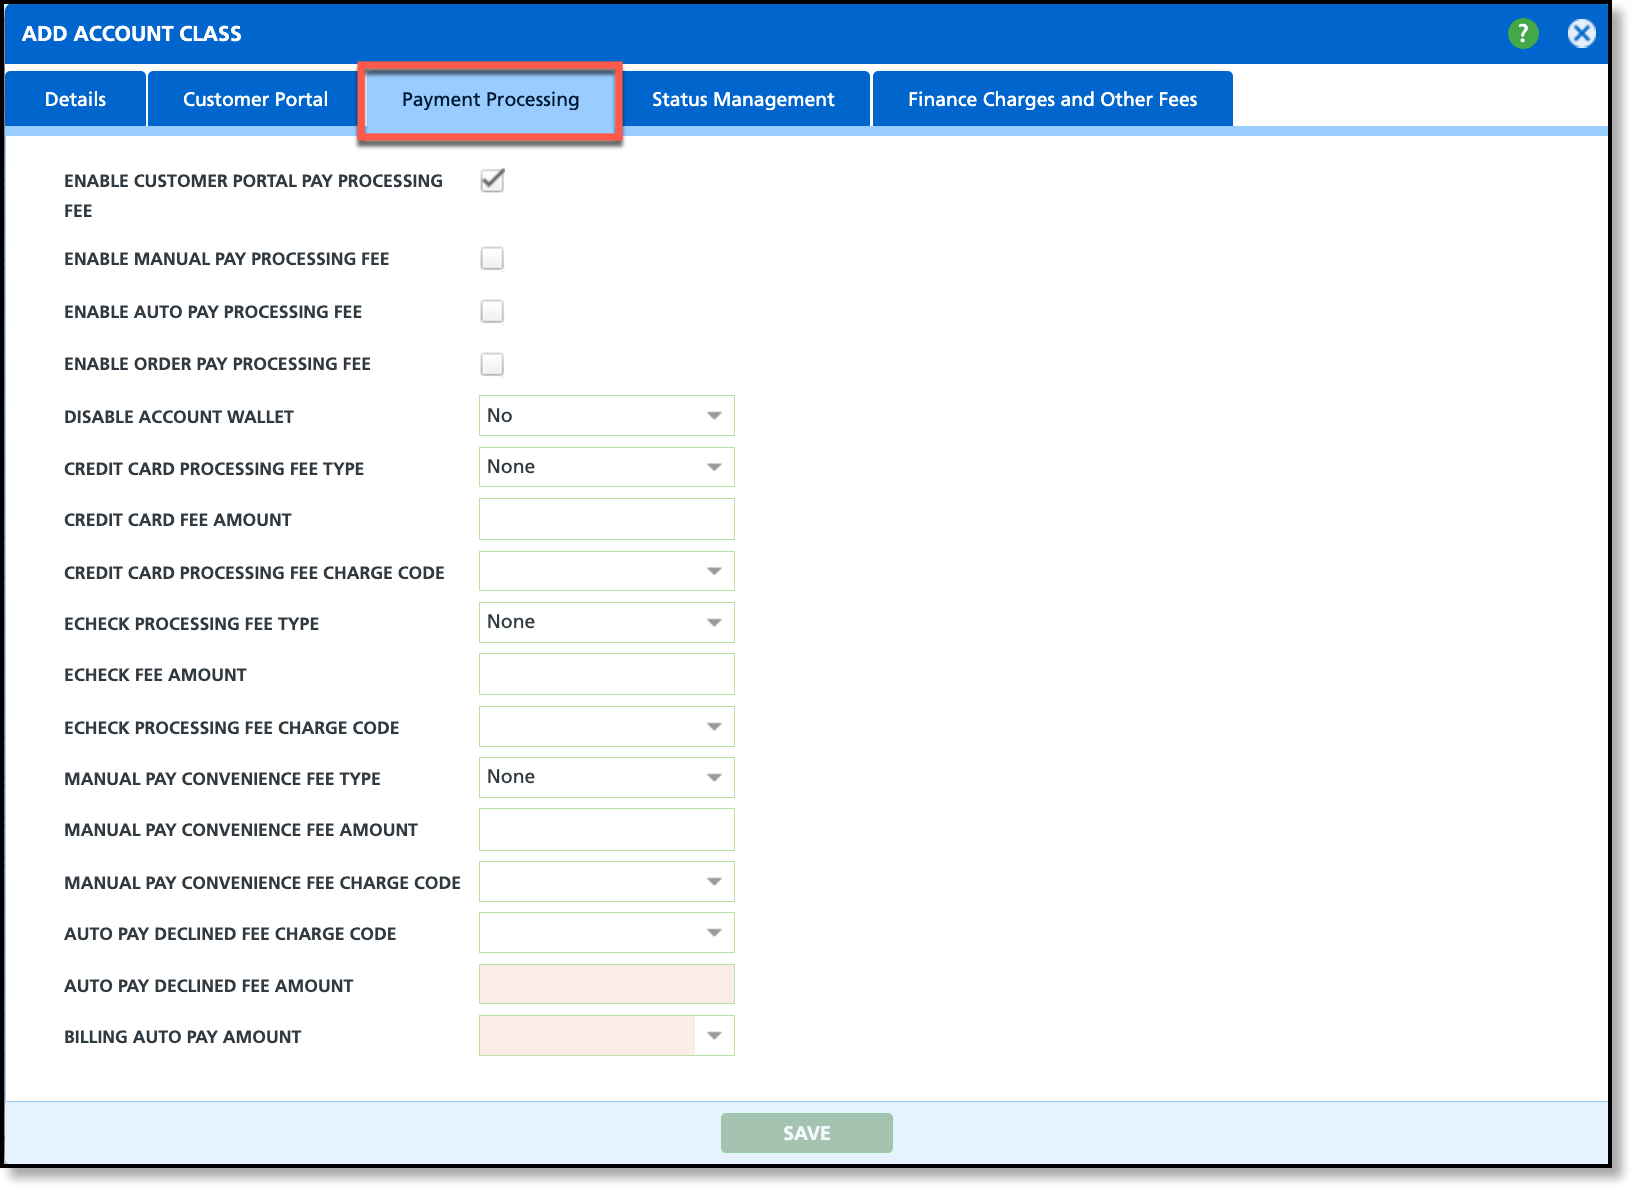
Field Descriptions: Payment Processing
Field Description Check the box to apply a processing fee for payments made through the portal. Check the box to apply a processing fee for manual portal payments. Check the box to apply a processing fee for auto pay payments. Check the box to apply a processing fee for Order Pay. Enables processing fees for credit card transactions and specifies the fee type to apply—Percentage or Amount. Select None if this does not apply. Text entry field to enter the amount associated with the selected fee type. The specific charge code the credit card processing fee is billed under. Enables processing fees for eCheck transactions and specifies the fee type to apply—Percentage or Amount. Select None if this does not apply. Text entry field to enter the amount associated with the selected fee type. The specific charge code the eCheck processing fee is billed under. Text entry field to enter the amount associated with the selected fee type. The specific charge code the convenience fee is billed under. Charge Code that displays for declined auto pay payments. The fee amount that is automatically applied towards declined transactions. Indicates the auto pay amount that will be collected from the account when auto pay is run. Payment Processing Setup
Add Account Class: Status Management
The Status Management tab contains settings for automating account status changes.
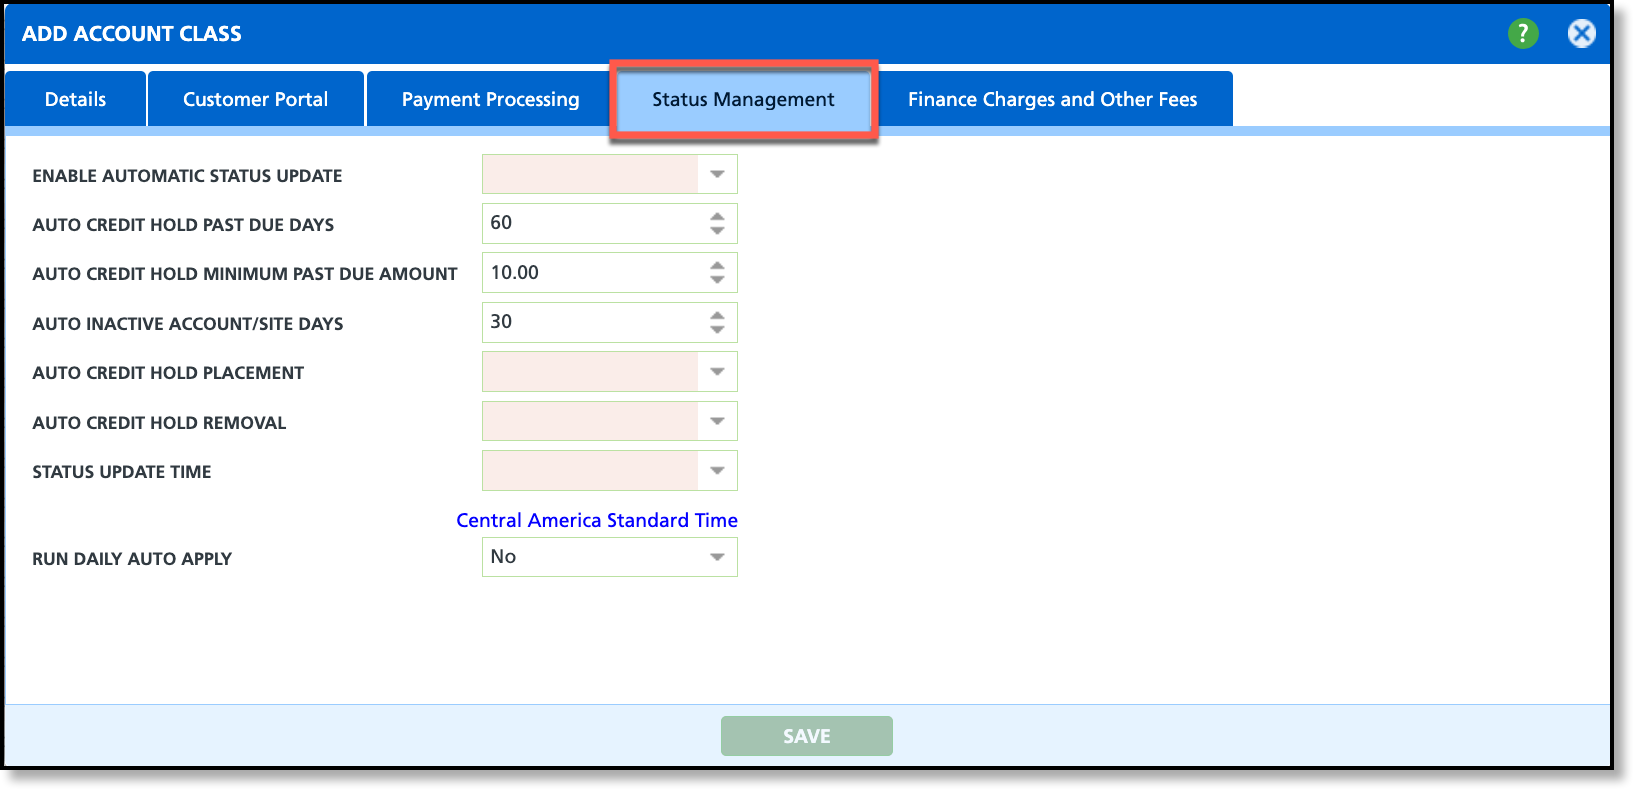
Field Descriptions: Status Management
Enables the automatic credit hold removal after payment has been received. Field Description If enabled (Yes) the system will look at the additional status management settings and automatically update an account or site's status based on established criteria. Identifies how many days an account must be past due before the credit hold is automatically applied. Identifies the minimum amount an account must be past due before the credit hold is automatically applied. Identifies how many days an account or site must not have activity before it is automatically updated to an inactive status. Enables the automatic credit hold placement if a past due balance exists. The time these account statuses should updated to hold or remove hold. Enables a daily check for unapplied payments and credits on an account and applies them to the account's oldest invoice balances first.
Add Account Class: Finance Charges and Other Fees
The Finance Charges/Late Fees tab establishes how charges and fees are applied to an account.
Related Article: Finance Charge and Late Fee Setup
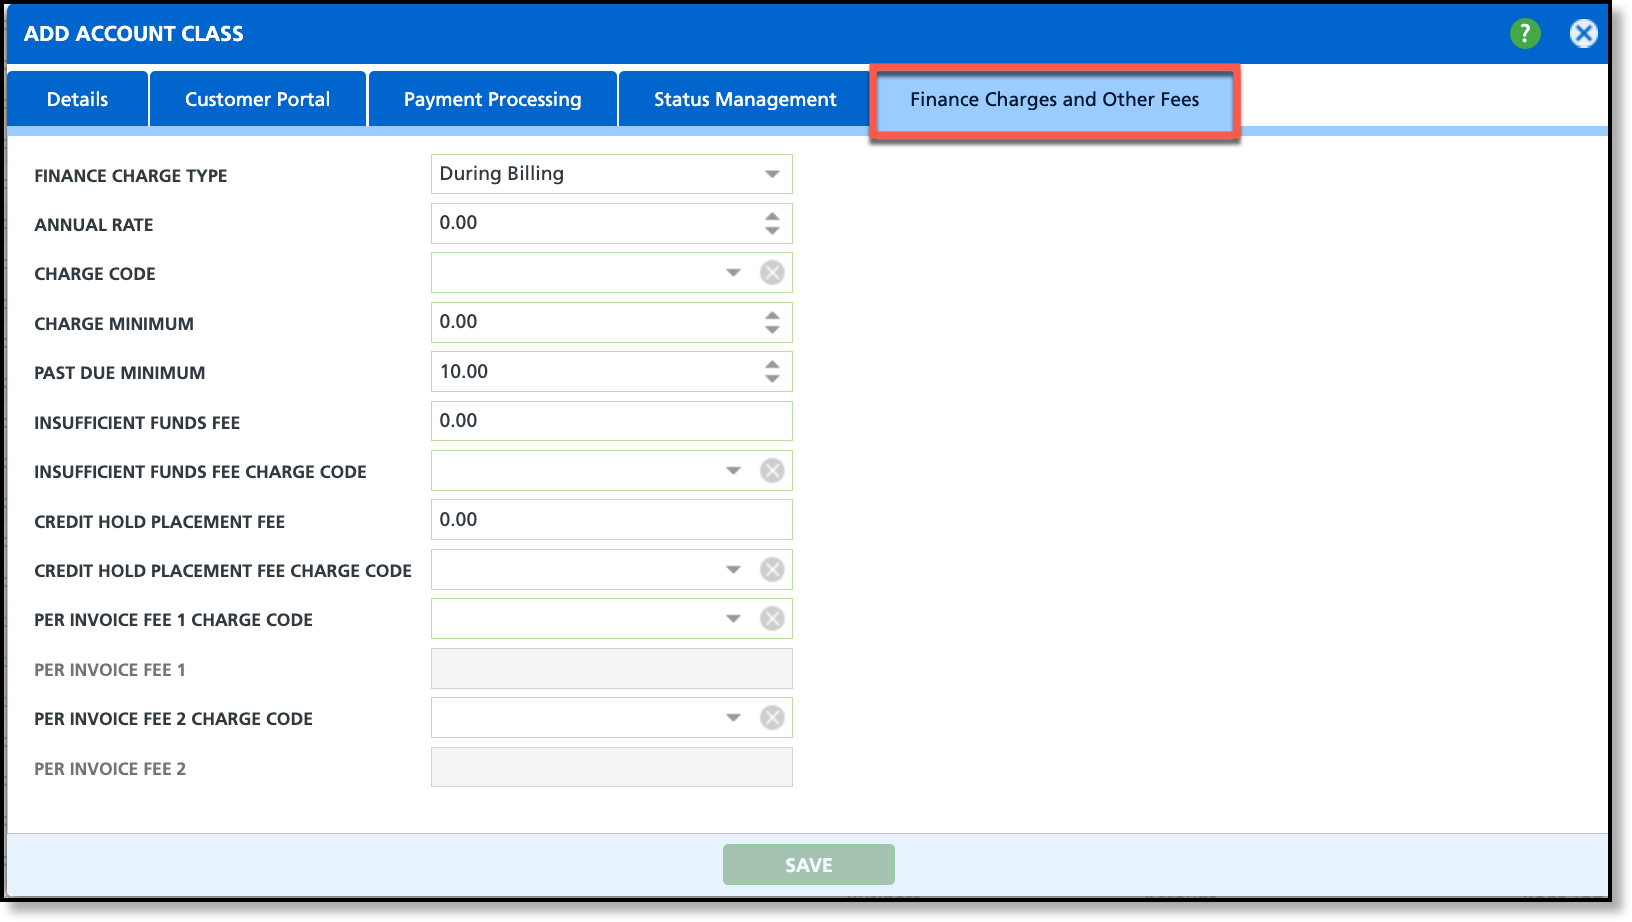
Field Descriptions: Finance Charges and Other Fees
| Field | Description |
Finance Charge Type | Establishes how a late fee will be applied on an account's invoice statement. Based on the selection that is made, functionality for other fields may change.
|
Annual Rate/Rate | Annual rate applied to accounts belonging to the account class. Rate Application for Finance Charge Types:
|
Charge Code | Identifies the charge code that billing will use for applying finance charges and late fees to an invoice. |
Charge Minimum | The minimum dollar amount an account must be charged. If the percentage value entered in the 'Rate' field is less than the charge minimum, the charge minimum is applied. |
Past Due Minimum | The minimum amount an account must be past due for late fees to apply. |
Insufficient Funds Fee | Fee that will be applied for insufficient funds. If a value greater than '0.00' is entered, the Insufficient Funds Fee Charge Code field is required. |
Insufficient Funds Fee Charge Code | Identifies the charge code to be applied at billing when an insufficient fund fee is incurred. |
Credit Hold Placement Fee | Fee that will be applied if an account is placed on a credit hold. If a value greater than '0.00' is entered, the Credit Hold Placement Fee Charge Code field is required. |
Credit Hold Placement Fee Charge Code | Identifies the charge code to be applied at billing when a credit hold placement fee is incurred. |
Per Invoice Fee 1 Charge Code | Identifies the charge code for Per Invoice Fee 1, which will be printed on invoices. When a charge code is selected, the Per Invoice Fee 1 field is enabled. |
Per Invoice Fee 1 | Manual charge that gets added to invoices at billing. The amount entered here can be overridden at the account-level in Edit Account under the Settings tab. |
Per Invoice Fee 2 Charge Code | Identifies the charge code for Per Invoice Fee 2, which will be printed on invoices. When a charge code is selected, the Per Invoice Fee 2 field is enabled. |
Per Invoice Fee 2 | Manual charge that gets added to invoices at billing. The amount entered here can be overridden at the account-level in Edit Account under the Settings tab. |
Application of Insufficient Funds Fee in AR History
(Only applies to Payment Reversals and Charge Backs. Transfers and Split Payments are Excluded.)
Pathway: Customer Service Screen > AR History
If a payment reversal, or charge back is recorded for a payment, and the account class includes a insufficient funds fee and charge code settings, a manual charge is created for the account. For this, the following logic is used:
- Insufficient Funds Fee must include a value greater than '0'.
- Insufficient Funds Fee Charge Code must exist.
By default, the 'Apply Insufficient Funds Fee' check box is checked. The full fee is applied regardless if the reversal or charge back was for a partial amount.

Application of Credit Hold Placement Fee in Customer Service
(Only applies to automated credit holds)
Pathway: Setup > Account > Account Class
- Credit Hold Placement Fee must include a value be greater than '0'
- Credit Hold Placement Fee Charge Code must exist.
- The account class to which the account belongs must have the necessary auto credit hold settings enabled and defined in the Status Management tab.

Related Articles
Finance Charge and Late Fee Setup