Release Version 66 [Archive]
Last Modified on 05/26/2026 9:40 am PDT
The release notes in this article correspond to version 66. Screens and logic may have changed in newer versions.
Portal
Account Portal - Account Portal Updated to Reflect Currency Code Selected in NavuCore (14122) [Enhancement]
An update has been made to Account Portal to use the currency code selected in NavuCore under Setup > System > System Options > Currency field.
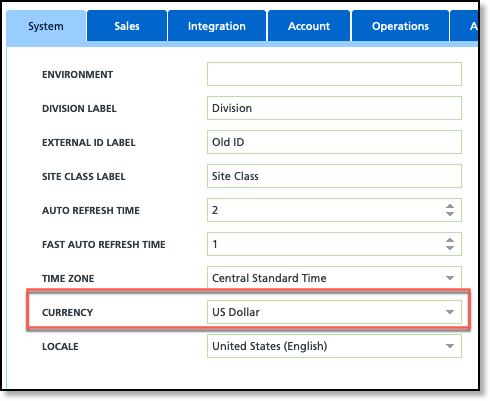
Pathway: Setup > System > System Options
Accounting
Billing – Logic Updated for Auto Pay Batch Processing to Prevent Duplicate Batches (13986) [Enhancement]
To prevent duplication of Auto Pay batches, the following enhancements have been made:
Process Auto Pay Now:
Process Auto Pay on a Specific Date:
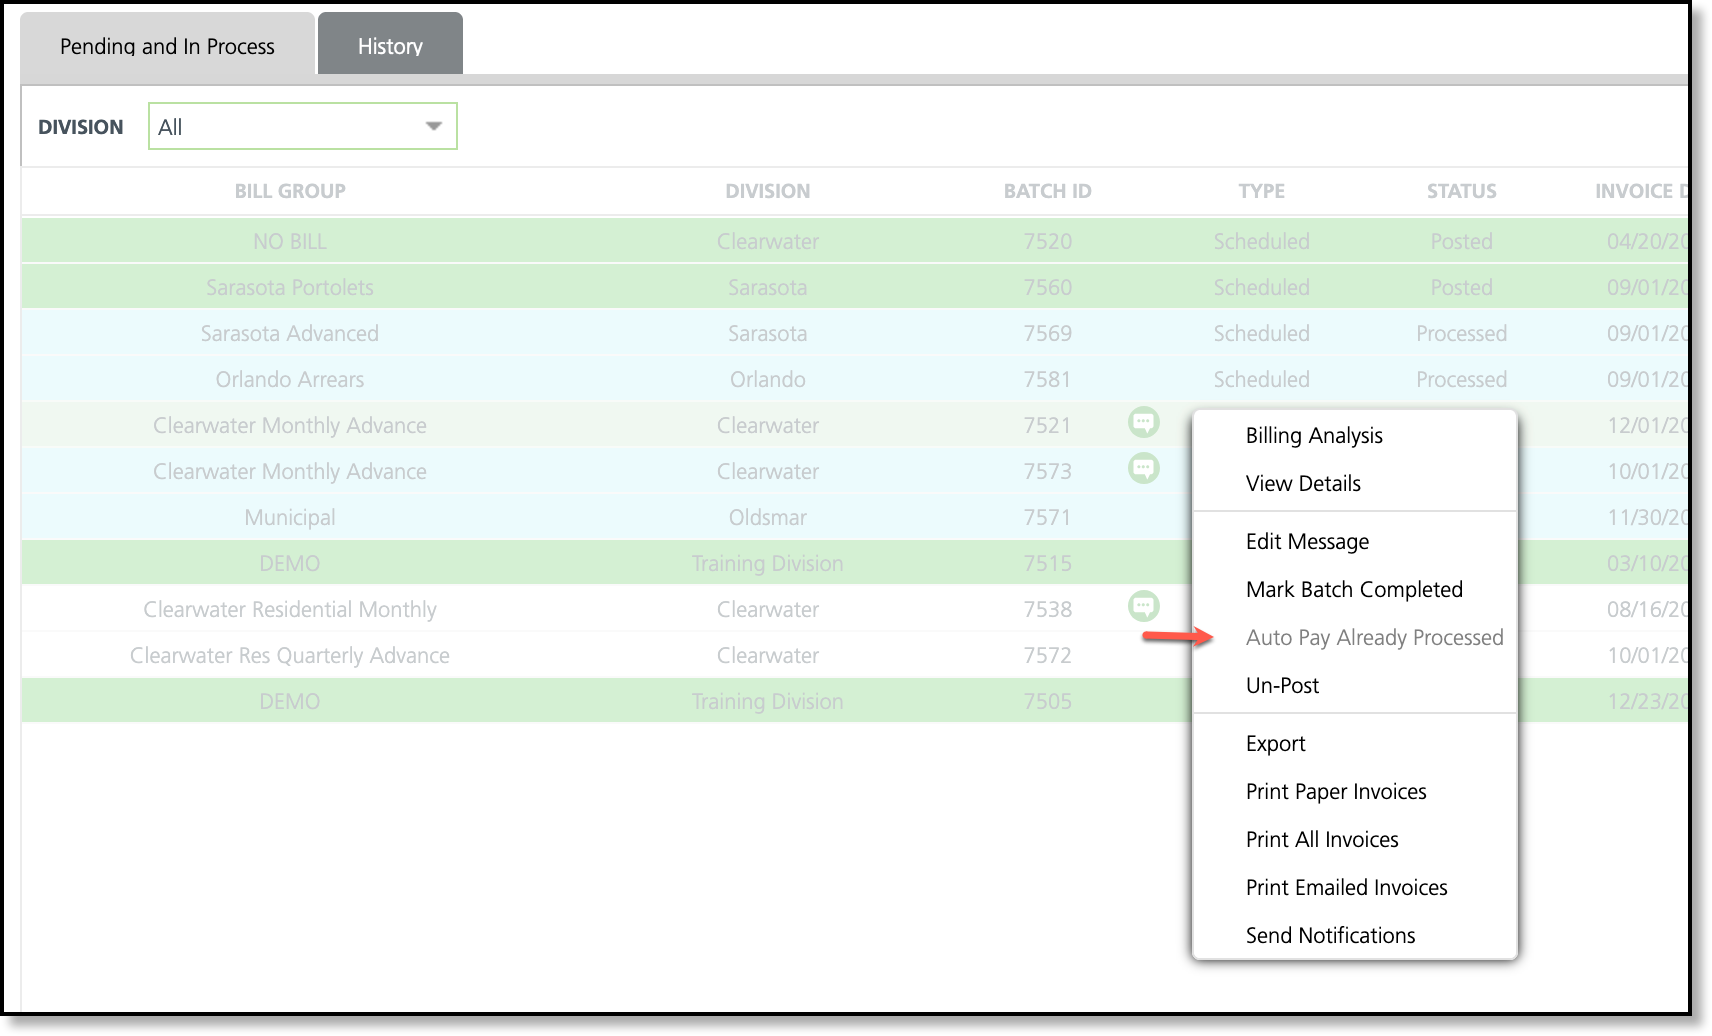
Pathway: Accounting > Billing
Billing - Multiple Enhancements to the Billing Screen (14092) [Enhancement]
The following enhancements have been made to the Billing screen:
The Date field has been modified to display as 'Invoice Date'.
A new column:'From-To Date', has been added to display the Bill From Date and Bill To Date for the invoice.
Edit Batch has been added as an available option for batches in a 'Not Started' status (refer to the on-screen Status column). NOTE- only Invoice Date, Bill From Date and Bill To Date can be edited
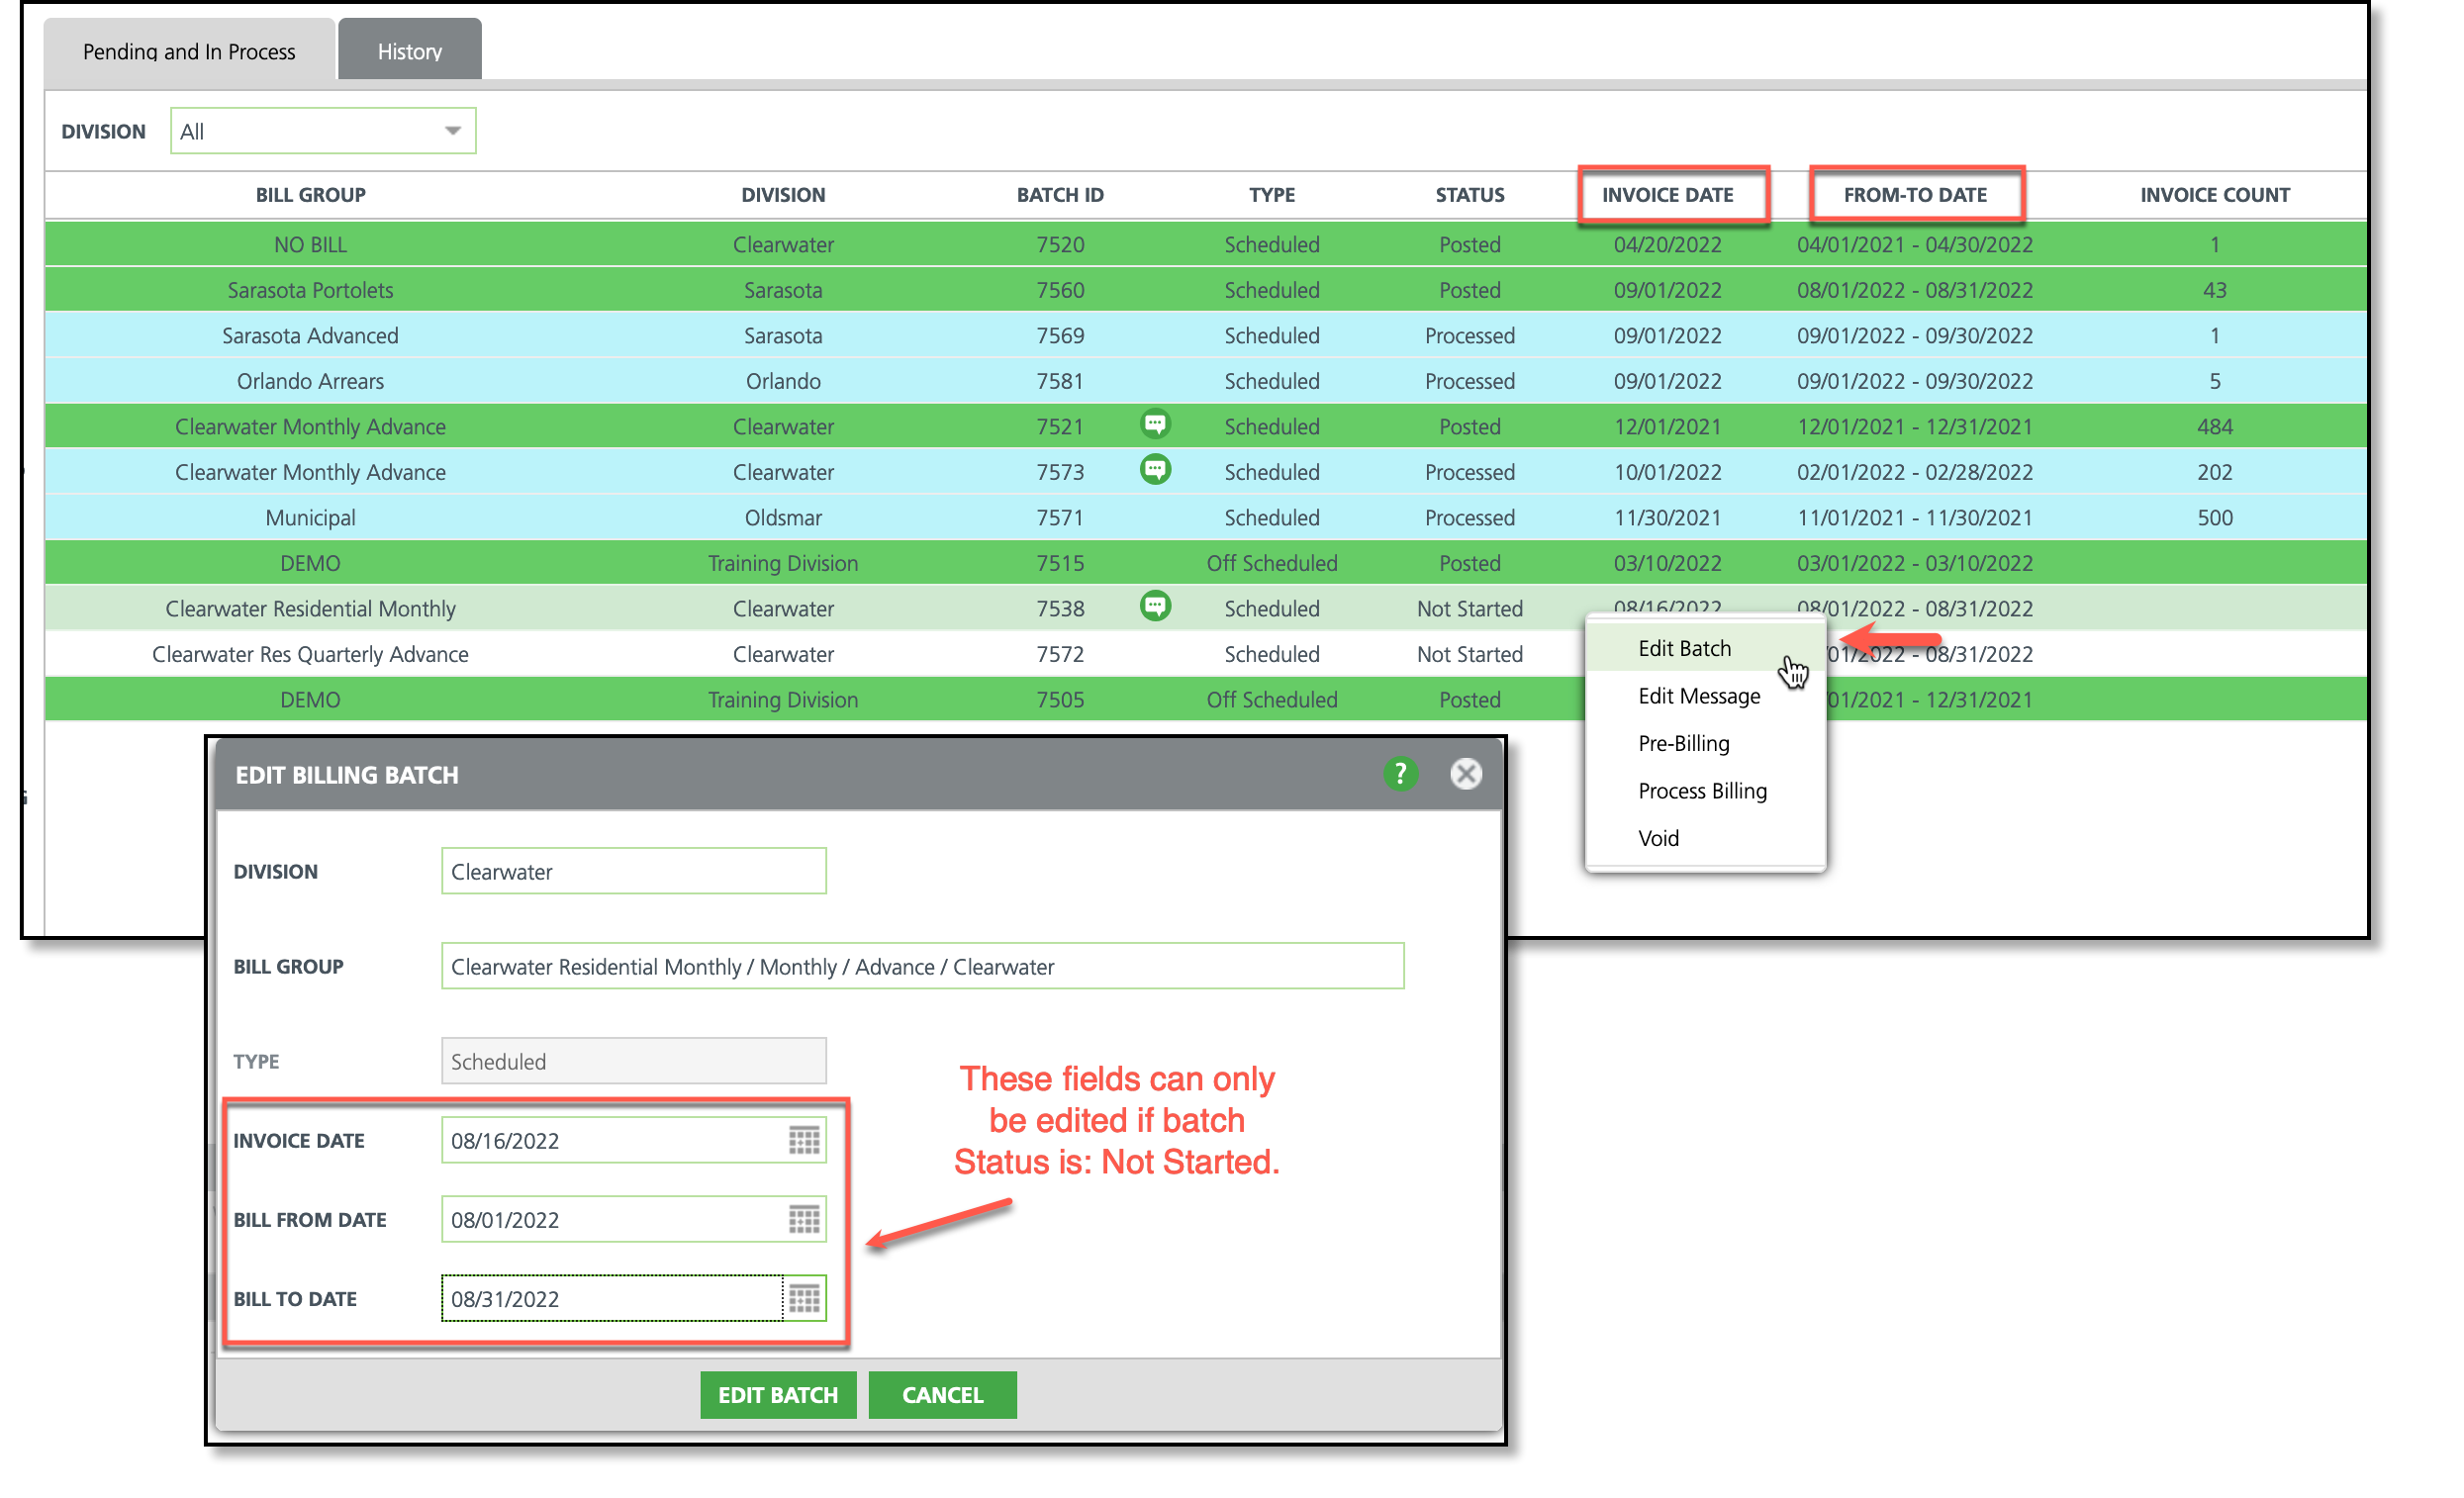
Pathway: Accounting > Billing
Billing Batch - Logic Updated to Default Dates for Manually Created Batches (14149)
Logic has been updated to the default dates that populate the 'Bill To Date' and 'Bill From Date' fields in the Create Billing Batch tool.
Bill From Date - defaults to the date that is one day after the date in the 'Bill To Date' field of the last billing batch. Otherwise, the first day of the month is used if a prior billing batch is not found.
Bill To Date - default date looks at the date in the Bill From Date field and includes additional logic based on the billing frequency to calculate (Example: Monthly, Every 2 Weeks, and etc.).

Pathway: Accounting > Billing > Create Billing Batch
Billing - Logic Updates to Billing Batch (14091) [Enhancement]
Logic has been updated to the automatic frequency of creating a new batch after a batch was marked 'Complete'. The following frequencies are supported:
Monthly
Weekly
Daily
Every 4 Weeks
Quarterly
Bi-Monthly
Semi-annual
'From' and 'To' date fields for auto-generated batches are determined using the previously completed billing batch.
Pathway: Accounting > Billing
Billing Inactivity Fees - Option to Print Invoice Available (14056) [Enhancement]
The Billing Inactivity Fees screen has been updated to include a print option. Select the print icon and the invoice will open in a new tab in PDF format.
An error screen displays if print is selected and no invoice was created (indicated if Invoice ID is '0').

Pathway: Accounting > Billing > Charges Screen
Customer Service
Tasks - Task Created By Text (13997, 14107)
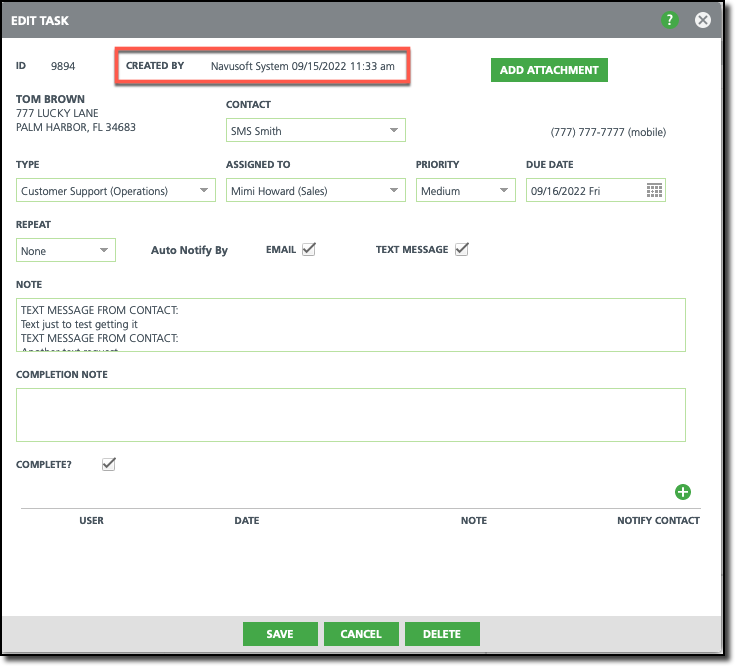
Pathway: Tasks (Icon); Tasks (Calendar Event)
Calendar - Option to Hide/Display Rental Fee (14062) [Enhancement]
'Rental Fee' has been added as a selection option to the Calendar Event drop down for an Account's calendar. Select 'Rental Fee' and any rental fees for the account will display on the calendar. Remove the selection and rental fees will be hidden from calendar view.
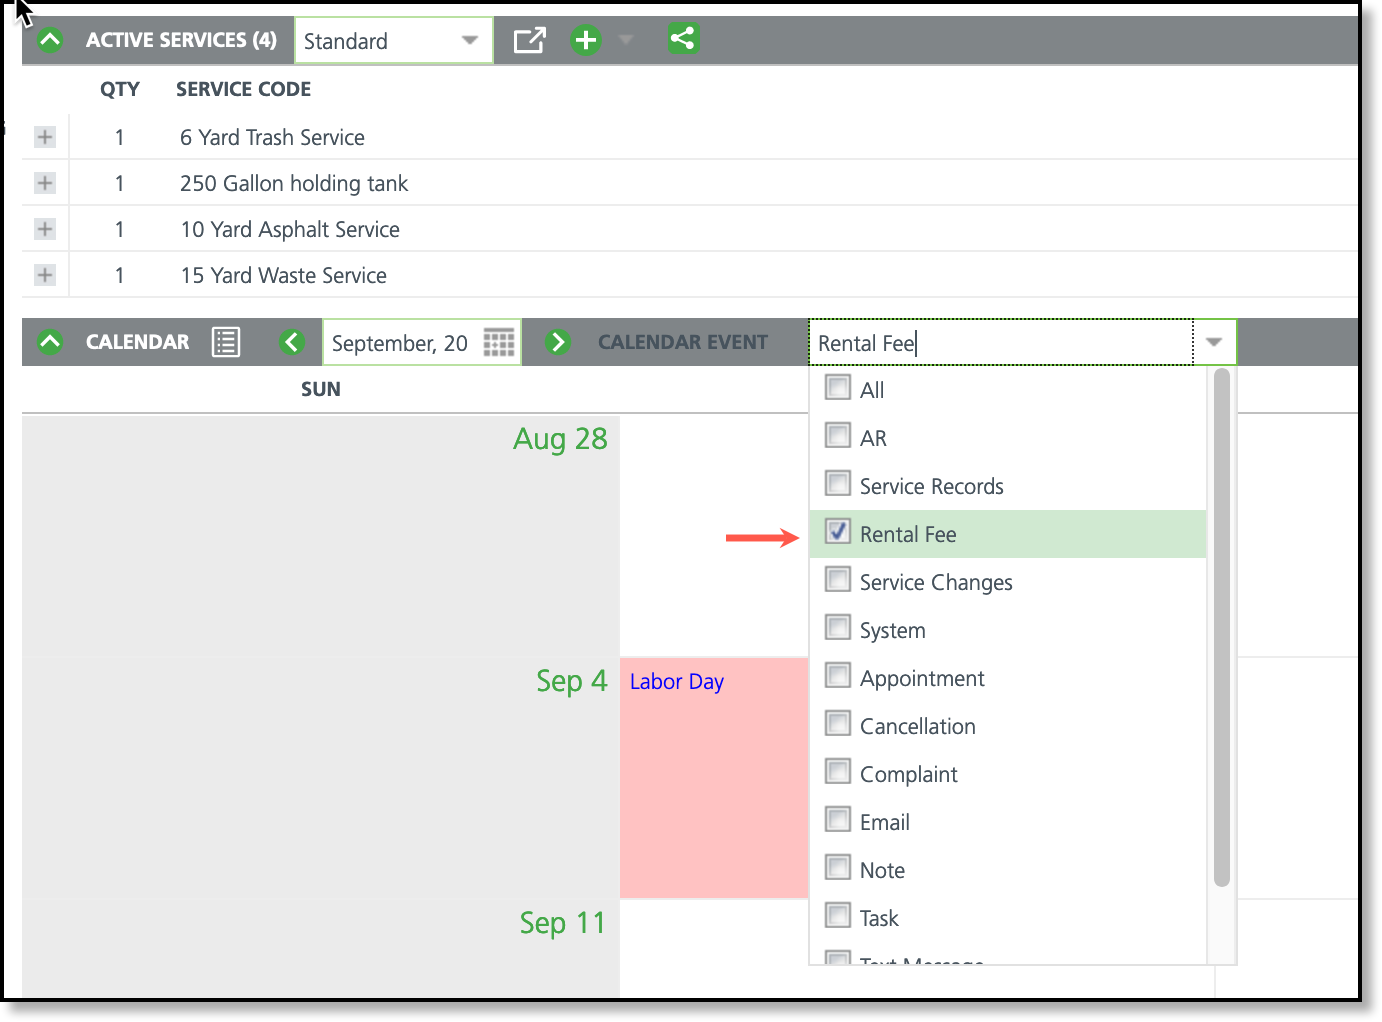
Pathway: Accounts > Search (Accounts) > Calendar
Account Calendar - Holiday Schedule Displays on Account Calendar (13983) [Enhancement]
An enhancement has been made to display scheduled holidays on the account's calendar. Holidays are added in Setup > Operations > Holiday Schedule. If a date includes more than one holiday, only the first holiday will display on the calendar in the upper left corner in blue font. Hover over the name of the holiday to display any notes it includes. In addition, the cell for the date in the calendar the holiday is on displays in red.
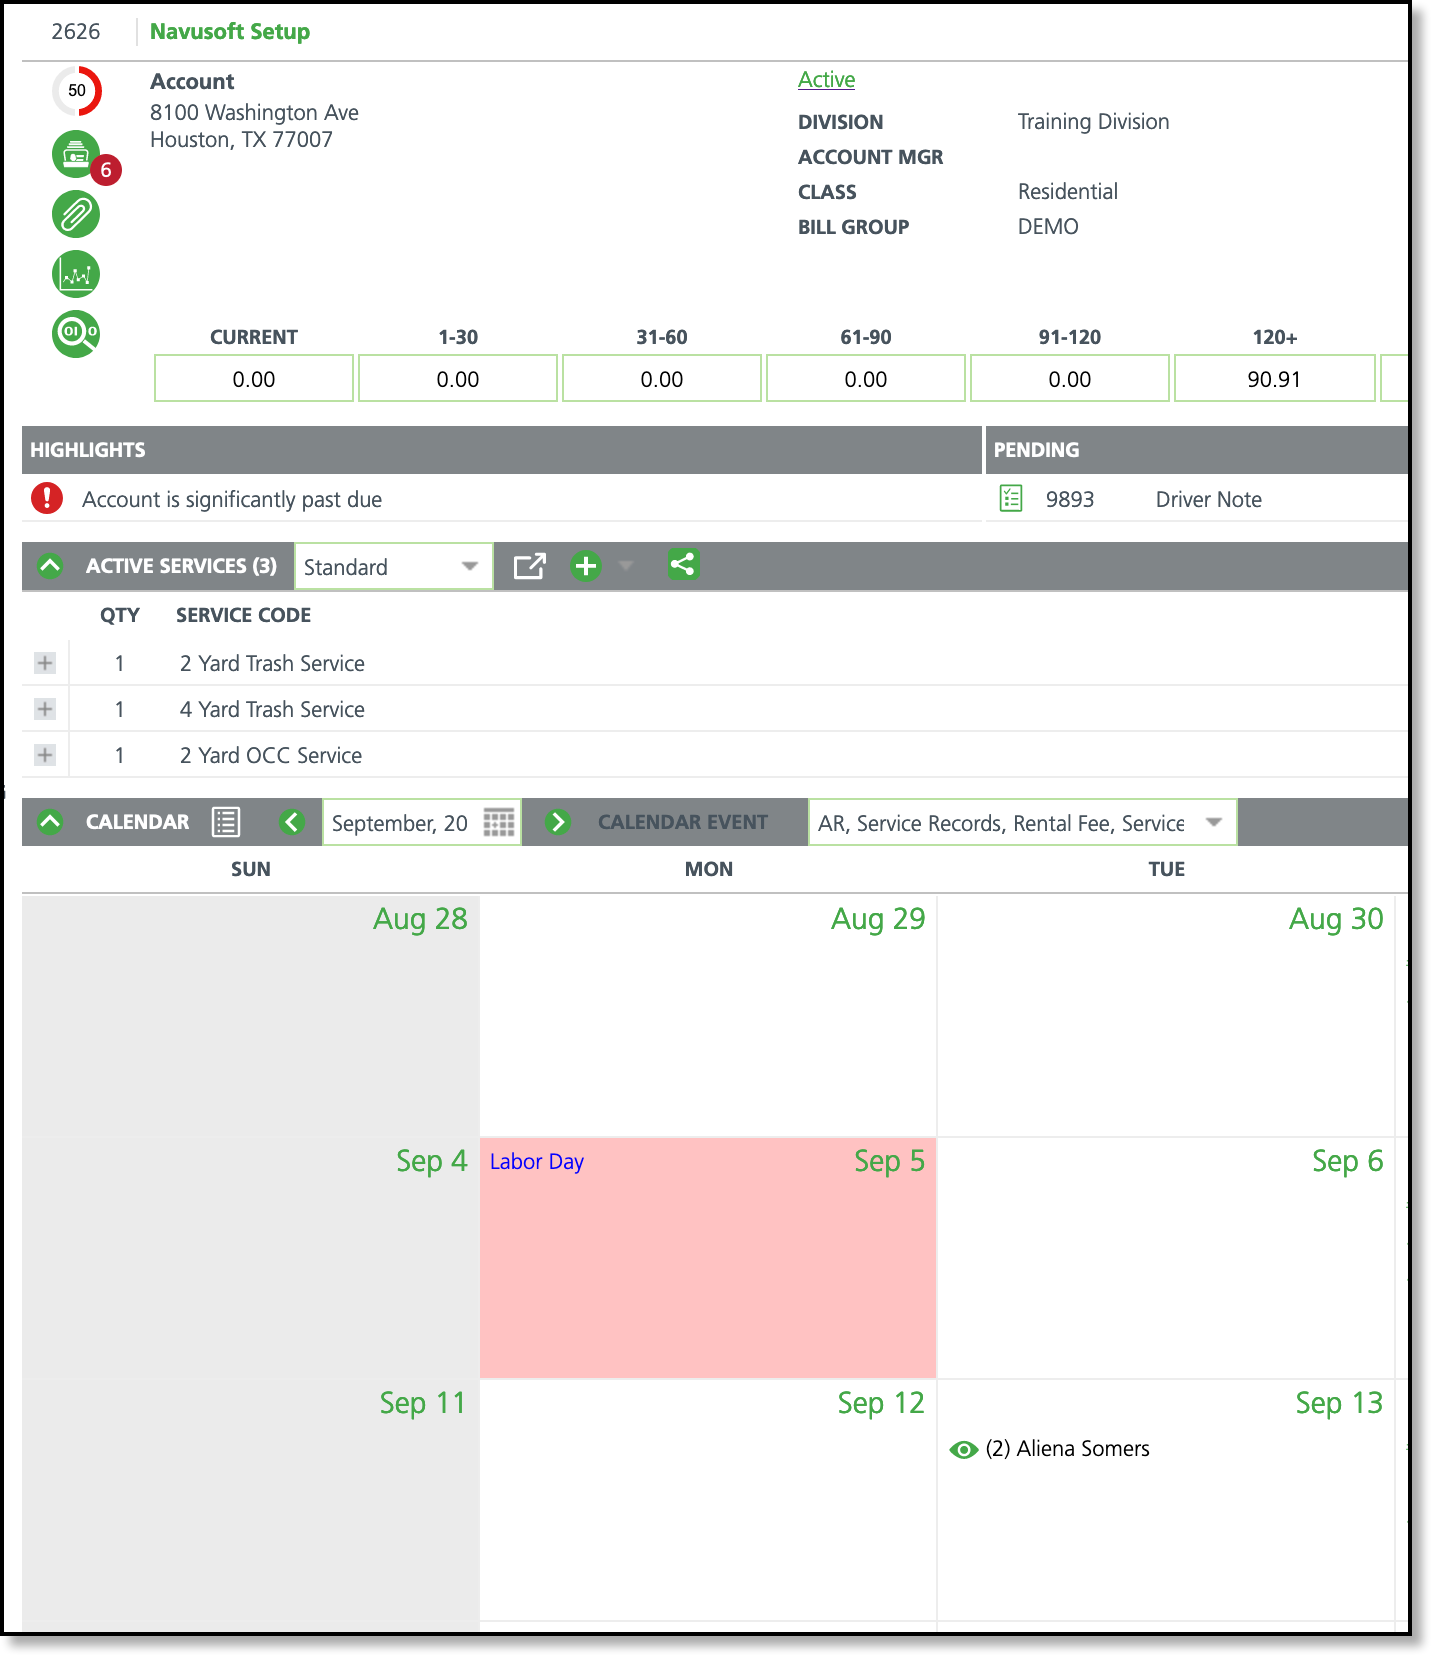
Pathway: Accounts > Account > Calendar (Section); Setup > Operations > Holiday Schedule
Blanket Purchase Orders - New Tool Available in Account Attachments (14035) [Enhancement]
Create a Blanket Purchase Order for an account to bill recurring services, manual charges and on call orders to. Blanket Purchase Orders can be limited to a specific site under the account, or be made available to all sites. After a Blanket PO has been created, the option to delete will be unavailable if any records are linked to it. Use the Blanket PO Management tool under the Accounts module to view all Blanket PO's for all accounts.
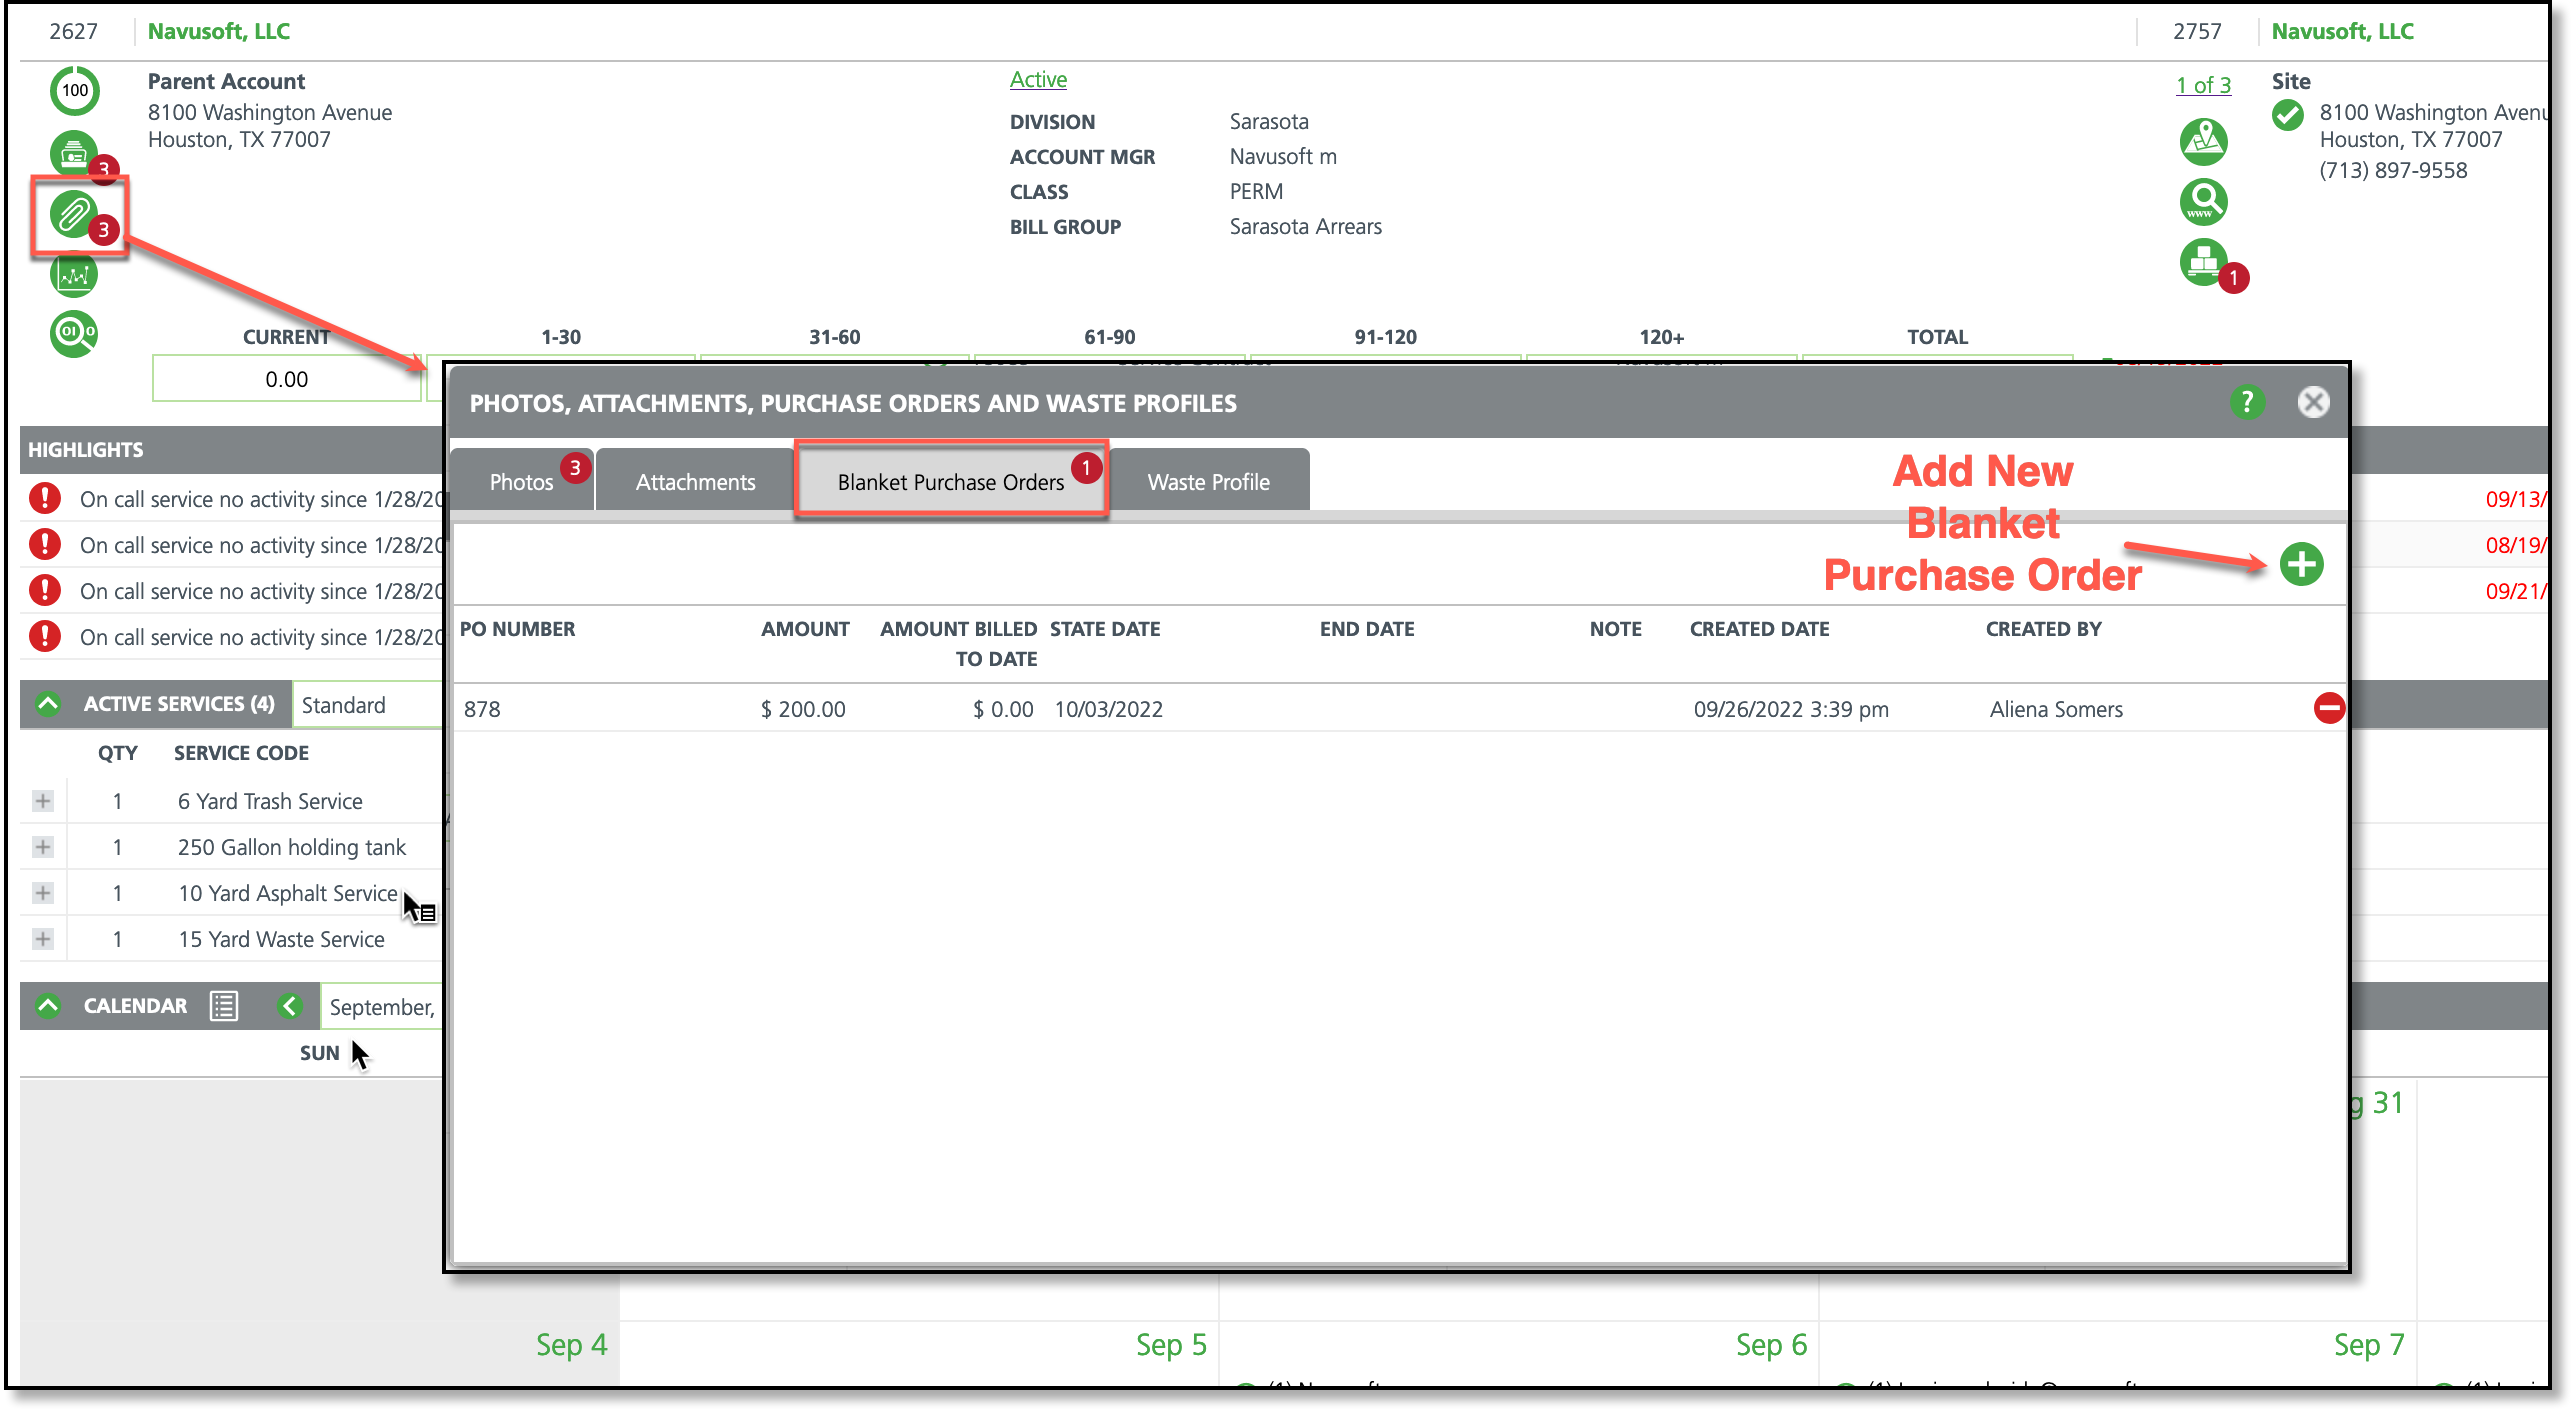
Pathway: Accounts > Search > Account Screen > Attachment Icon
Articles: Blanket Purchase Orders, Blanket PO Management, Video-Blanket Purchase orders
Database
Request Audit – Screen Modifications and Response Code Filter Added (14003) [Enhancement]
The following enhancements have been made to the Request Audit screen:
Upon entry, the tool will default to display a blank screen. Results will load once selections have been made using the filter drop down options at the top.
Addition of 'Response Code' filter. Only one response code may be selected at a time.
Logic updated to the Response Code column to display the name of the response code. Previously this displayed as a numeric value.
Logic updated to the screen display for response codes that are not Success. If the Response Code is not Success, the entire row and any subsequent rows will be highlighted red.
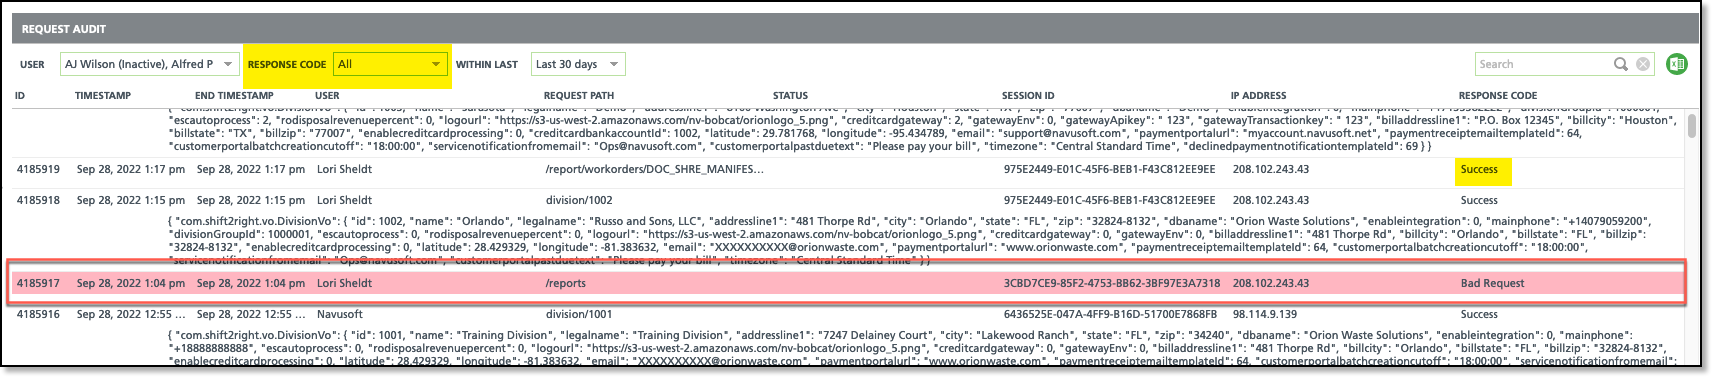
Pathway: Database > Request Audit
Operations
Dispatch - Add/ Edit Payroll Hours in Route Productivity (14162) [Enhancement]
Logic has been updated to the Payroll Clock In/Clock Out fields in Dispatch (Route Productivity view) to allow for adding and editing hours. A '?' displays when no time has been clocked for the employee.
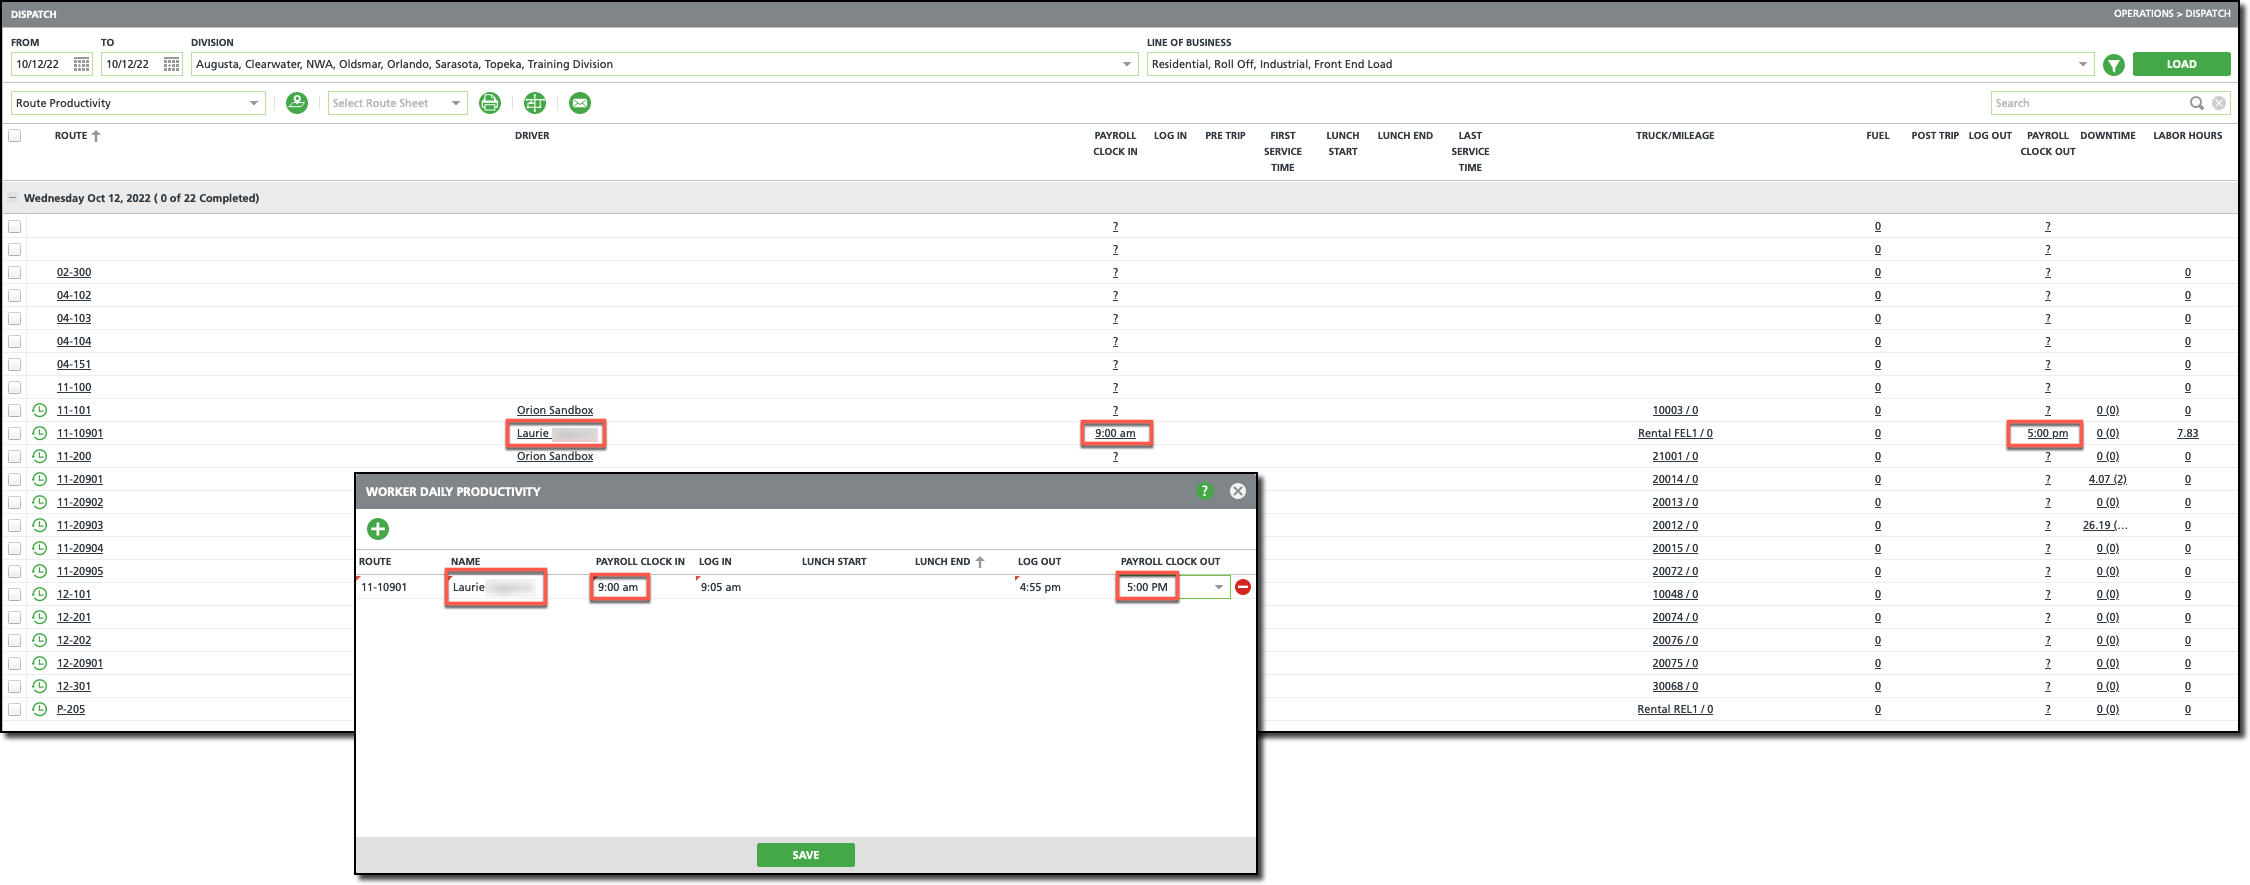
Pathway: Operations > Dispatch > Route Productivity (view)
Manifest Consolidation - ‘Transfer Transporter’ Field Relocated (14004) [Enhancement]
The Transfer Transporter field located in Setup > Operations > Route (double click to open) and Operations > Dispatch > Edit Route (double click to open) has been moved to the Manifest Consolidation screen in Operations. To access the field, right-click within the line item and the Manifest Consolidation Batch popup editor will display. Click on the Transporter drop down field and a list of transfer transporters will display. Select the transporter that applies.
Additional information about the Transporter field and its role in the Manifest Consolidation process can be found in the Prepare Open Batches article attached below.
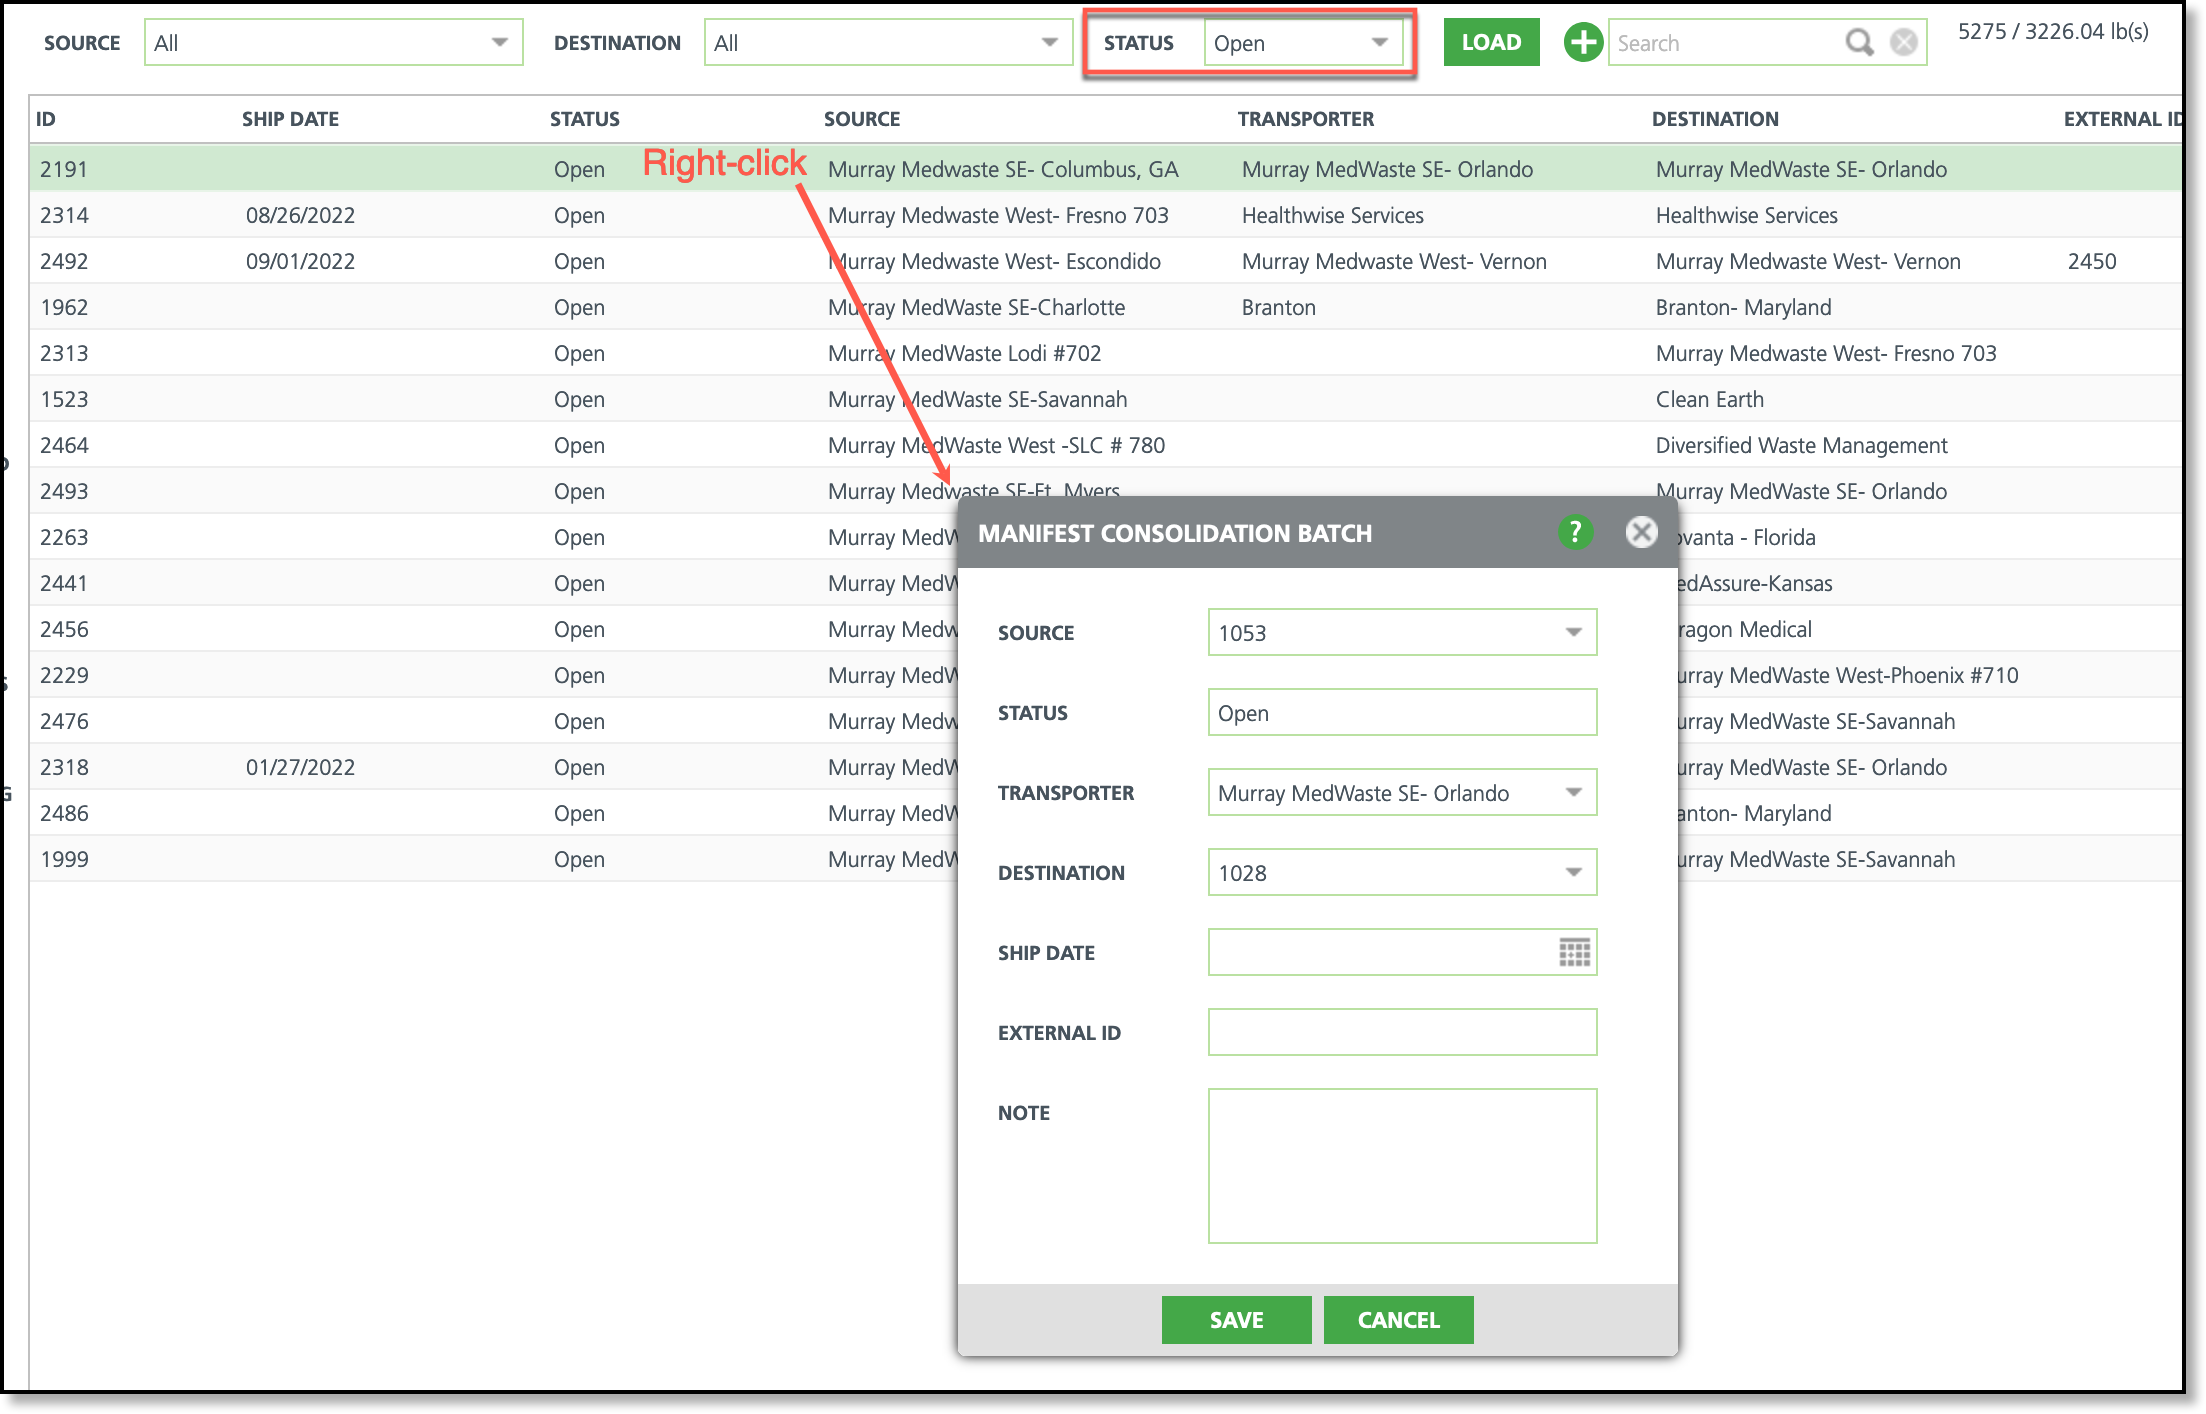
Pathway: Operations > Manifest Consolidation
Articles: Prepare Open Batches
Dispatch (Services List) - Email Notification Added (14084) [Enhancement]
An Email Notification icon has been added to the Services List screen display to send service notification emails to select locations on a route. To use this feature, a template must be created (and marked Active) for the Operations Notification (Type) in Setup > System > Notification Template.
To create an email notification:
Select the service locations you would like to include in the notification.
Click the email icon and the Email Notification popup window will display.
Select a template from the Notification Template dropdown. This will populate the Subject and Body fields with what is found in the template. If necessary, these fields can be edited before the email is sent.
Select Send Email when finished.
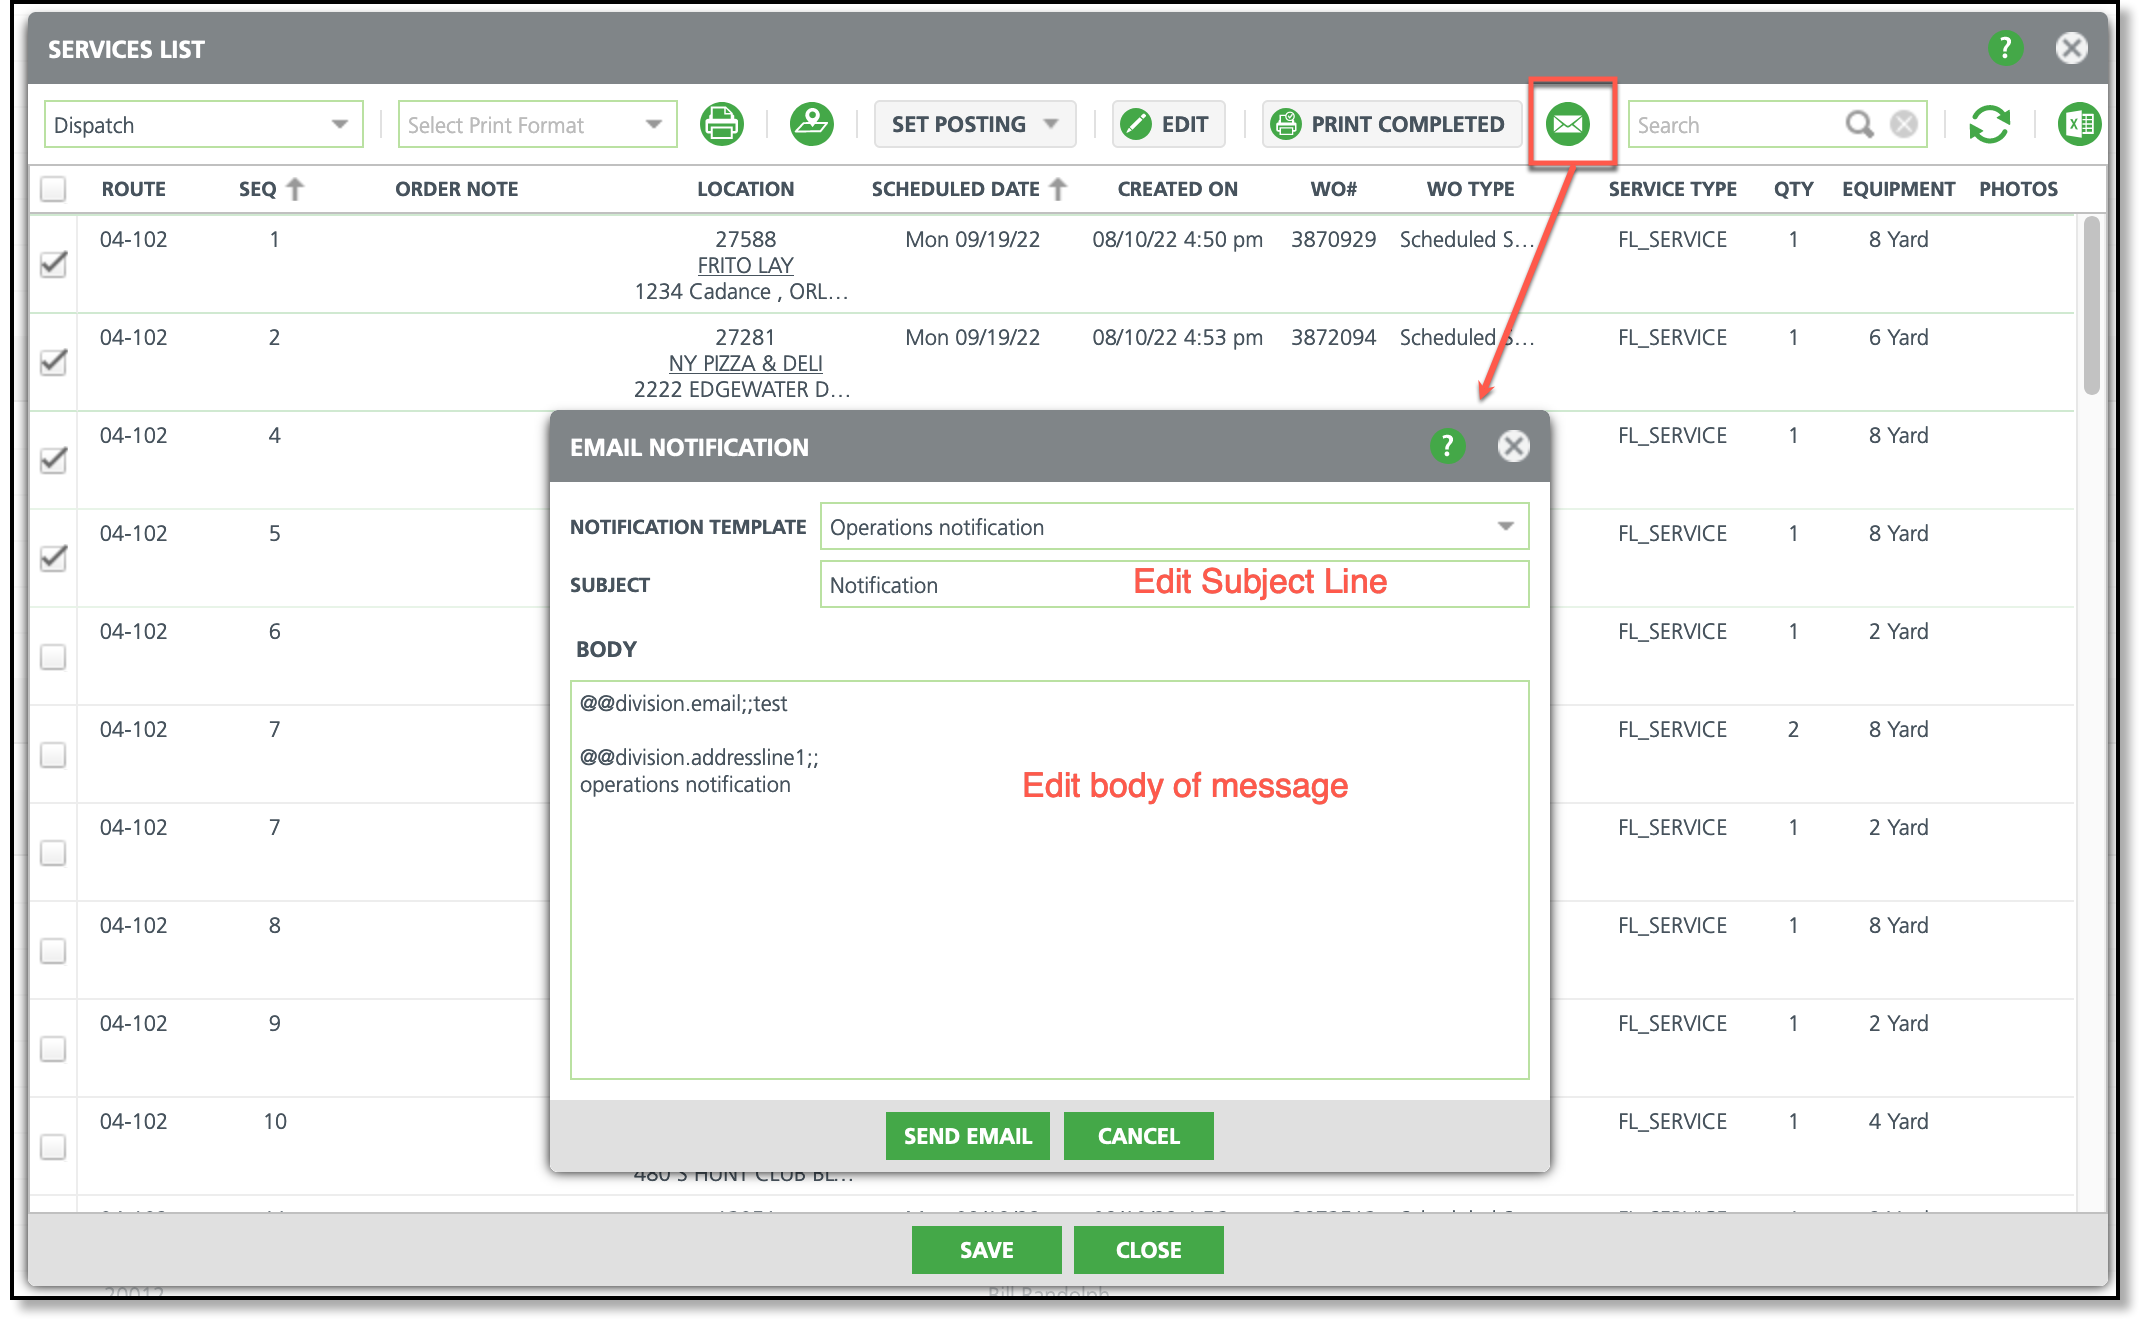
Pathway: Operations > Dispatch; Setup > System > Notification Template
Article Link: Route Service Notifications
Dispatch (Services List) – Screen Updates for 'Completion Data' View (13984) [Enhancement]
The Services List screen has been updated to include a Distance column to track the distance between the service location's address and the location the driver marked the service complete. The value in the Distance column displays as a link and will generate a map of the two locations when selected. If the driver has not marked a service location as complete, a Distance value will not be produced.
The Distance column is only available in the 'Completion Data' screen view.
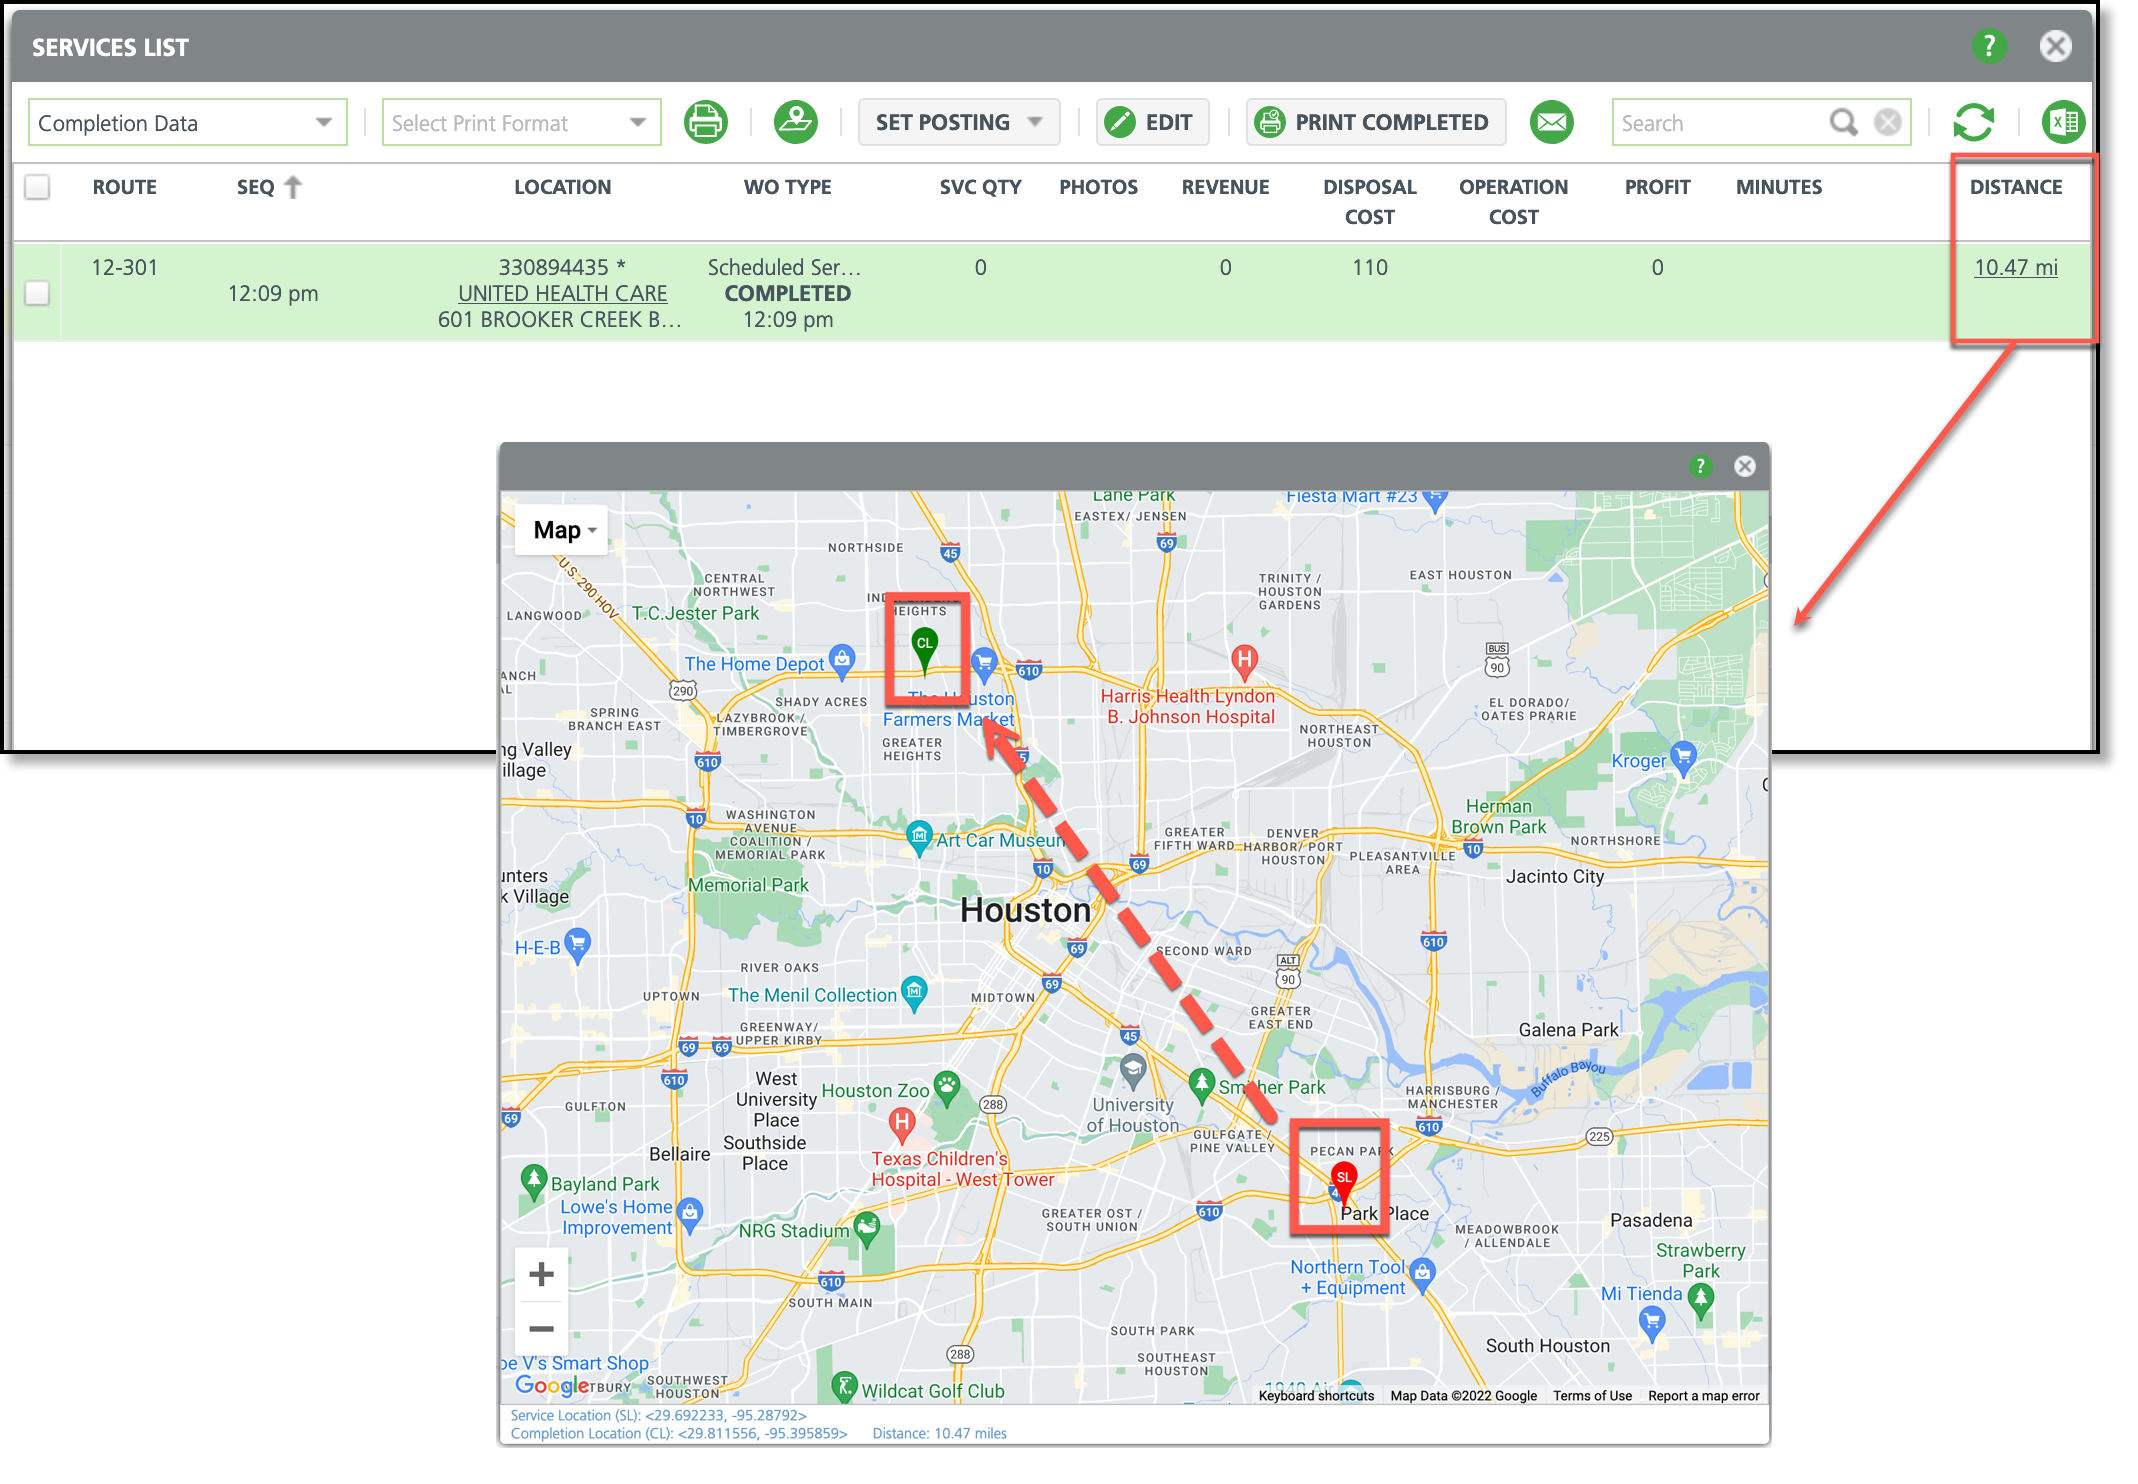
Pathway: Operations > Dispatch > Select 'Scheduled' Link
Operations - Route Management Renumber Tool (13987)[Enhancement]
A new Re-Number tab has been added to the Route Management tool in Operations. This tool is used for the purpose of re-numbering a route's sequence and can be used for multiple routes at a time.
To use the tool:
Select each route sequence re-numbering should be applied to.
Select the Day(s) of Week for the route(s) you would like re-sequenced.
Enter a Sequence Gap.
Example: Enter a value of 5 and stops will be sequenced as 5, 10, 15, 20, 25, 30, and etc for each route.
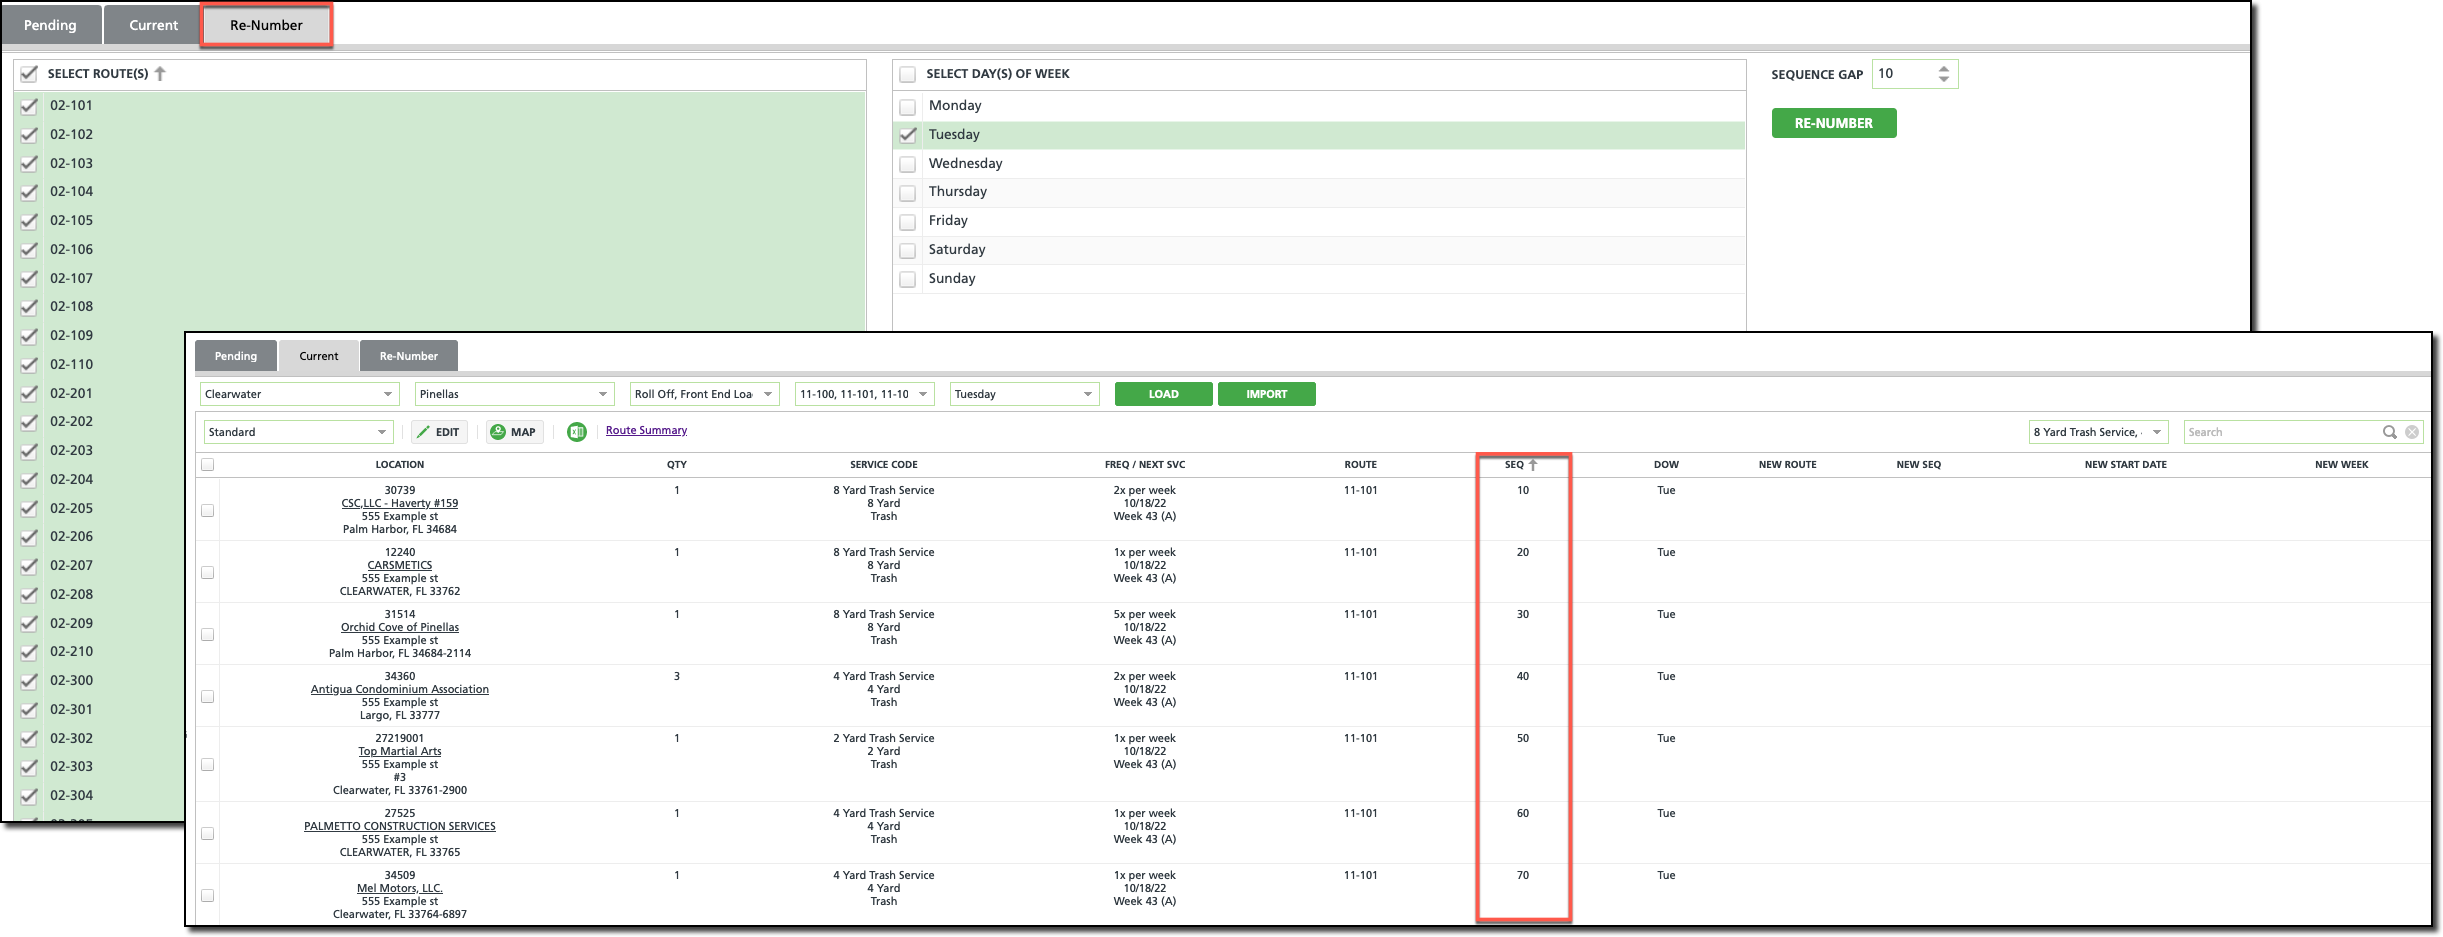
Pathway: Operations > Management > (Tab)
Dispatch - Rounding Logic Updated to Disposal Rate Field (14045)
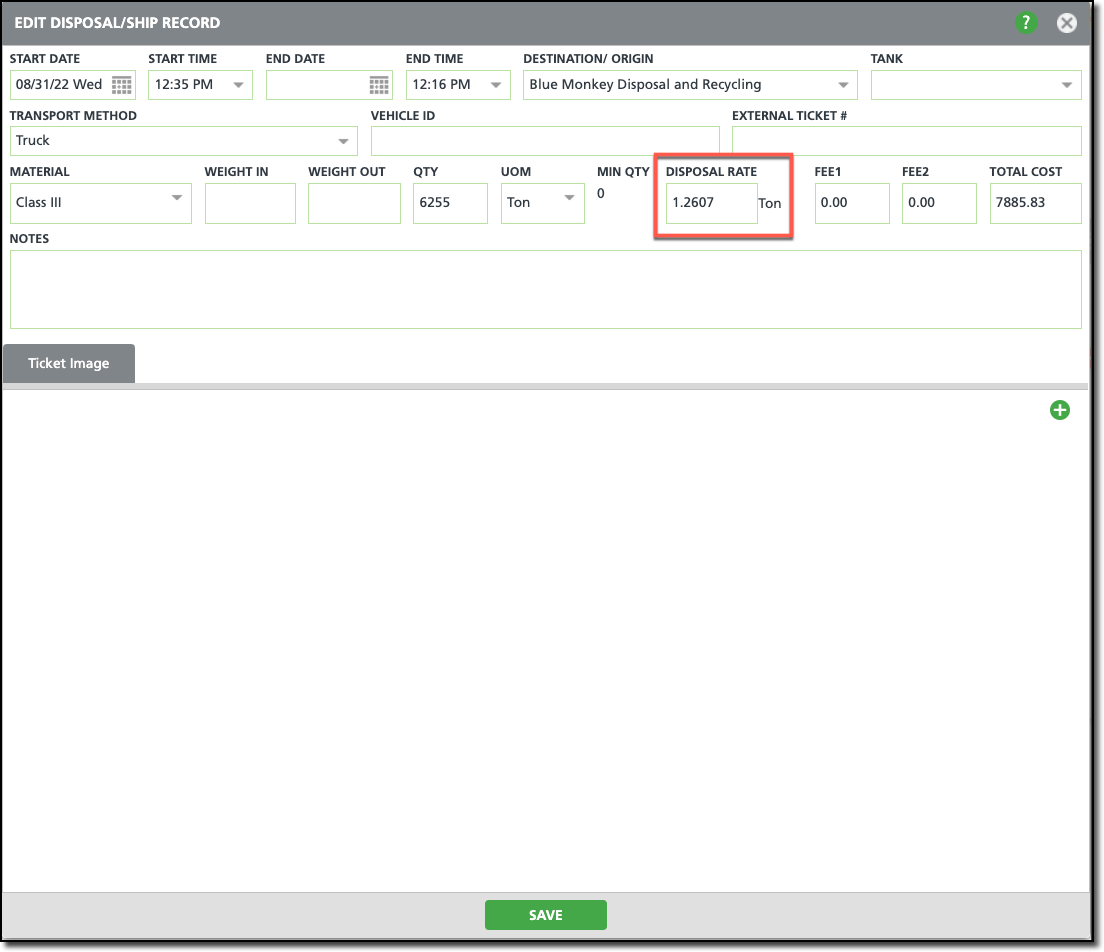
Pathway: Operations > Dispatch > (Edit Disposal/ Ship Record)
Dispatch - Route Notifications Expanded to Include Text (14213) [Enhancement]
The following changes have been made to the Email Notification tool in Dispatch and Services List:
Email Notification has been renamed to Route Notification (Dispatch) or Service Notification (Services List).
The notification has been expanded to include the option to text. To support this, Email Body and Text Body tabs were added. Upon selection of a Notification Template, the Subject, Email Body and Text Body fields populate with content created in the template (Setup > System > Notification Template). Before sending the notification, users can edit any of the fields.
The 'Send Email' button has been renamed to 'Send Notification'. Notifications are sent to the contact's service notification preference.
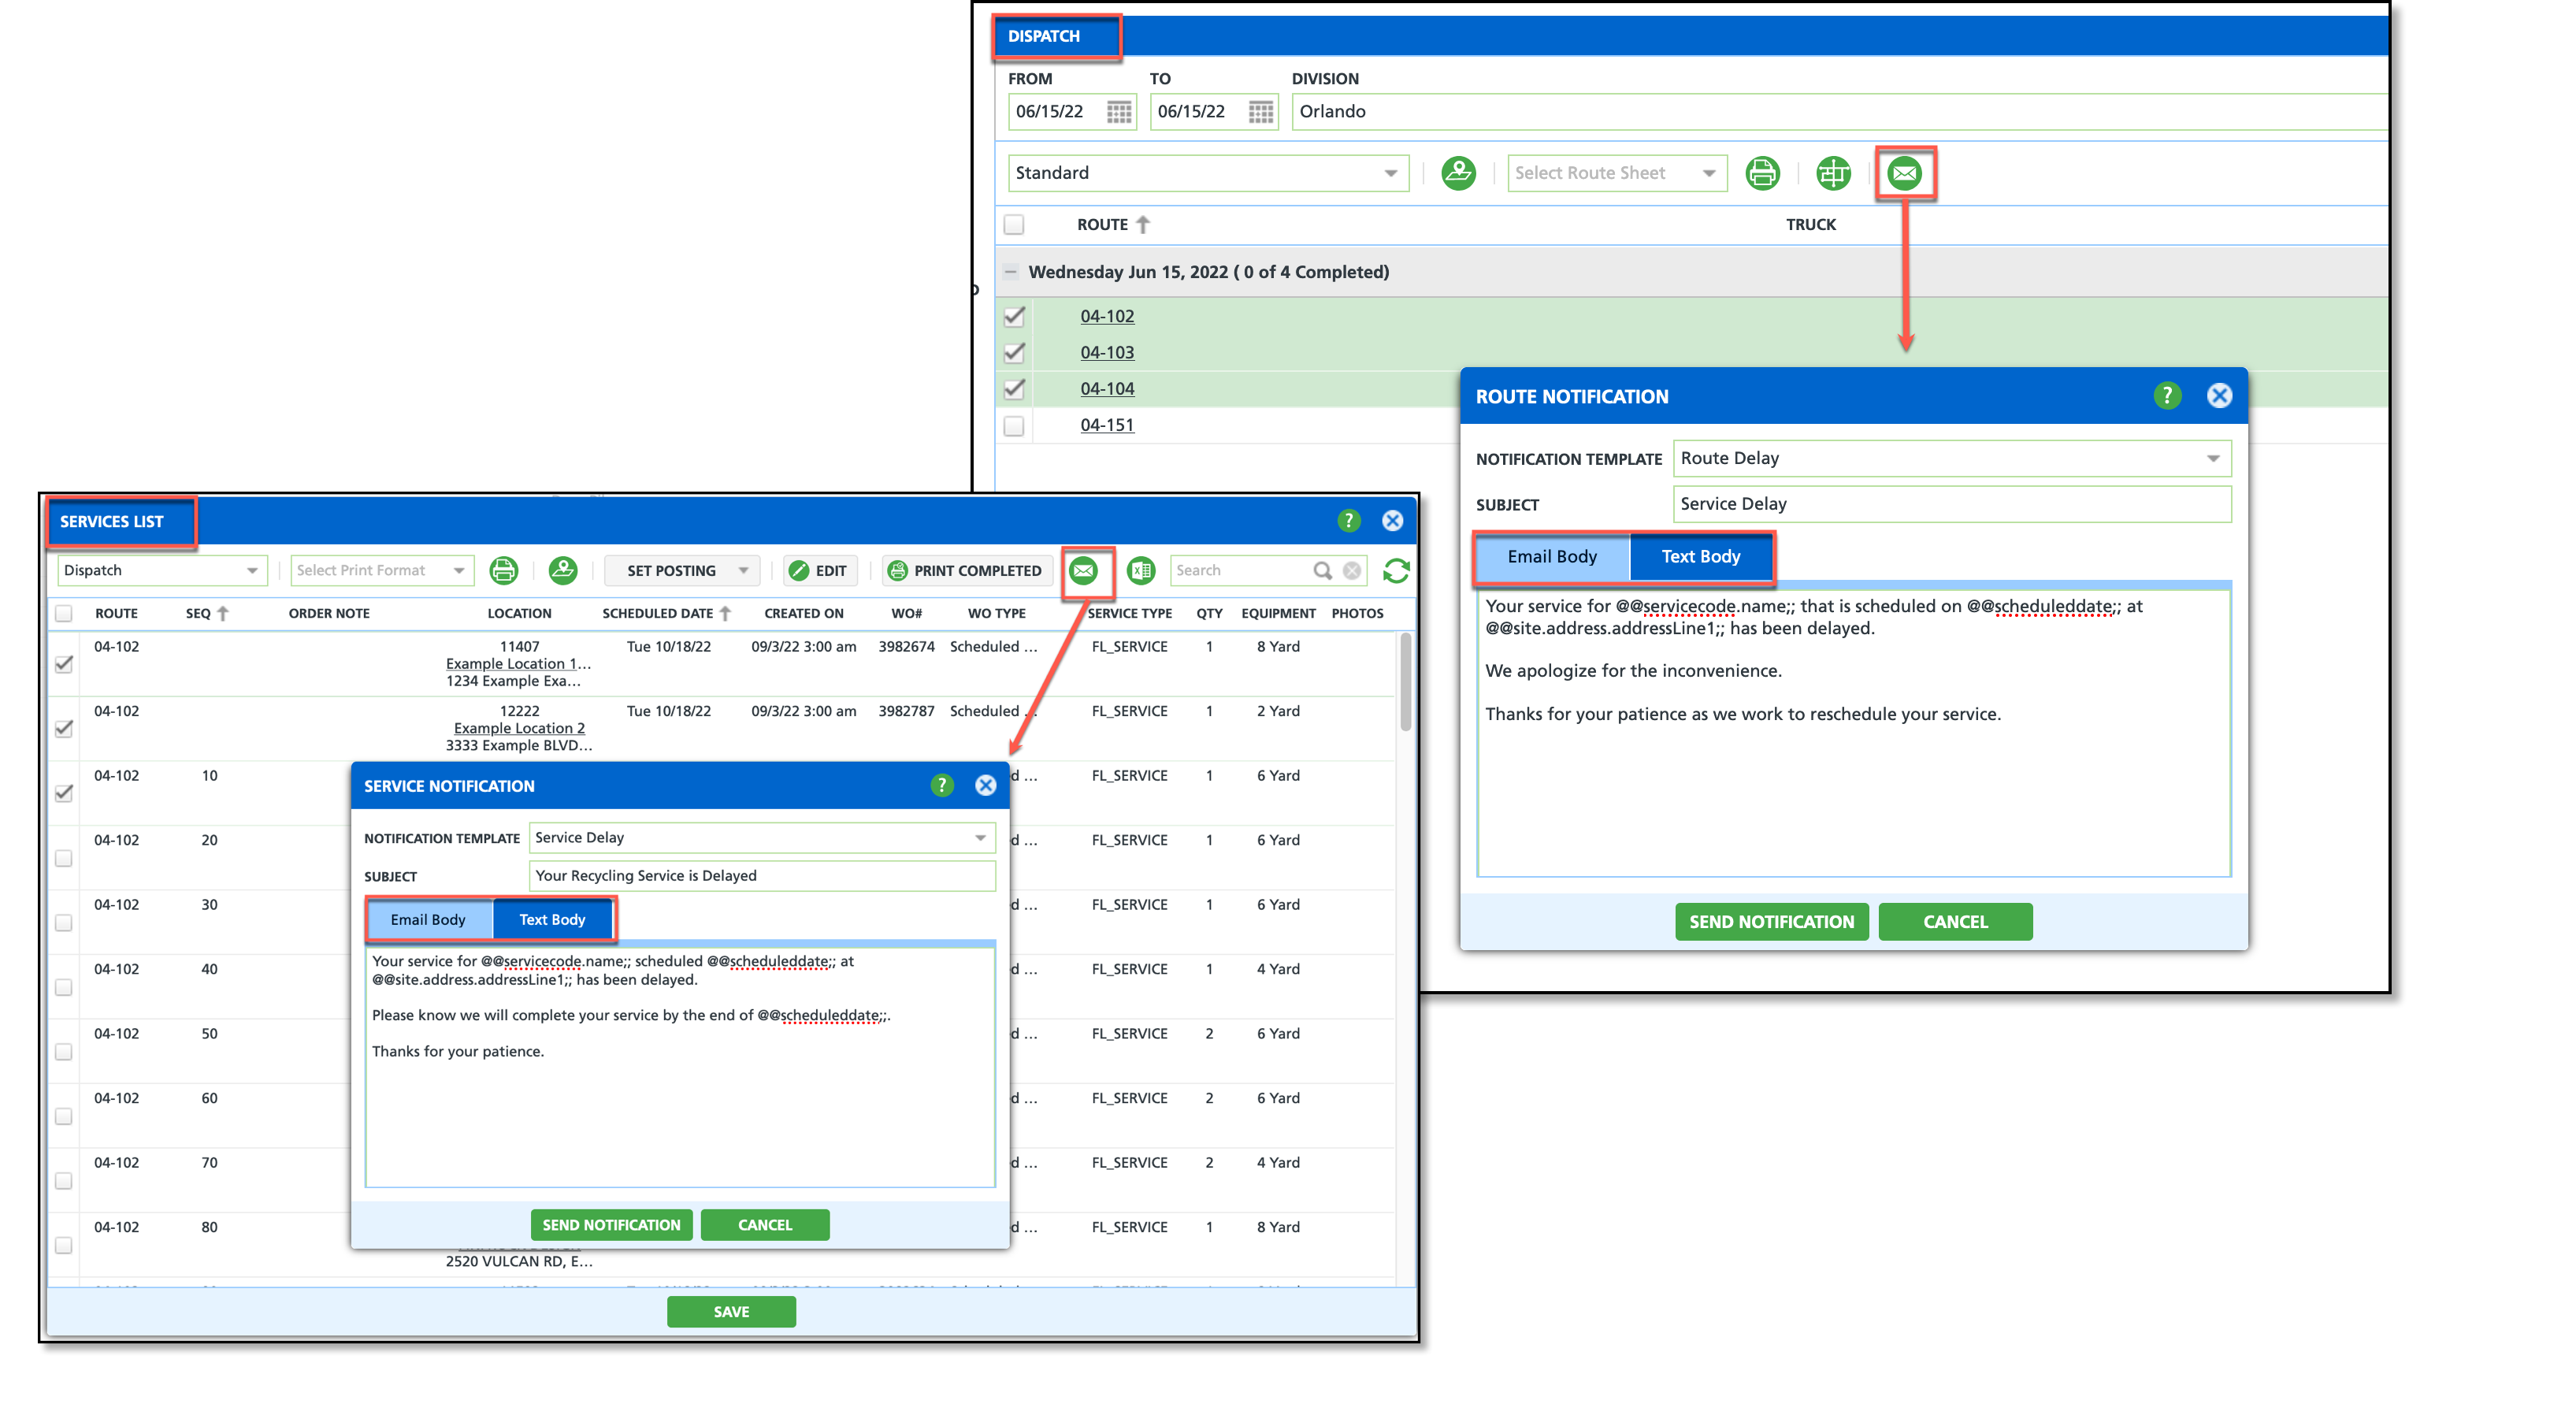
Pathway: Operations > Dispatch
Article: Route and Service Notifications
Manifest Consolidation – Updating ‘Post Batch’ Status (14025)
Logic has been updated to the availability of the 'Post Batch' status option in Manifest Consolidation. Post Batch is only available for selection when the work order linked to the batch is in a 'Posted' status.
Pathway: Operations > Manifest Consolidation
Operations - Route Management Renumber Tool (13987)[Enhancement]
A new Re-Number tab has been added to the Route Management tool in Operations. This tool is used for the purpose of re-numbering a route's sequence and can be used for multiple routes at a time.
To use the tool:
Select each route sequence re-numbering should be applied to.
Select the Day(s) of Week for the route(s) you would like re-sequenced.
Enter a Sequence Gap.
Example: Enter a value of 5 and stops will be sequenced as 5, 10, 15, 20, 25, 30, and etc for each route
Pathway: Operations > Management > (Tab)
Dispatch (Services List) – Screen Updates for 'Completion Data' View (13984) [Enhancement]
The Services List screen has been updated to include a Distance column to track the distance between the service location's address and the location the driver marked the service complete. The value in the Distance column displays as a link and will generate a map of the two locations when selected. If the driver has not marked a service location as complete, a Distance value will not be produced.
The Distance column is only available in the 'Completion Data' screen view.
Pathway: Operations > Dispatch > Select 'Scheduled' Link
Dispatch (Services List) - Email Notification Added (14084) [Enhancement]
An Email Notification icon has been added to the Services List screen display to send service notification emails to select locations on a route. To use this feature, a template must be created (and marked Active) for the Operations Notification (Type) in Setup > System > Notification Template.
To create an email notification:
Select the service locations you would like to include in the notification.
Click the email icon and the Email Notification popup window will display.
Select a template from the Notification Template dropdown. This will populate the Subject and Body fields with what is found in the template. If necessary, these fields can be edited before the email is sent.
Select Send Email when finished.
Pathway: Operations > Dispatch; Setup > System > Notification Template
Article Link: Route Service Notifications
Sales
Sales Management - New Column Placement for Rejected Contracts (14174) [Enhancement]
Previously, rejected contracts displayed under the 'Contract Review Pending' column in the Sales Management screen. An update has relocated rejected contracts to display under the 'Contract Review Complete' column.
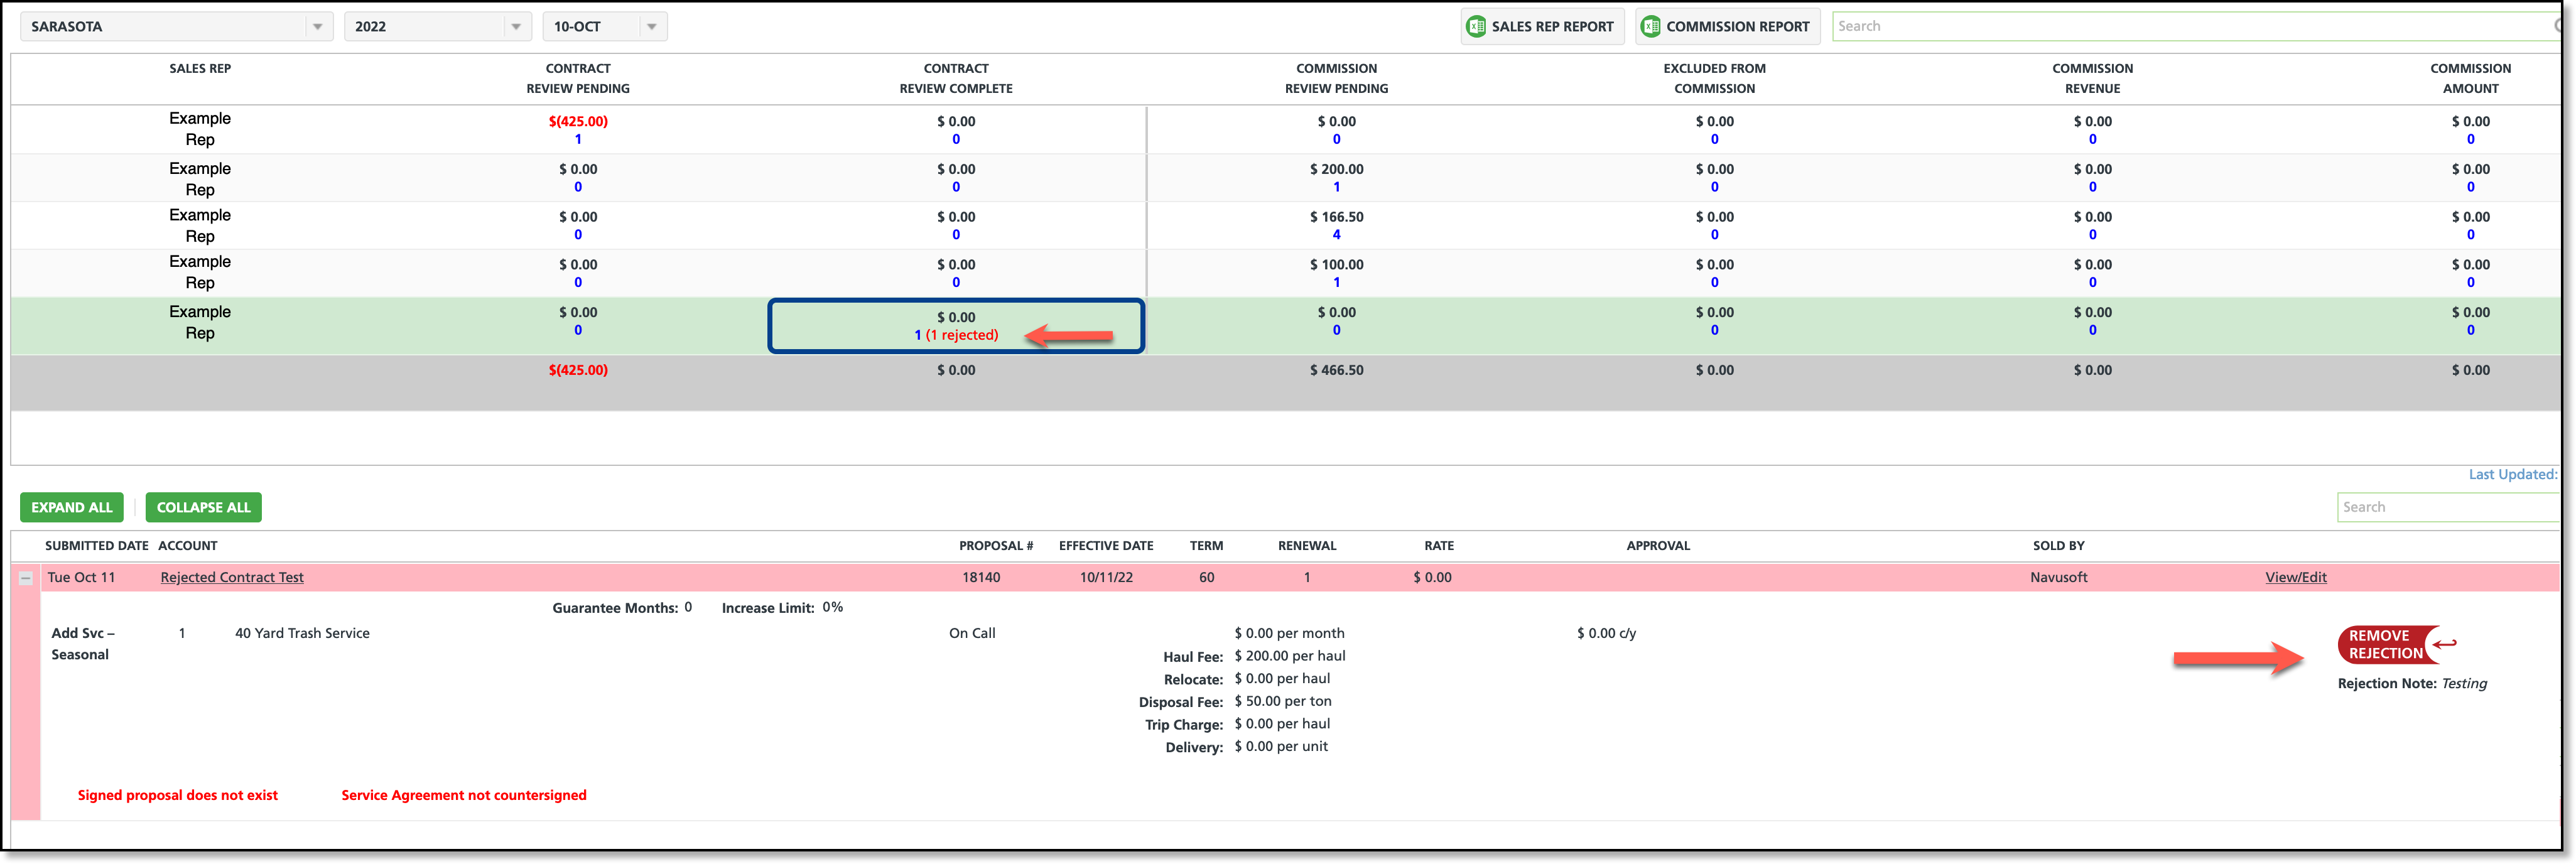
Pathway: Sales > Sales Management
Setup
Permissions - New Permission Added for Invoice Notification Monitoring Tool (13996) [Enhancement]
Permission 427 'Permission to view Notification History' is now available. This permission should only be assigned to users whose job duties include accessing the Invoice Notification Monitoring tool in the Accounting module.
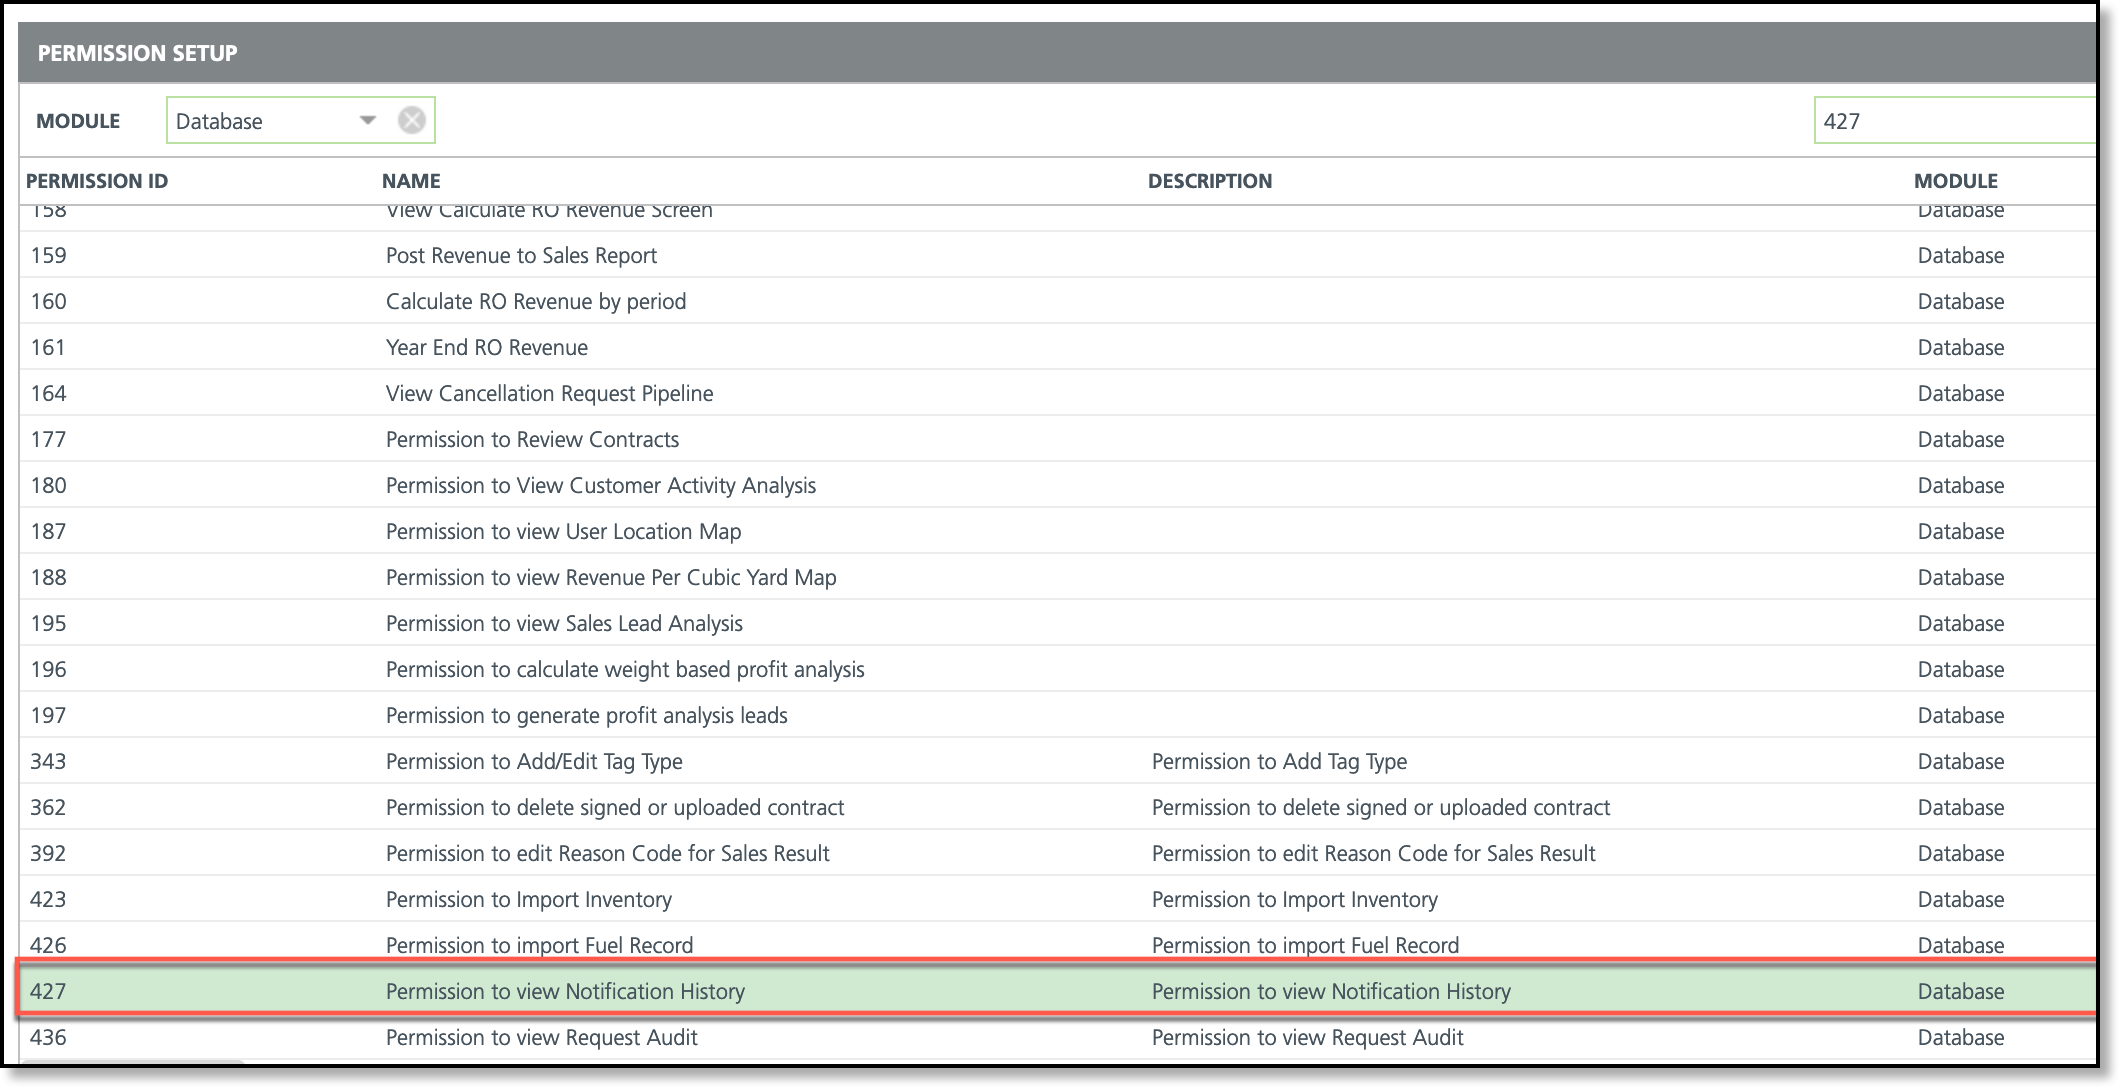
Pathway: Setup > System > Permission
Setup (Bill Group) - Custom Fields Added to Bill Group Setup (14178) [Enhancement]
Two new fields, Custom 1 and Custom 2 have been added to the Add and Edit screens for Bill Groups for use in custom invoice formatting.
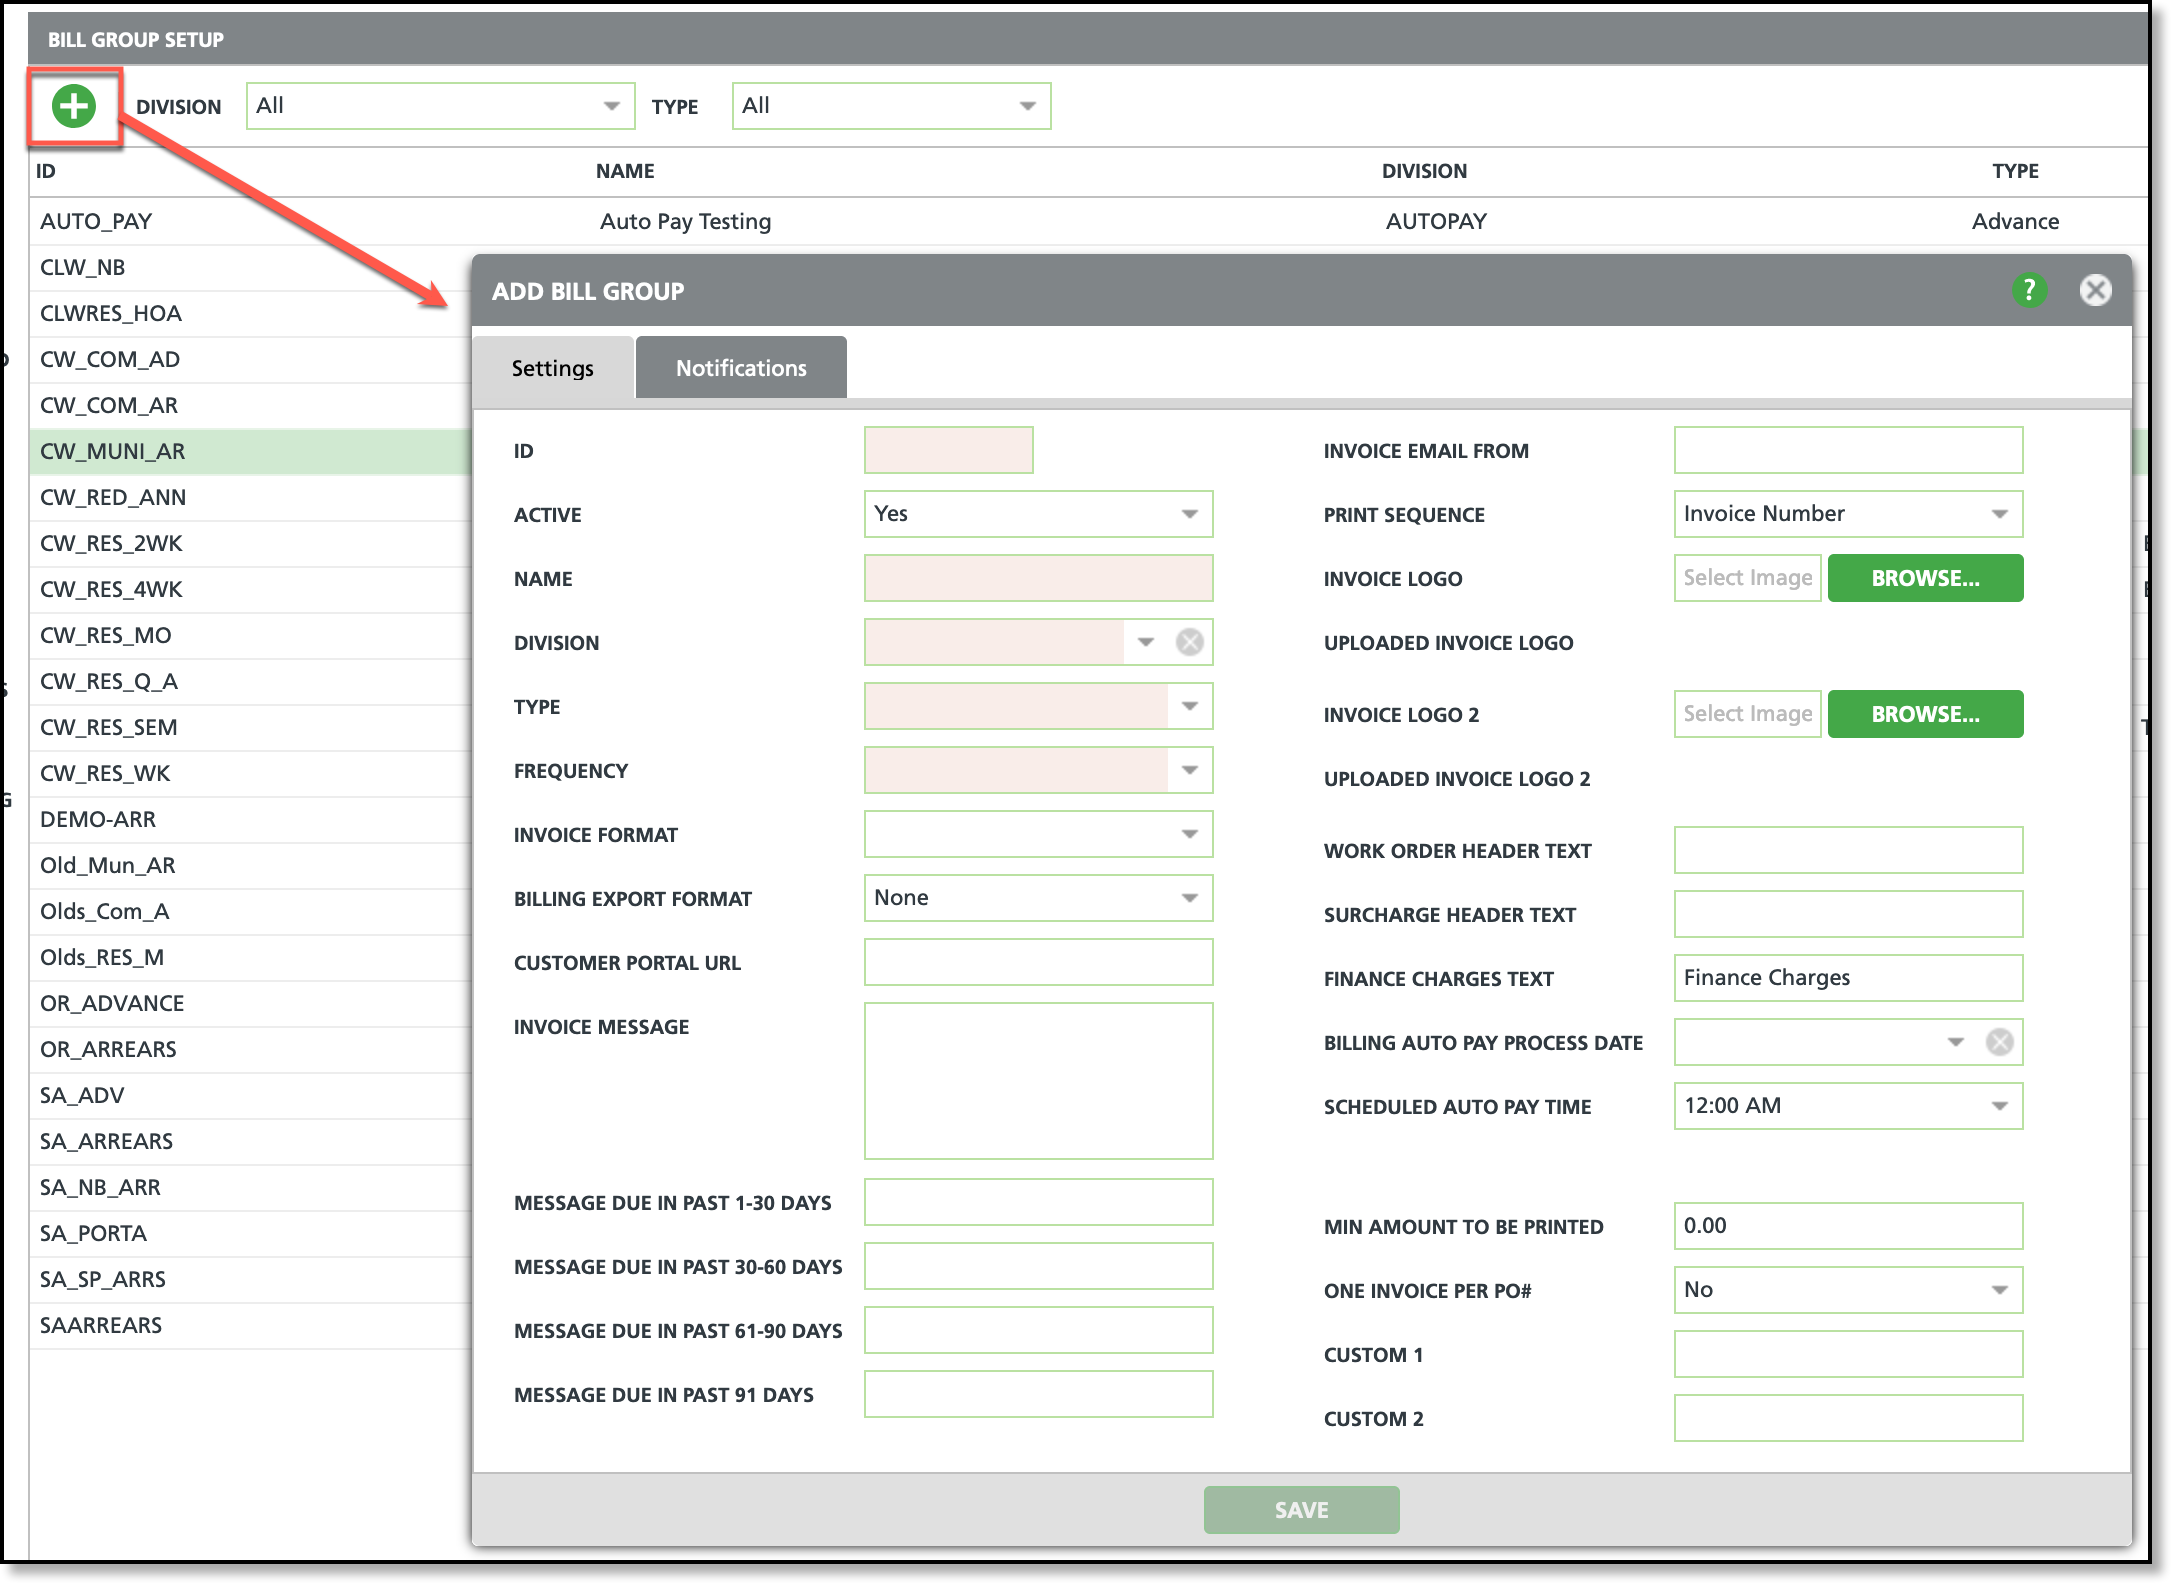
Pathway: Setup > Accounting > Bill Group
Work Type - Logic Updated to Manifest Notification Template in Work Type Setup (14067)
Logic has been updated to the 'Manifest Notification Template' field in Work Type Setup to limit the options to only display Operation Notification template types. Operation Notifications are created in Setup > System > Notification Template. This applies when adding or updating the work types.
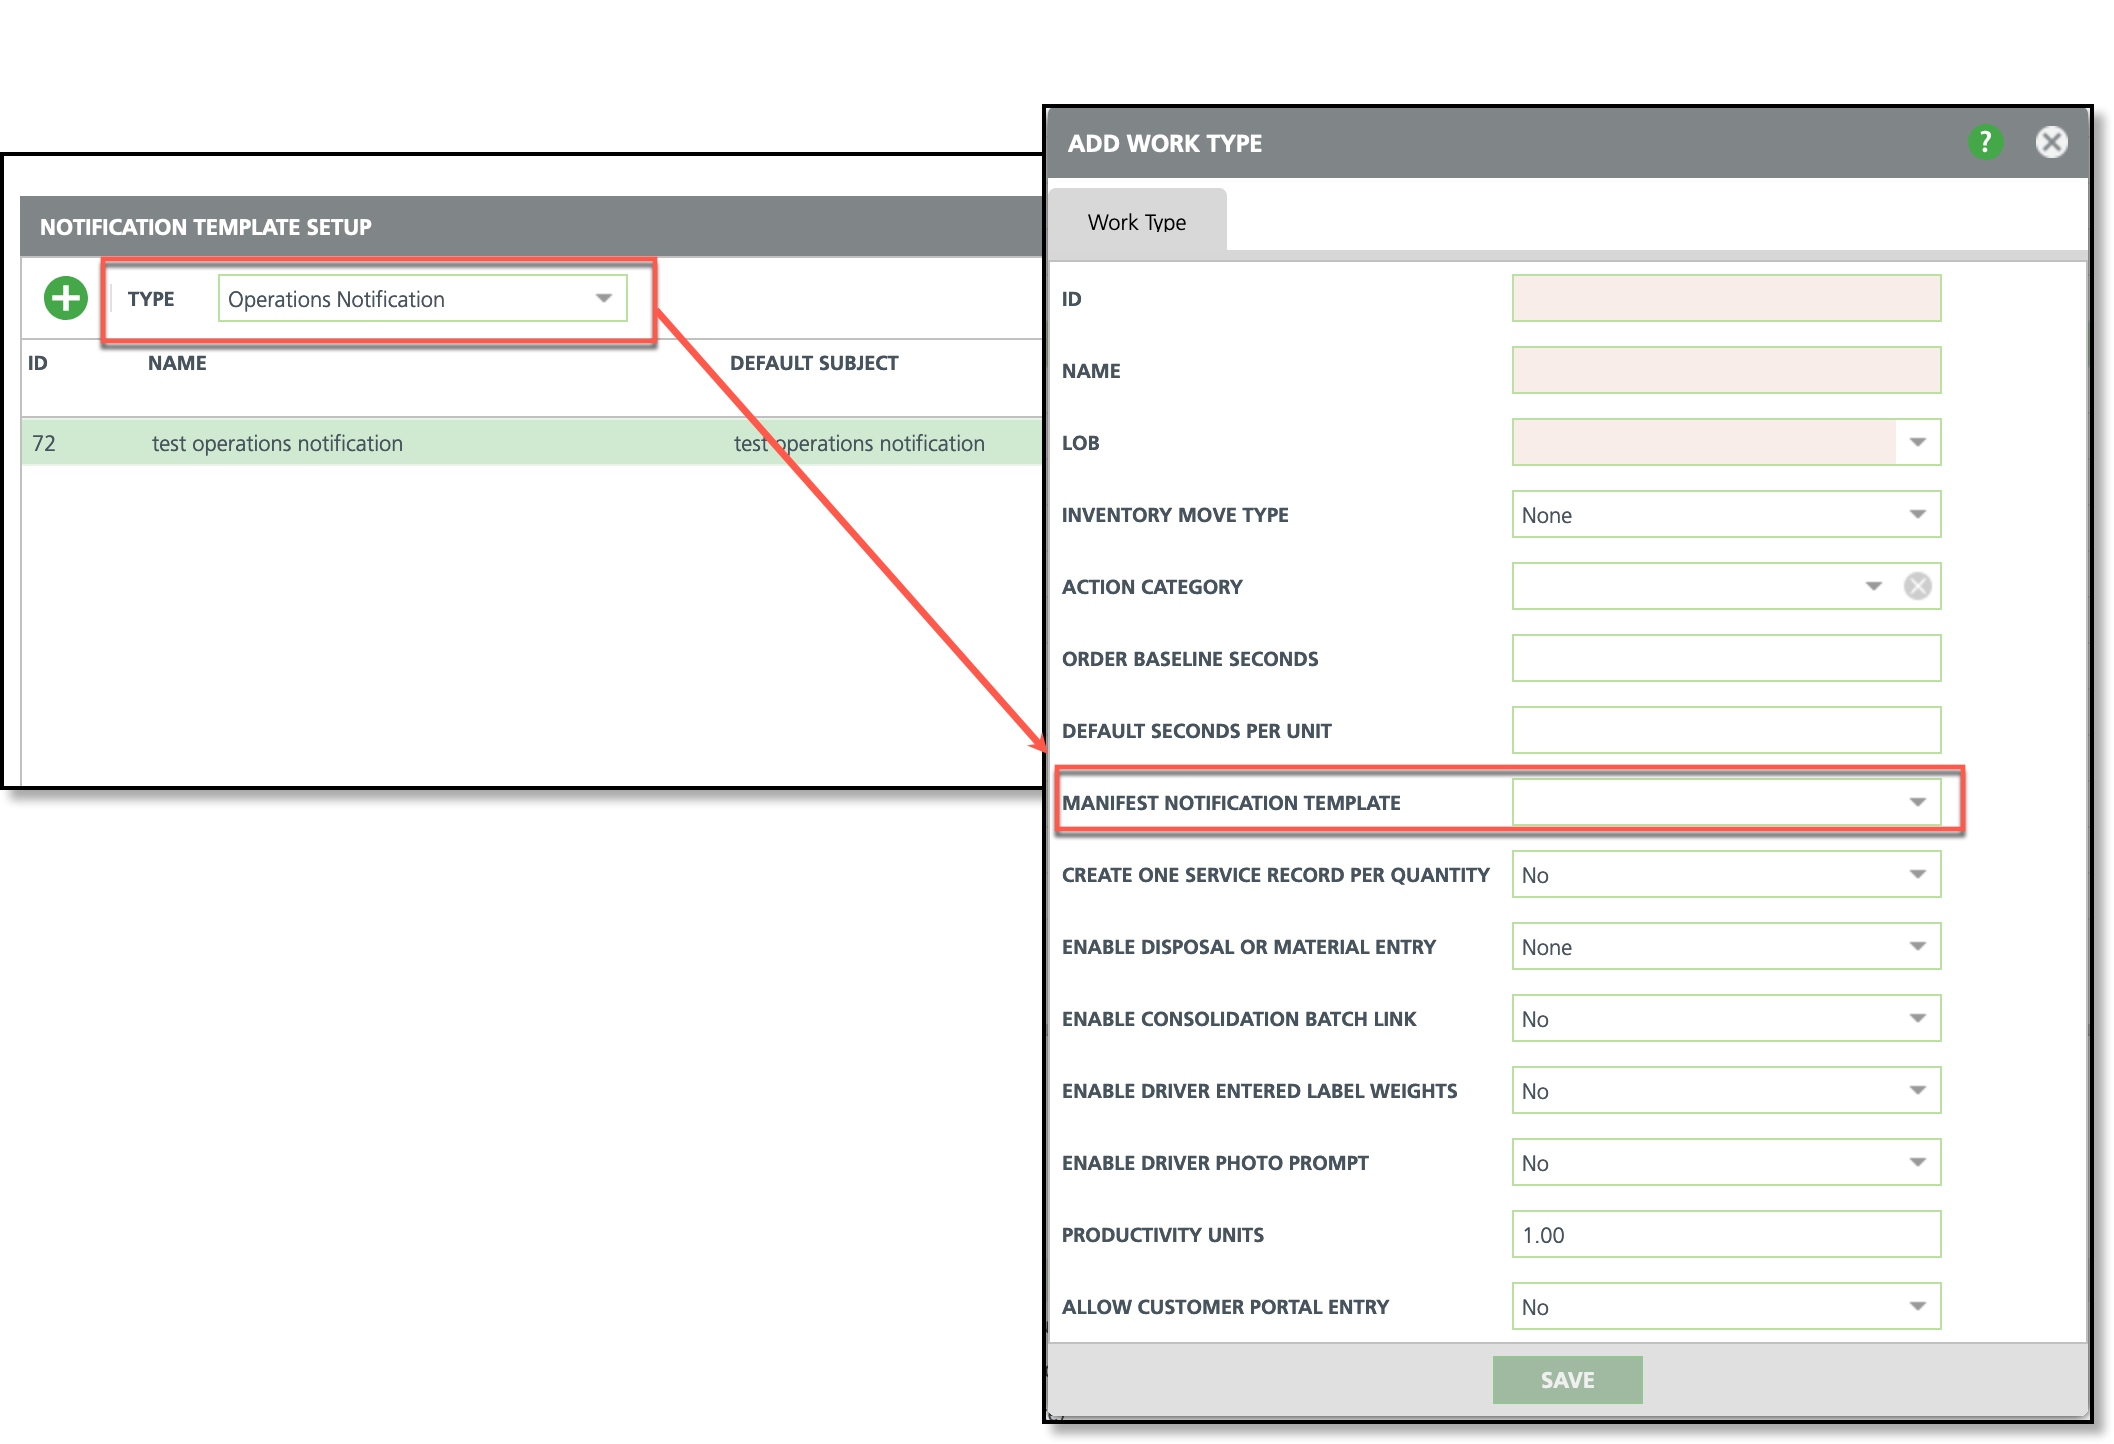
Pathway: Setup > Operations > Work Type
Setup (Account) - Additional Option Added to Finance Charge Type (14155) [Enhancement]
A new option, 'One Time Fee Per Invoice' has been added to the Finance Charge Type selection field in the Add Account Class screen. When 'One Time Fee Per Invoice' is selected, the Annual Rate field below it will display as 'Rate'.
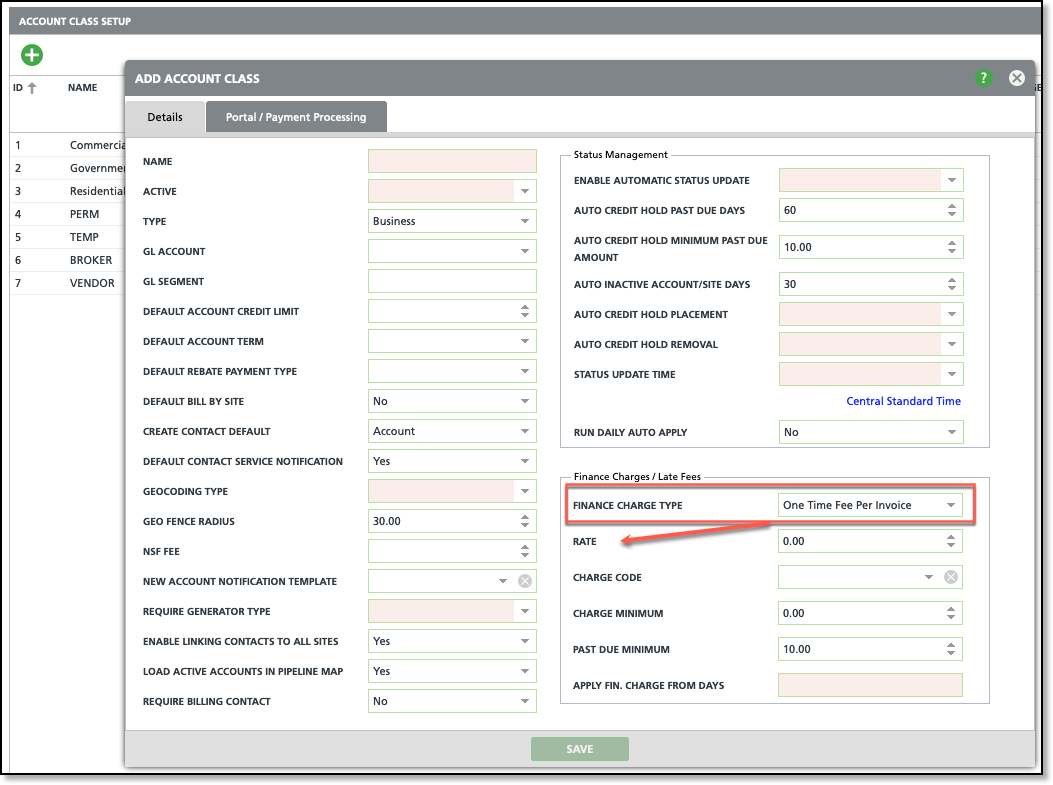
Pathway: Setup > Account > Account Class
Setup (Accounting) - New 'Account Portal URL' Field Added to Bill Group Setup (14153) [Enhancement]
An Account Portal URL field has been added to the Add Bill Group screen to accommodate accounts with multiple portal URLs. When the Account Portal URL field is populated for the Bill Group, it will display on invoices, past due letters and manifests. If the Account Portal URL field is not populated for the Bill Group the system will then look at the Division for the URL and finally the account's setup.
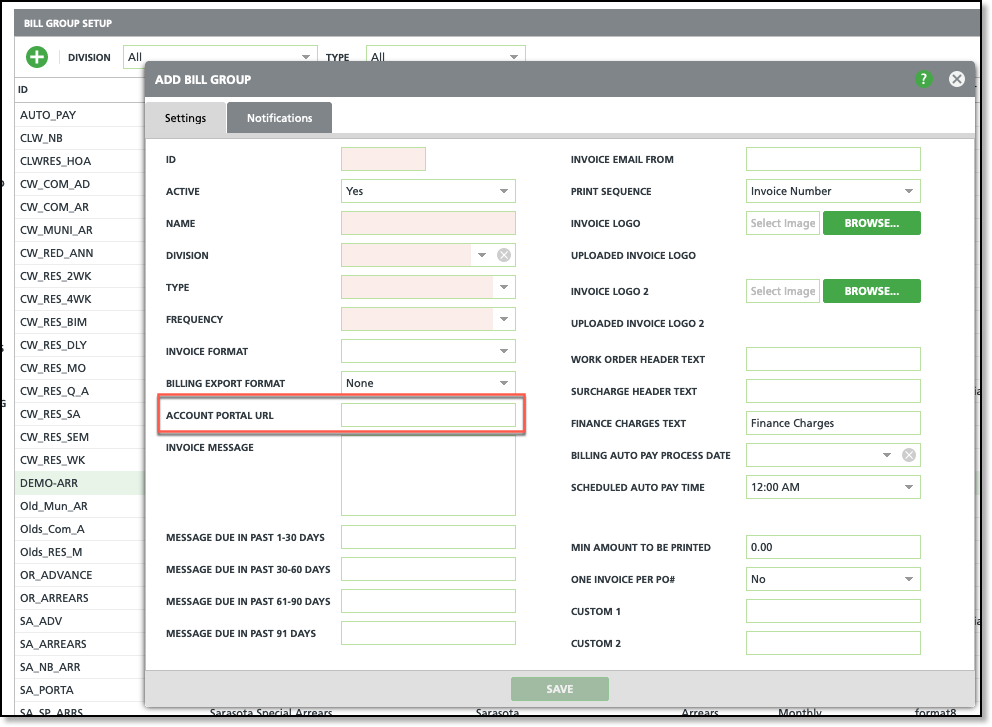
Pathway: Setup > Accounting > Bill Group
Division Setup – Default Logic Updated to 'Credit Card Gateway' and 'RO Disposal REV %' Fields (14113) [Enhancement]
The following default logic has been applied when adding a new division:
RO Disposal Rev % in the Details tab defaults to display '0.00'.
Credit Card Gateway in the Credit Card /ACH Processing tab defaults to display 'None'.

Pathway: Setup > System > Division
Set Up - System Options Currency Field Added (14120)
A Currency field has been added to the Systems tab in the System Options tool. Making a selection here will change how currency is displayed throughout the application for all users.
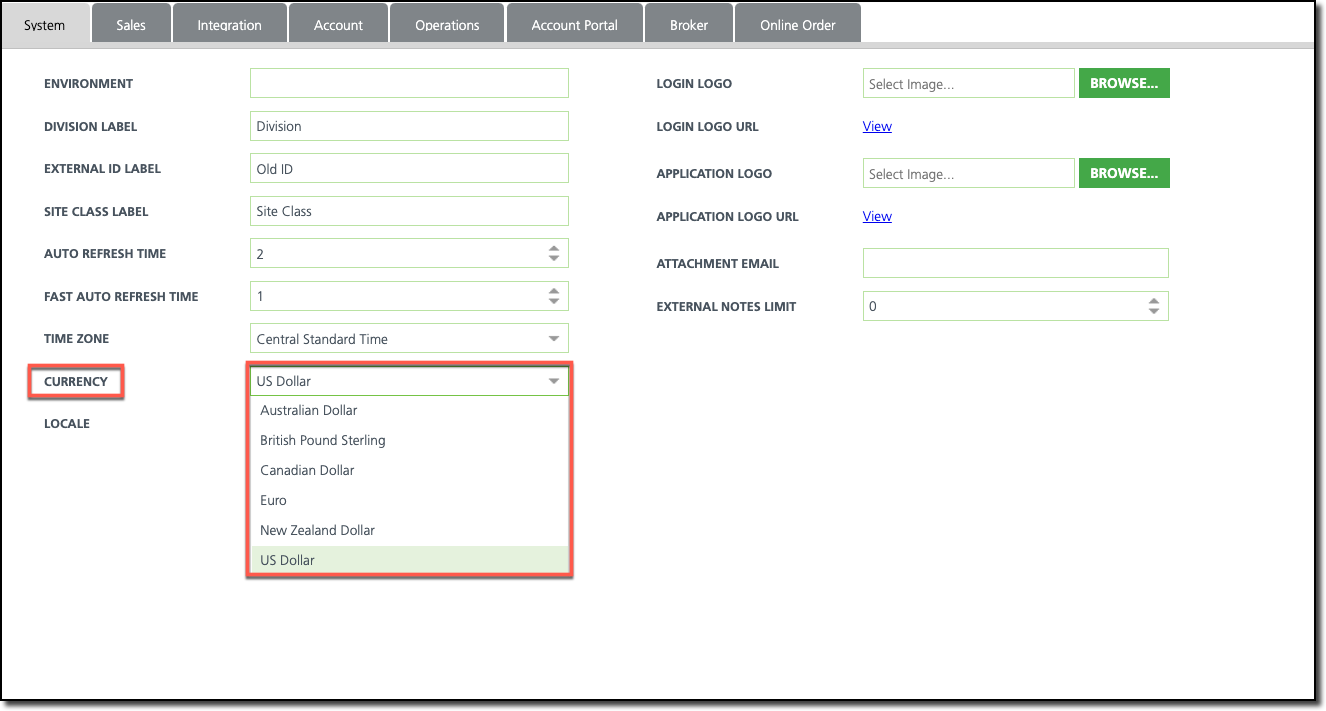
Pathway: Set Up > System > System Options


