Notification Template
Last Modified on 06/26/2026 8:54 am PDT
Pathway: Setup > System > Notification Template
The Notification Template tool is used to create custom email/text notifications for use throughout the Navusoft application. Some templates may require a ticket to be submitted to customer service for additional setup and training.
Permissions
The following permission is required to add and edit notification templates:
| Permission ID |
Permission Name |
| 120 |
Setup \ System and Security |
Fields and Descriptions
| Field |
Description |
| Type |
Categorizes and controls where the notification is available for use.
|
| Name |
The Name of the template.
|
| Active |
Identifies if the template is available for selection and use.
|
| Email Design |
| Default Subject |
Entries made here will display in the subject line of the email. For system-generated emails, the default subject cannot be modified prior to sending. However, in certain areas where users can choose a template, such as the Send Email feature in Customer Details, the subject field can be edited.
|
| Content Type |
Option to compose the message in either text/html or text/plain. For best formatting, text/html should be used.
|
| Default Message |
Text field to compose the body of the email.
|
| Key Paths |
System paths that are used to pull information specific to an account into the message body. When composing a message, double click on the key path to add it in the cursor's location. As the email is sent, the system will look at the key path to pull the customer's information and include it in the message. This allows for users to create one email for generic use across many accounts.
|
| Text Message Design |
| Default Message |
Text field to compose the body of the text.
|
| Est. Character Count |
Calculates the approximate number of characters in the text message.
|
| Key Paths |
System paths that are used to pull information specific to an account into the message body. When composing the message, double click on the key path to add it to the message. When the text is sent, the system will look at the key path to pull the customer's information. This allows for users to create one email for wide use across accounts.
|
Template Types
The following section details each of the template types and where they are used in the application.
Template Type
|
Use Locations in the Application
|
Description |
Proposal
|
- Customer Service Screen (Orders, Quotes and Contracts)
|
Template used to email a proposal. |
Contract
|
- Customer Service Screen (Orders, Quotes and Contracts)
|
Template used to email a contract. |
Order Form
|
- Customer Service Screen (Orders, Quotes and Contracts)
|
Template used to email an Order Form. |
Contact Form
|
|
The template for a welcome email to be sent out for a new contact when added.
|
Other
|
- Customer Customer Service Screen (Menu- Send Email)
|
Option to create a template that can be used in the 'Send Email' feature available in the Customer Service screen.
Sent from: Customer Details screen > Send Email (drop down menu)
|
Invoice
|
|
Template used for sending invoice notices.
Assigned in: Setup > Accounting - Notifications (tab)
|
Customer Portal Invite
|
|
Template used to provide new portal users access to their portal account.
Assigned in: Setup > System > System Options > Customer Portal [tab].
Sent from: Database > Send Bulk Customer Portal Invites
|
Account Statement Email
|
- Bill group (Notifications tab)
|
Message template issued for sending account statements.
Assigned in: Setup > Accounting - Notifications (tab)
|
New On Call Order
|
|
Message template issued for when new on call orders are created.
Assigned in: Setup > Operations > Work Type - Alerts (tab)
|
Service Record Notification
Or Reminder
|
|
Message template issued for service record updates or service reminders.
Assigned in: Setup > Operations > Work Type - Alerts (tab)
|
Online Order
|
|
Notification that is sent to the customer when an on-line order has been received.
Assigned in:Setup > System > System Options - Online Order - Notification Template.
|
Future Services Calendar
|
- Customer Service Screen (Menu- Send Email)
|
The template for upcoming service notifications on the calendar.
Selection option in: Customer Details screen > Send Email (drop down menu)
|
Past Due Notification
|
- Bill Group setting
- AR Aging Management
|
The template for creating a Past Due payment notification for a customer.
Assigned in: Setup > Accounting - Notifications (tab)
Selection option in: AR Aging Management by right-clicking on customer
|
Account Notification
|
- Customer Service Screen
- Send Bulk Email
|
Templates that can be used for account notifications in Send Email (Customer Details) and Send Bulk Email (Database module).
|
Site Notification
|
- Customer Service Screen
- Send Bulk Email
|
Templates that can be used for account notifications in Send Email (Customer Details) and Send Bulk Email (Database module).
|
Operations Notification
|
|
Templates that can be sent from dispatch to alert customers of service changes, updates and etc.
Selection option in:Operations > Dispatch - select a route(s) - select email icon
|
Payment Notification
|
|
Templates that can be used to communicate payment receipts, refunds, and declined payments.
Assigned in:Setup > System - Division - Credit Card /ACH Processing Tab
|
Work Order Prepayment
|
- Customer Service Screen - Create On-Call Order
|
Template used for prepayments when an on-call work order is created.
Selection option in: Customer Details > Create On Call Order > Prepayment link (displayed under Reason Code field)
|
Online Survey
|
|
|
Vendor Service Change Notification
|
|
Notification template that is used to send a vendor notice of service changes processed in Accounts > Order Processing.
Requirements:
- Vendor must be assigned to a service.
- Vendor must exist as an account/site
Selection option in: Accounts > Order Processing > Service Changes tab > right click an account record > select Notify Vendor
|
Vendor Work Order Notification
|
|
Notification template that is used to send a notice to the vendor when a work order is created.
Requirements:
- Site must have service linked to a vendor
- Vendor must exist as an account/site where Account Class Type = Vendor
- Vendor must have contact setup to receive service notifications
Assigned in:Setup > System Options > Broker (tab)
|
Automatic Payment Change
|
- Customer Service Screen (AR History)
- Customer Portal
|
Notification template that is sent when a change has been made to automatic payments.
|
Credit Card Expiration
|
- Customer Service Screen (AR History)
- Billing
|
Template notification that is used to alert customers their credit card is/has expired.
Assigned in:
Selection option in: |
Credit Memo
|
- Customer Service Screen (AR History)
|
Templates that can be used for emailing credit memos.
Selection option in: AR History when emailing a credit memo.
|
Understanding Keypaths
Keypaths are data points that the system uses to extract account- or site-specific information and insert it into notification emails and texts, allowing notifications to be universally used across all accounts. In the example below, a Welcome notification is created for new accounts. When the email is sent, the system user sees the keypaths, but the customer only sees the specific information the keypaths extract from the data table.
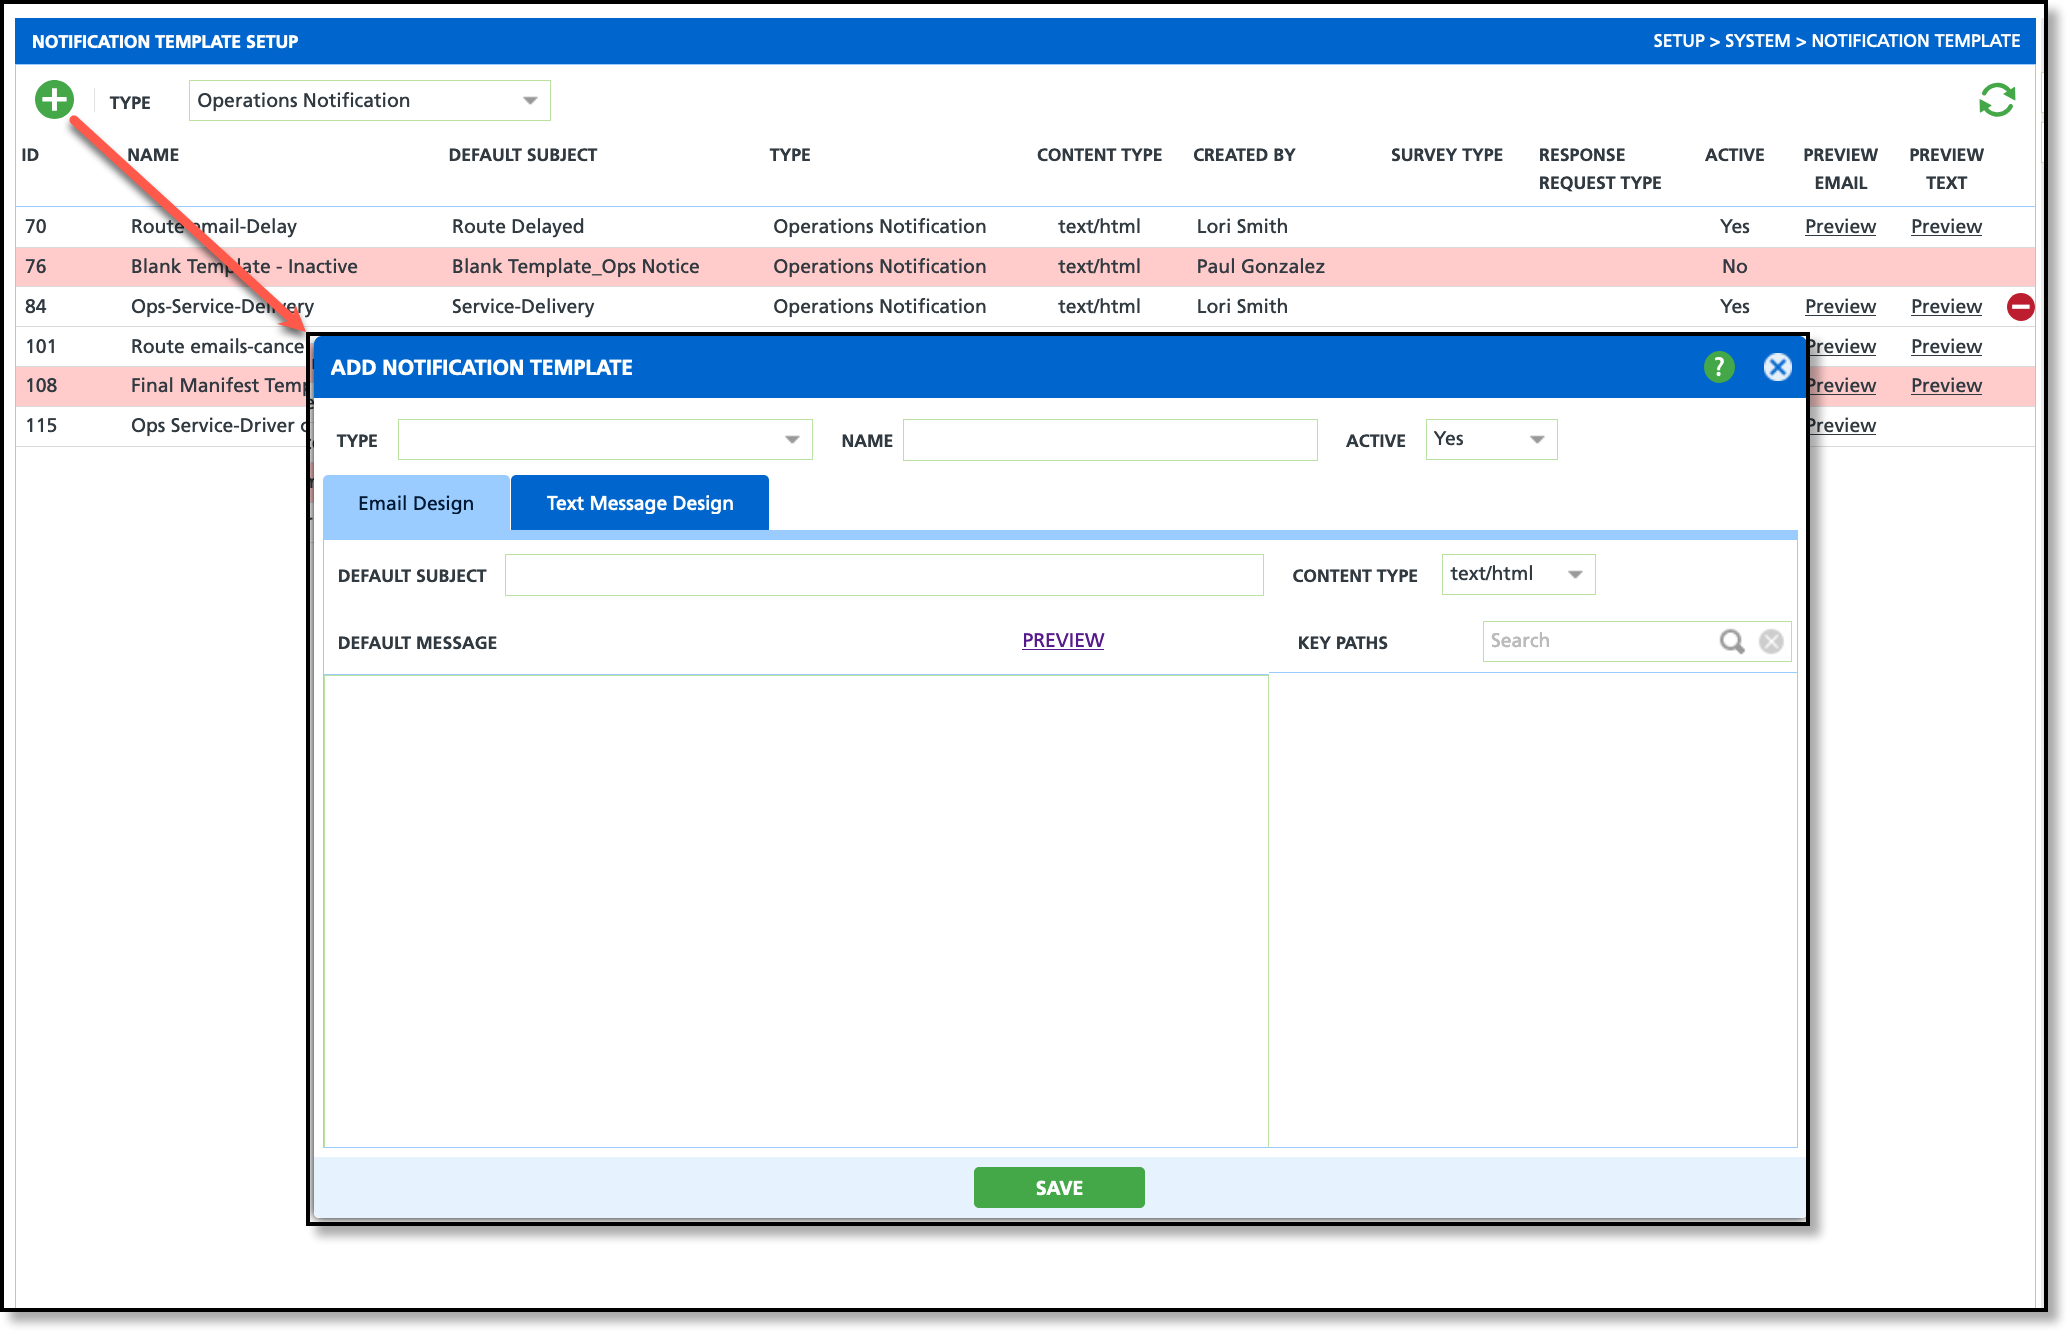
Add Notification Template: Email Design
- Click the green + to open the Add Notification Template tool.
- Select a Type from the drop down to create the template in. This controls the availability of the template in other areas.
- Enter a Name for the notification template.
- Set the Active status for the template to 'Yes'. Otherwise, if set to 'No', the template will not be available for use.
- Select the Response Request Type to identify how a response from a notification is categorized in Account Request Management.
- Select the Email Design tab.
- Create a Default Subject for the email. This will display in the Subject box of the email.
- Select the Context Type. Text/HTML is recommended for best formatting.
- Compose the body of the email in the Default Message field. Double click on a Key Path to insert customer specific information into the message. Customer information only displays for the recipient of the email.
- Click Save when finished.
Add Notification Template: Text Message Design
Consider reducing the size and complexity of a message that will be sent as a text. An estimated character count displays on the screen to help track and manage the size of the text.
- Click the green + to open the Add Notification Template tool.
- Select a Type from the drop down to create the template in. This controls the availability of the template in other areas.
- Enter a Name for the notification template.
- Set the Active status for the template to 'Yes'. Otherwise, if set to 'No', the template will not be available for use.
- Select the Response Request Type to identify how a response from a notification is categorized in Account Request Management.
- Select the Text Message Design tab.
- Compose the body of the text in the Default Message field. Double click on a Key Path to insert customer specific information into the message. Customer information only displays for the text recipient.
- Click Save when finished.

