Add a New Account (Active)
Last Modified on 02/26/2025 12:02 pm PST
Pathway: Customer > Add Account
In the Add Account editor, accounts can be added either as an Active account or a Prospect account. This illustrates the process of creating an Active account for new customers. Review each section and minimally complete all required fields highlighted in red. Field descriptions that include logic and setup can be viewed here: Create Account: Screen Field Descriptions.
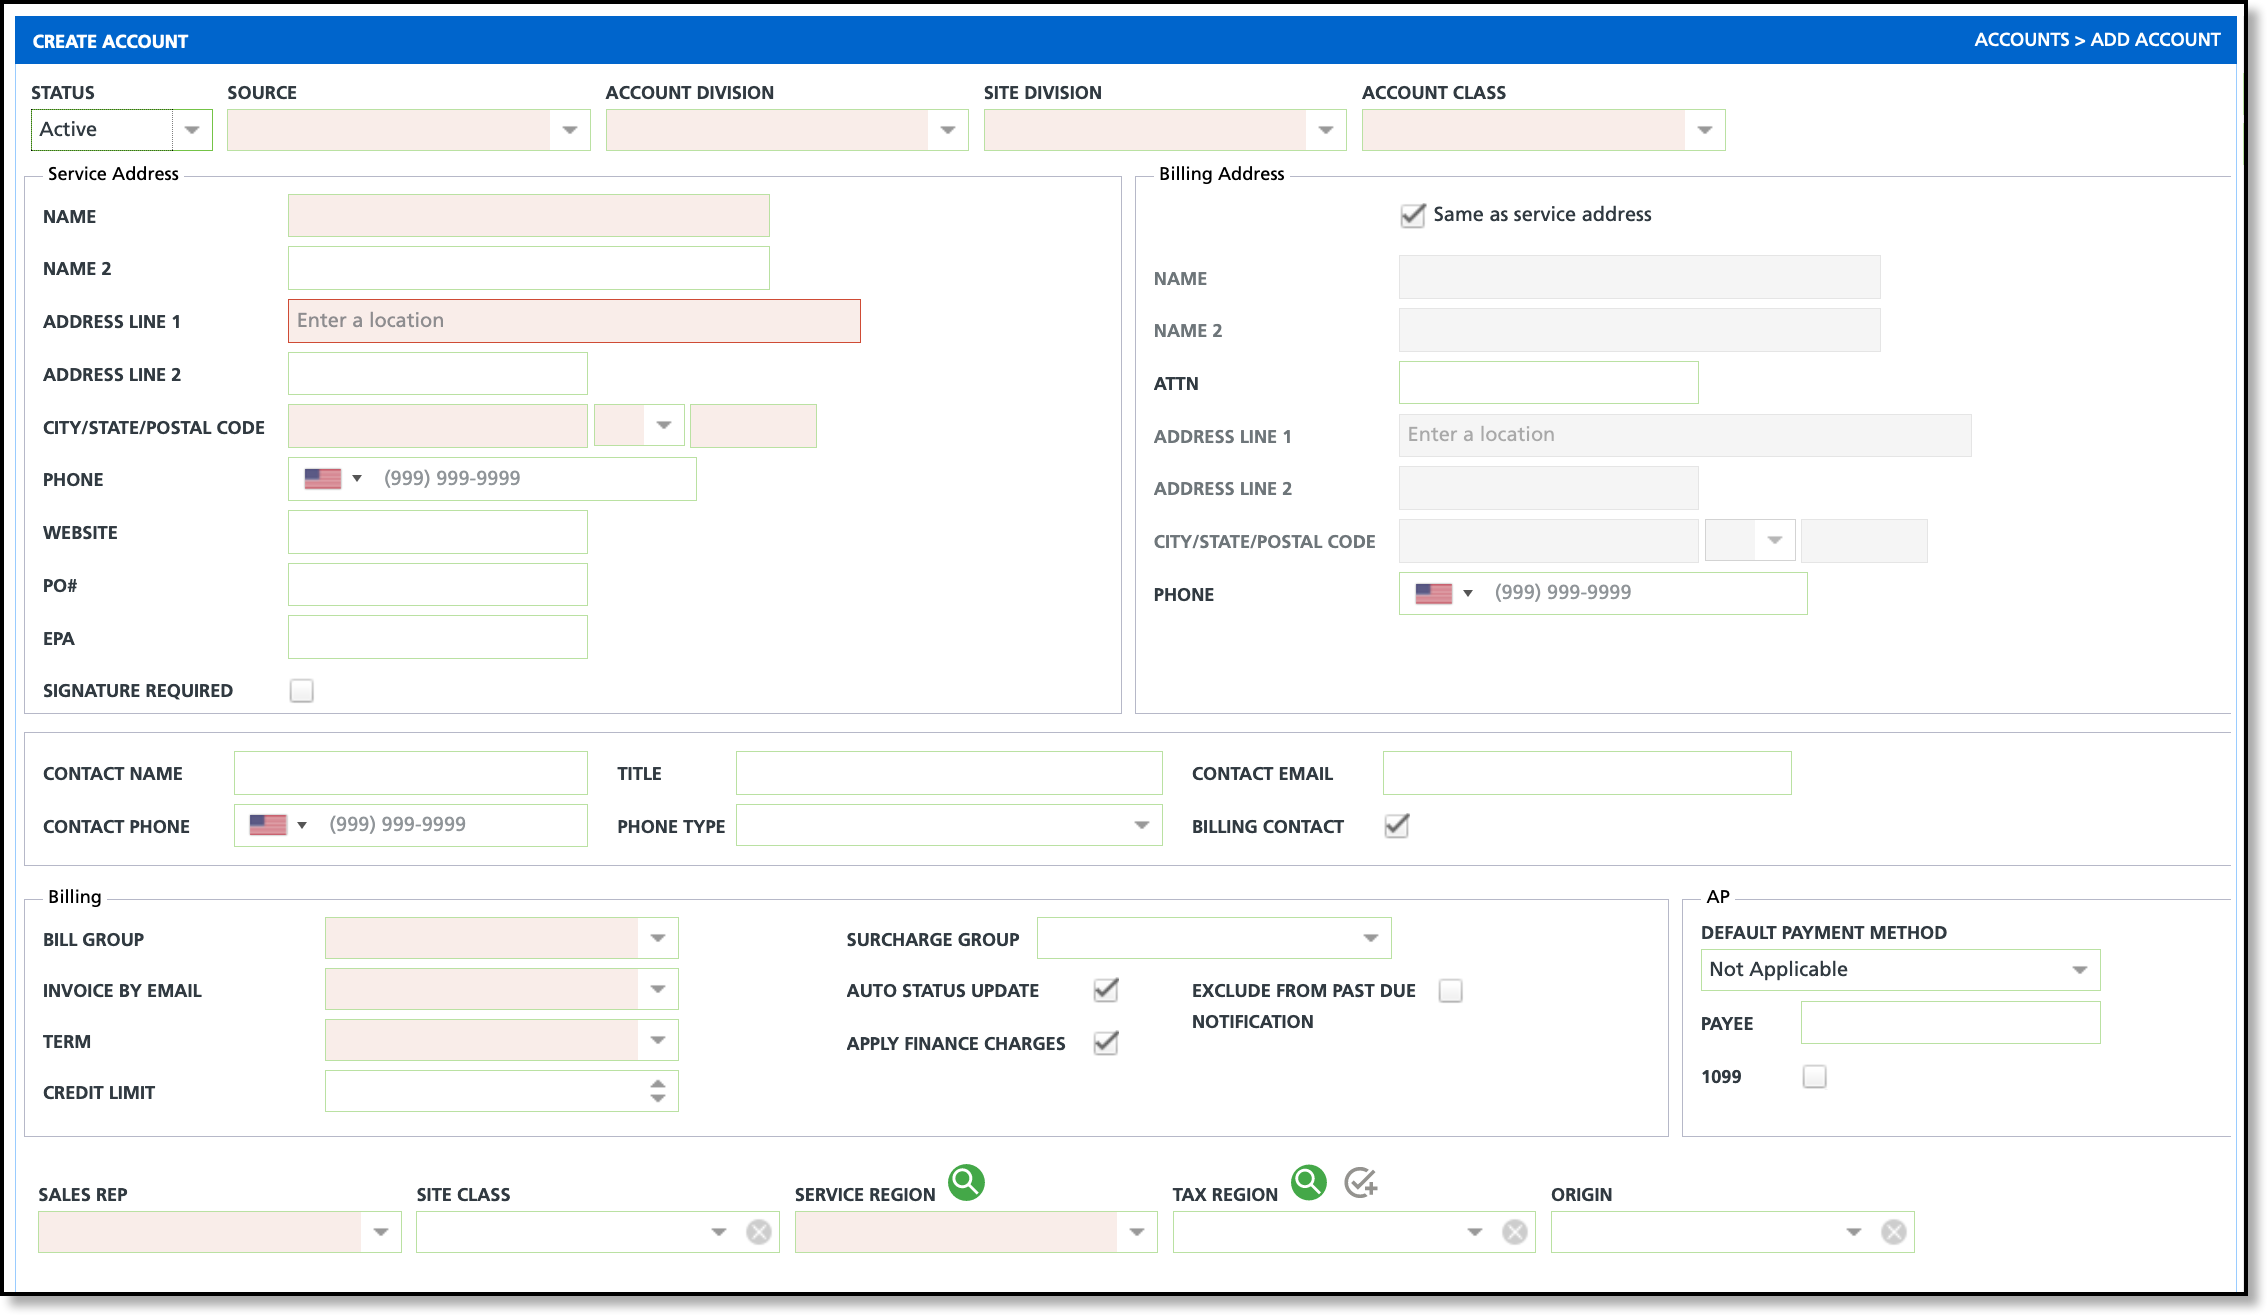
Permissions:
The following permissions are required to create and edit accounts and sites.
| Permission ID | Permission Name | Description |
| 60 | Add Account | Displays the 'Add Account' option in the Accounts module. |
| 66 | Add Active Account | Displays the 'Active' as a status option. Forces creation of prospect account in scenarios where users should not be creating active accounts. Example: Limit your sales reps' access so they can only create prospect accounts. |
Create Account
Account Identification
The following section applies to the drop down fields located at the very top of the Create Account screen.
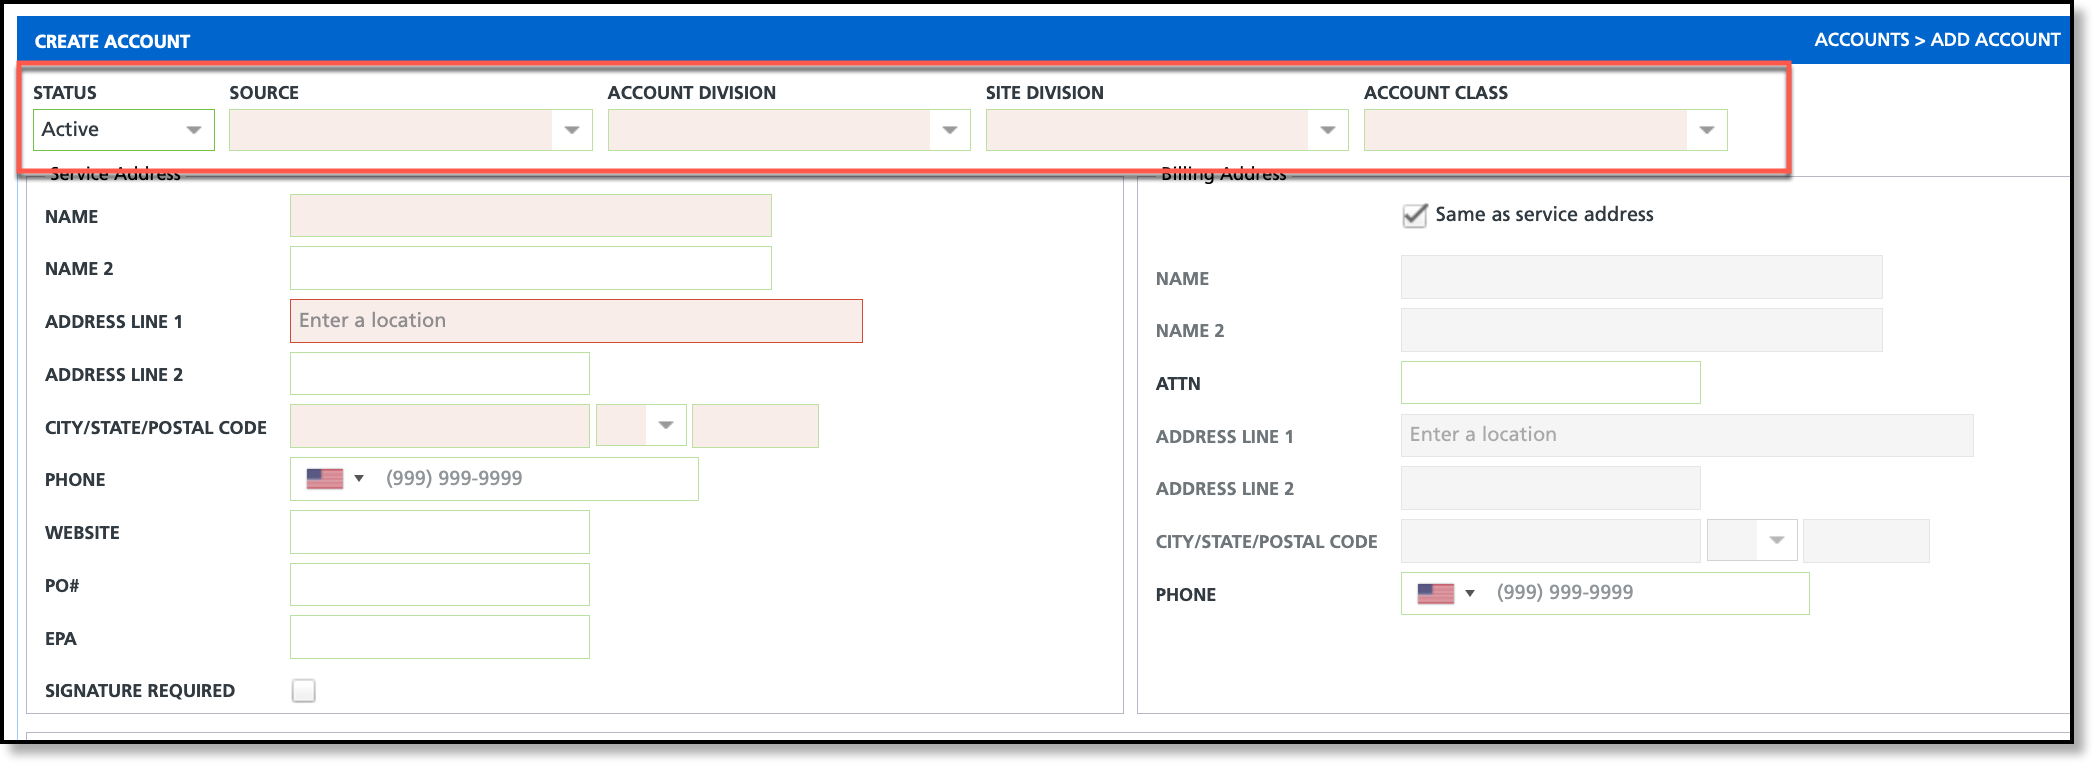
- Select Active from the Status drop down.
- Select the Source of how the account was acquired.
- Select the Account Division.
- Select the Site Division.
- Select the Account Class.
Service and Billing Addresses
The following section details what fields must be completed in the Service Address and Billing Address sections.
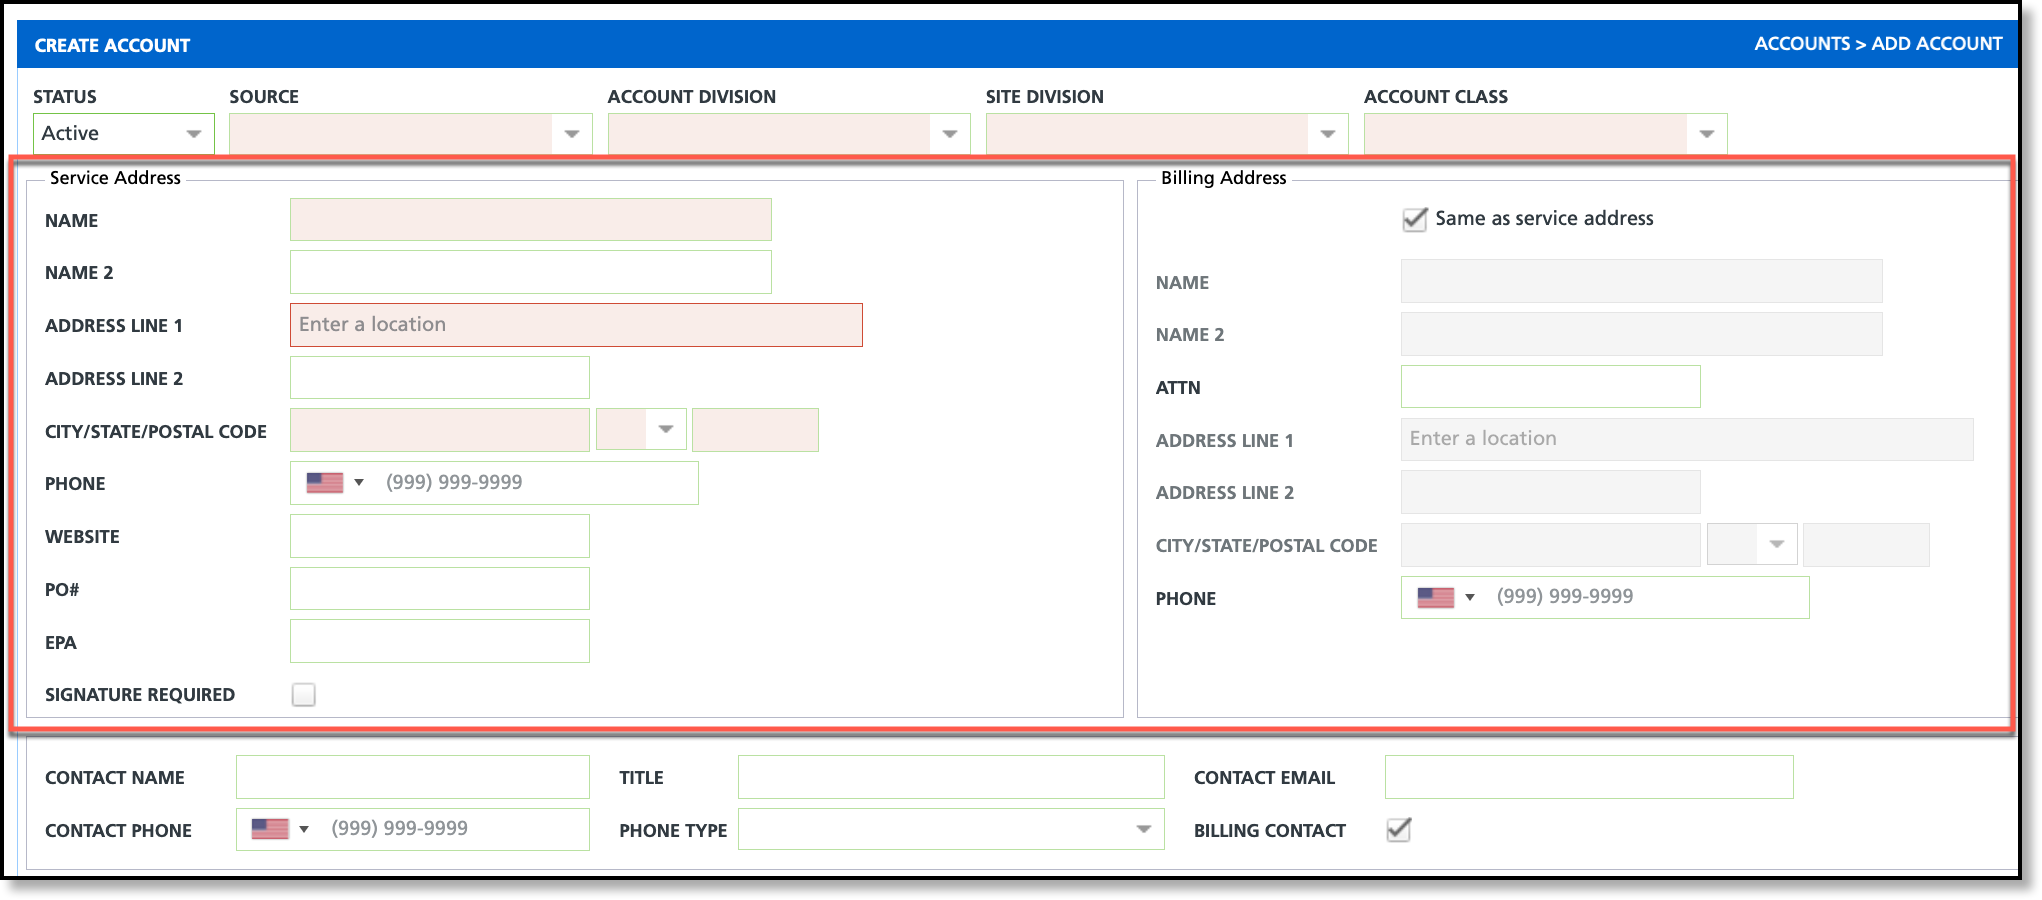
Service Address:
- Enter a Name for the account.
- Enter the address for the service location in Address Line 1. As you enter the address, the system will auto-suggest addresses based on what has been entered. Selecting from what is suggested will auto-fill additional address fields. If this is a business, entering the name of the business here will also initiate an address search.
- Enter the City/State/Postal Code.
- Enter a phone number for the location.
- If a website is provided you may enter that in the Website field.
- Select Signature Required if the driver must always get a signature.
Billing Address:
- If the billing address is the same as the service address, leave the Same as Service Address box checked. Otherwise, uncheck and continue to step 2.
- Enter the Name the billing should be addressed to. As you enter the name or address, the system will auto-suggest addresses based on what has been entered. Selecting from what is suggested will auto-fill additional address fields.
- Enter who the mailing should be ATTN to.
- Enter the mailing address in Address Line 1.
- Enter a phone number if different than the phone number for the service location.
Contact Information
The Contact section identifies the account contact and allows the user to also designate them as a billing contact. Additional contacts can be added to the account once the account has been created.
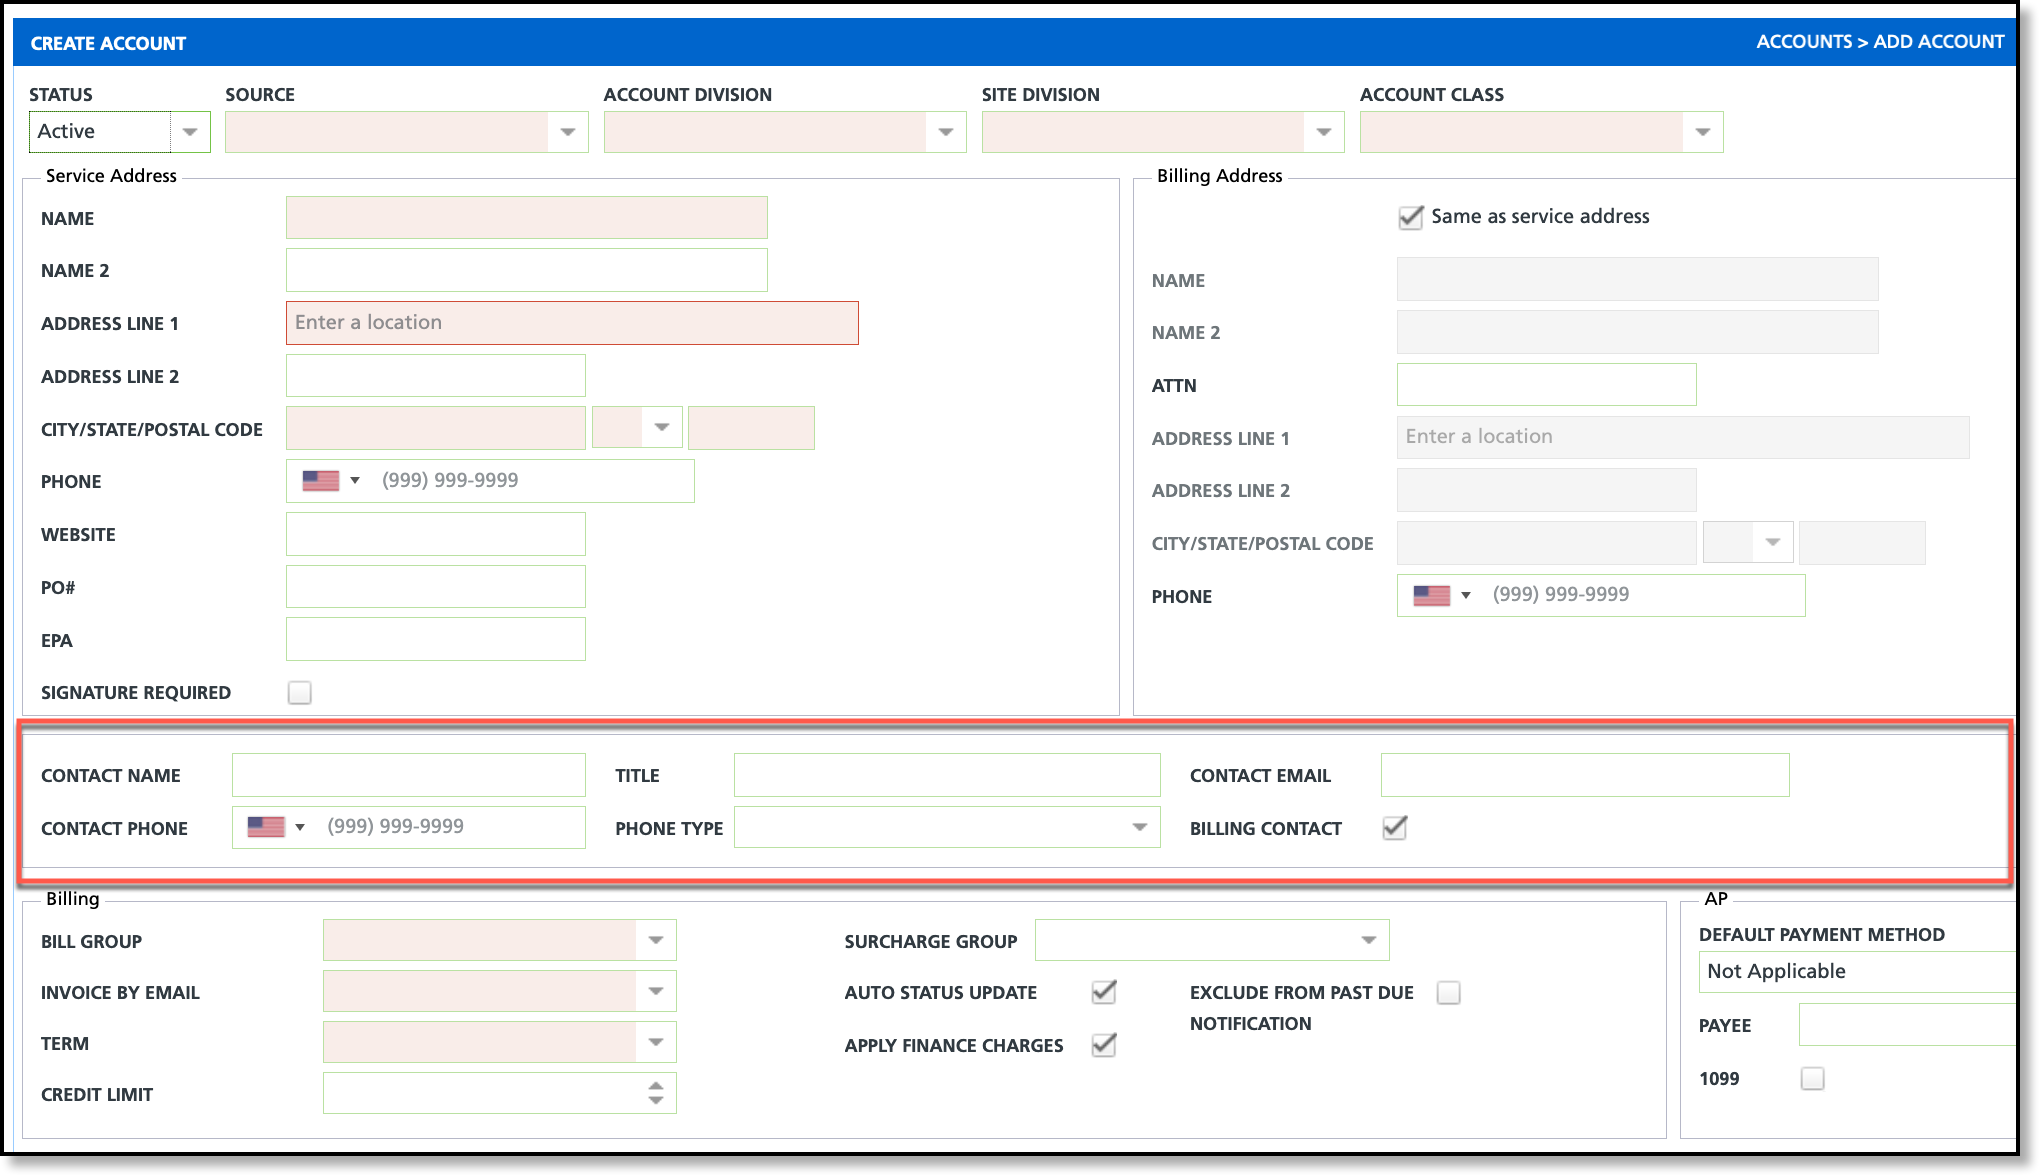
- Enter Name of the account contact.
- Enter the Title or role of the contact (optional).
- Enter the Contact Email. This is required if invoices are emailed to the contact.
- Enter the Contact Phone number and Phone Type.
- Remove the selection from Billing Contact only if this person IS NOT a billing contact.
Billing Information
The Billing section is responsible for configuring the account's billing settings and specifying preferences for invoice notifications. After an account is created, billing information can be updated on the customer service screen by right-clicking within the account details section and selecting "Edit." This section does not display for prospect accounts. Further information about this section can be found in the Billing section of the Create Account: Screen Field Descriptions article.

- Select a Bill Group from the drop down list. Options populate based on the selected Account Division.
- Select from the Invoice By Email options. If 'NO' is selected all invoices will be mailed.
- Select a Term for when payments are due upon receipt of the invoice.
- Select a Surcharge Group if one applies.
- Select Auto Status Update if the account's status should automatically update to inactive due to credit holds or inactivity of services.
- Select Apply Finance Charge if the account should be subject to late fees.
- Select Exclude From Past Due Notifications if you do not want to send a past due notification to this account/customer.
Sales/Regional Information
The sales and regional information section identifies the account's sales representative and gathers geographic region details for tax calculations and applicable surcharges.

- Select the Sales Rep who is assigned to the account for future handlings.
- Select the Site Class if one applies.
- Select the Service Region.
- Select the Tax Region. If no region is selected the customer is considered tax exempt.
Create Account & Check For Duplicates
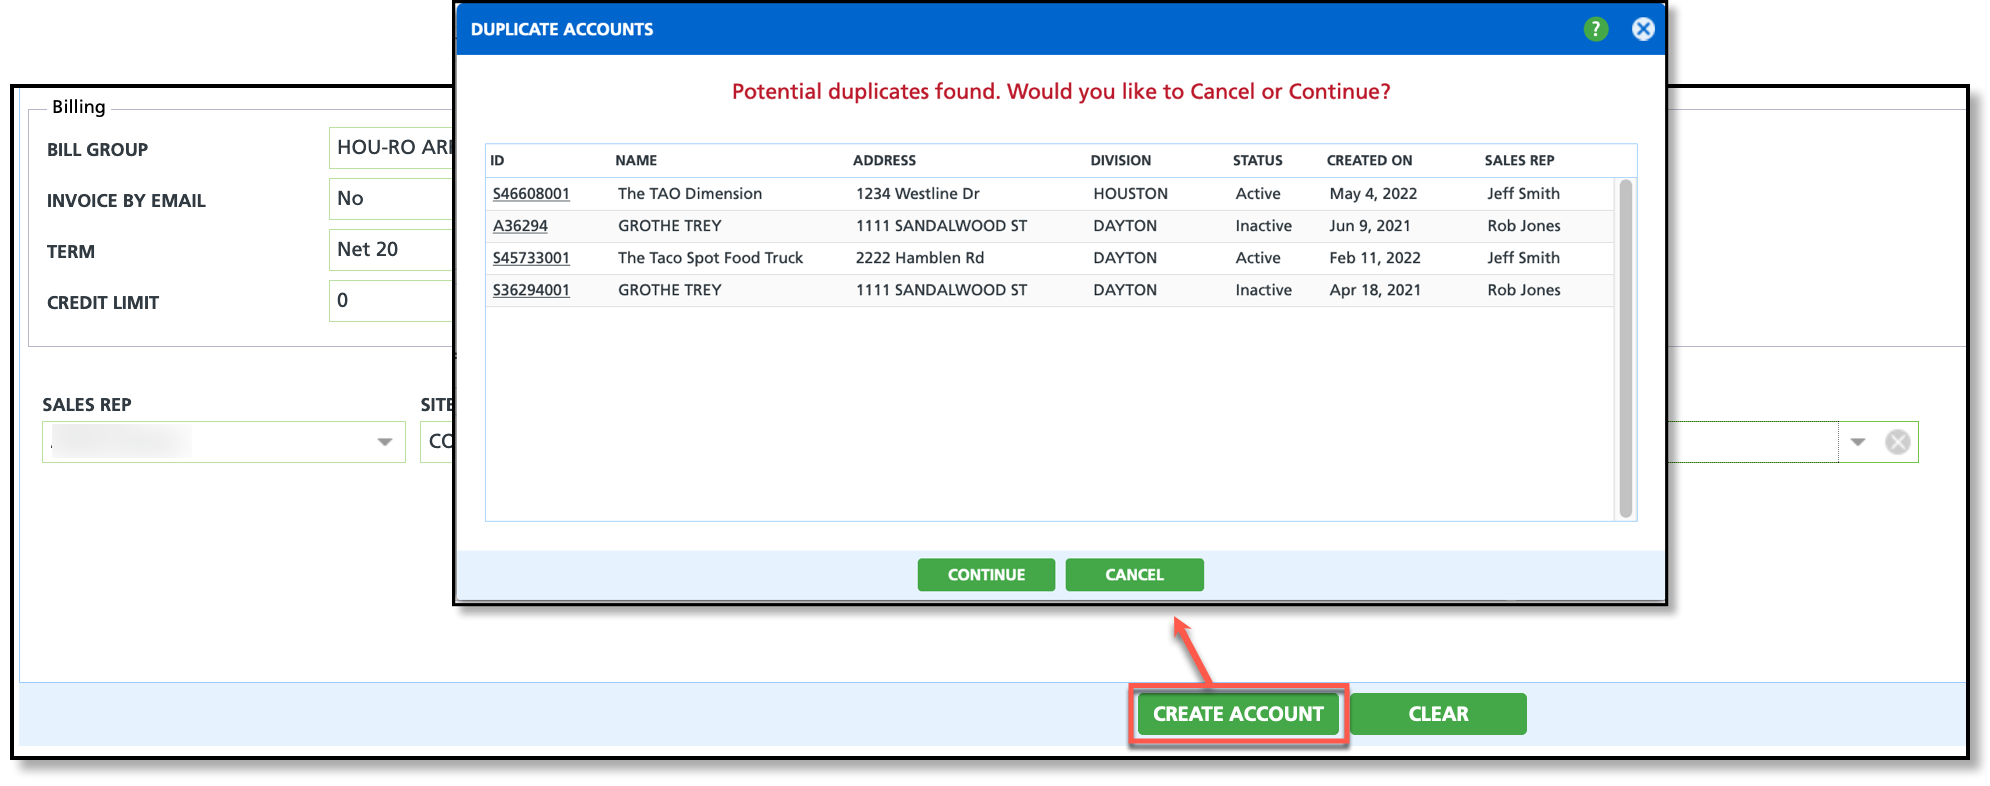
Upon selecting Create Account, the system will check for any duplicates. Review the list of returned results to verify a duplicate does not exist before proceeding any further.
- Duplicate Found: If you identify a duplicate upon reviewing the results, choose the duplicate from the list, and you will be directed to the customer service screen of the selected account. This step ensures that a new account is not created.
- No Duplicate: If upon reviewing the results a duplicate is not found, select the "Continue" button and the account will be created.
Review Additional Setup
After an account has been created, additional setup may be required. Review the Edit Account and Edit Site screens to add any additional information. Fields in here are found by double-clicking within Account Details and Site Details sections.

Edit Account
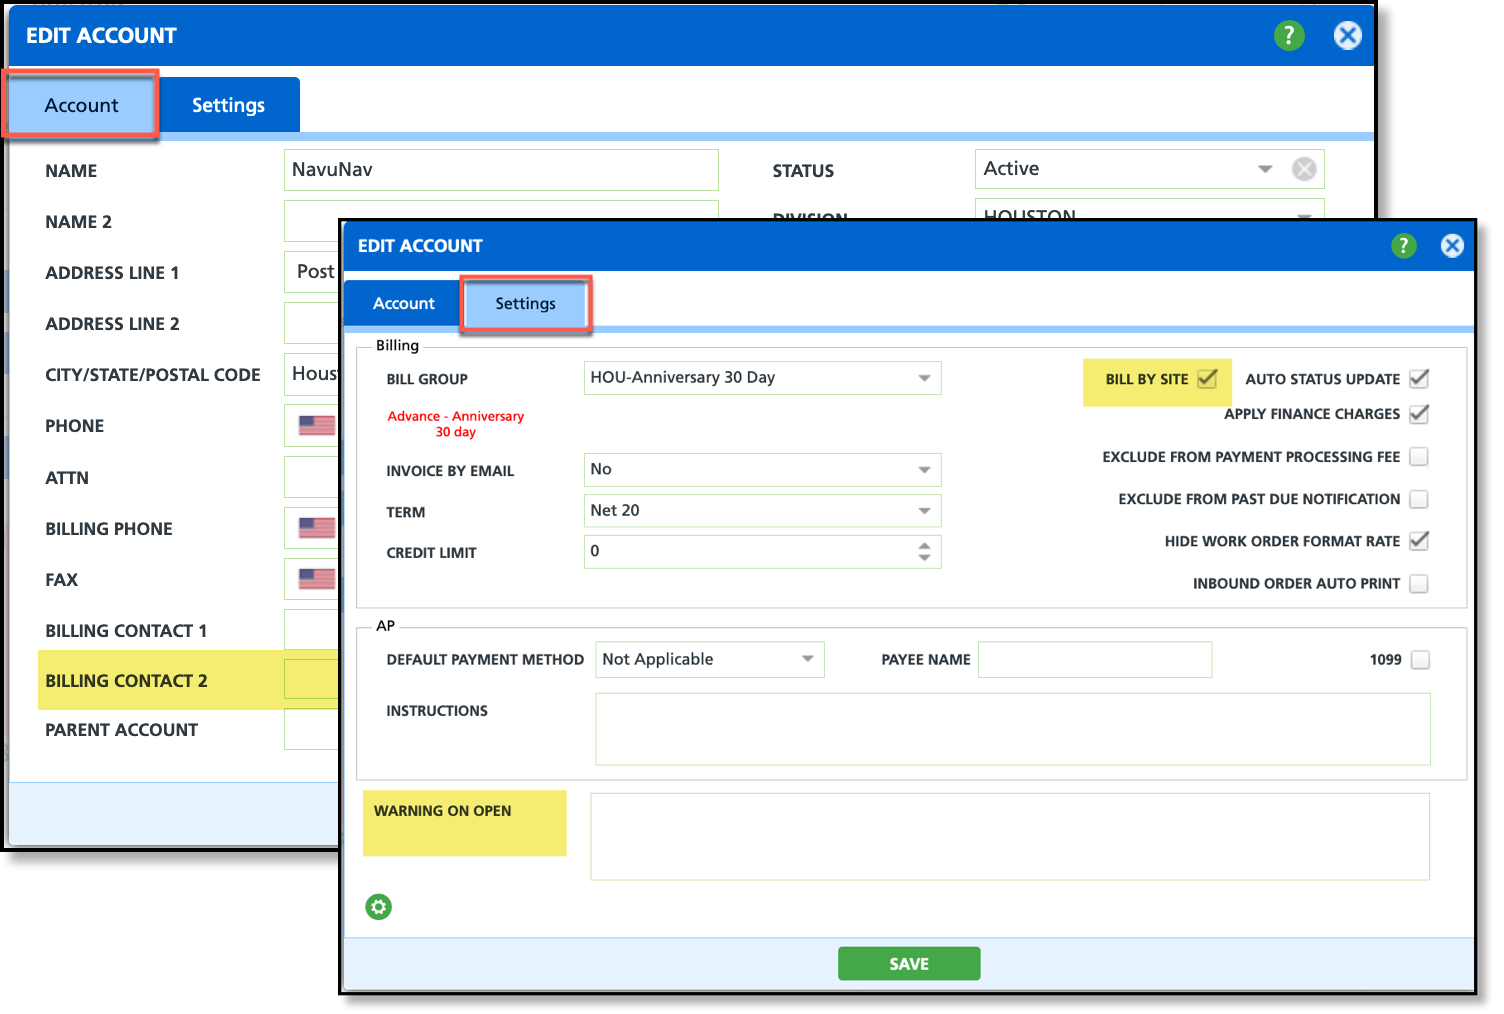
Access Edit Account by double-clicking within the left side of Account Details.
Account Tab
- Billing Contact 2- If there is a need to designate a secondary billing contact, it can be chosen here. Names of contacts only display in the drop down if they have been previously added to the account. That process can be reviewed here: Add Contact.
Settings Tab
- Bill By Site: Considering checking this if multiple sites exist for an account to send one invoice per site.
- Warning On Open: If a popup warning/message should display upon opening the account, enter that here. This will display for any user who views the account.
Edit Site
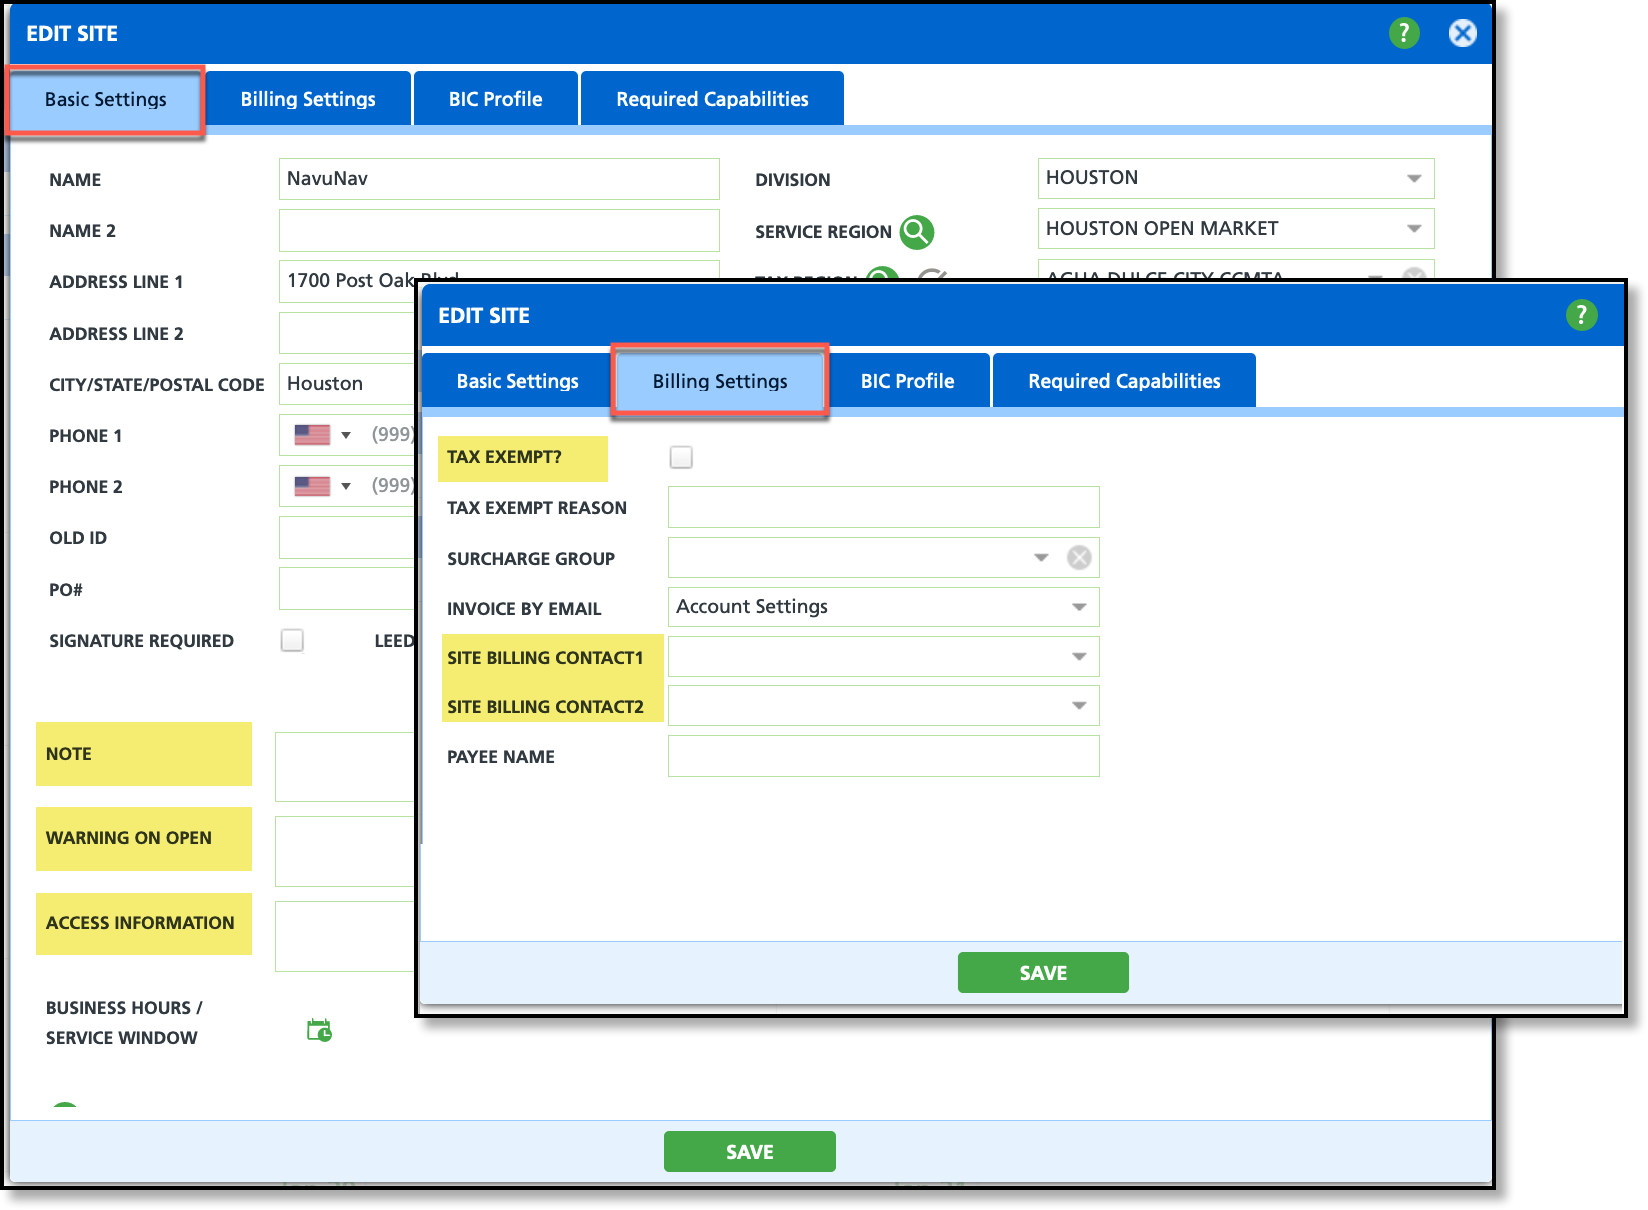
Access Edit Site by double-clicking within the Site Details section of the screen.
Basic Settings
- Note: Option to add any internal notes regarding the site. Notes added here are not visible to drivers or customers.
- Warning On Open: Option to add a warning note users will see when opening the site.
- Access Information: Enter a note for the driver to see when servicing the site.
Billing Settings
- Tax Exempt: Select the check box if the site is tax exempt and no tax region was selected when the site was added.
- Site Billing Contact (1 and 2): Identify up to two billing contacts for the site if the contact is different than the account contact. Contacts are only assigned here, not created. To create a contact, review: Add Contact.
Related Articles:
Create Account: Screen Field Descriptions
Add and Edit Contacts
Add Active Service
Add Account Template


